It's the month of LOVE so of course I'm thinking Valentines Day Projects. This one I am calling Crayon Applique! For real! I love doing seasonal projects and I attended a mini workshop at my Elmira Needle Sisters Group last week and one of our members demo'd how to use crayons on fabric. I had done this years ago as a demo and it was a pleasant reminder of a very nice technique, so I thought I would share it with my followers.
1) The first thing you do is find a black line image you like, colouring books an the internet are great resources for this. Raid your grandchildren's colouring books ha, ha (I'm sure they would be happy to share). Or buy one of those new therapeutic adult colouring books.
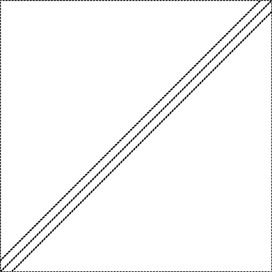
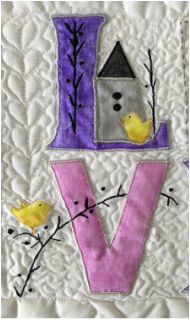
My image is below: 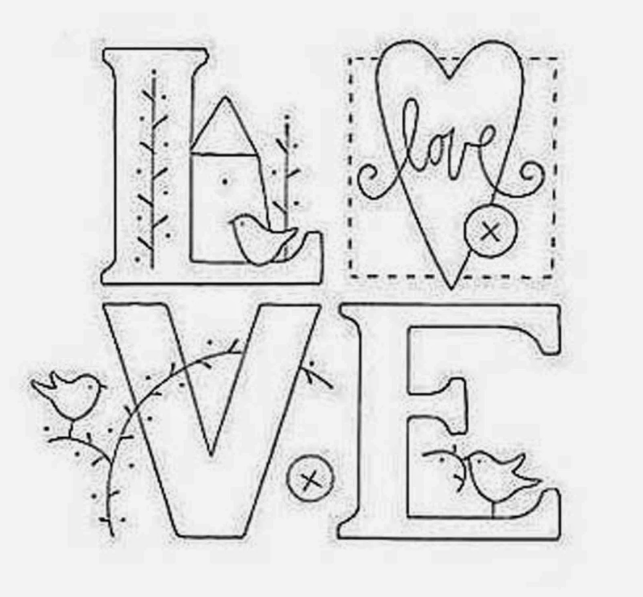
Feel free to share!
2) IronFreezer paper wax side down on the wrong side of the fabric as it helps to keep your fabric firm as you colour.
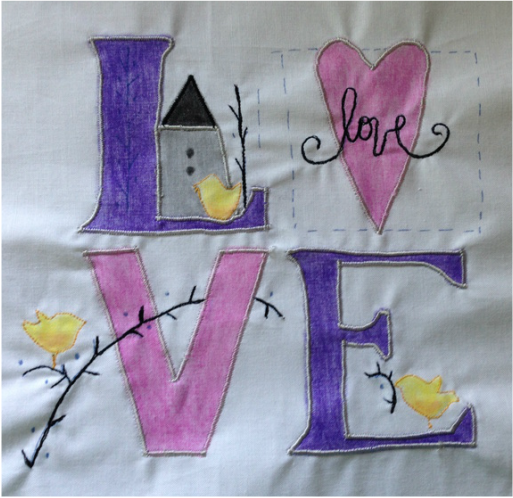
3) Once your fabric has cooled, with a Frixion pen (this pen disappears with heat and is wonderful for quilting/sewing projects), trace the image onto light coloured fabric, you can use a light box if you wish. I traced only the areas that were going to receive the crayon first. 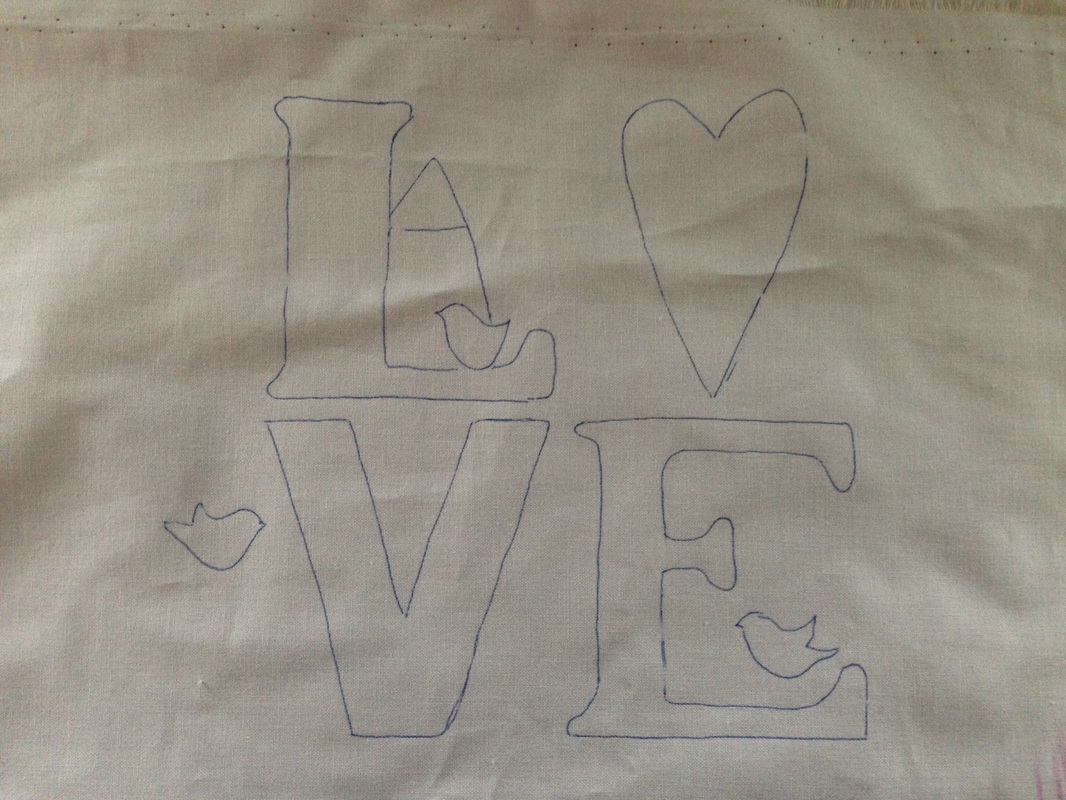
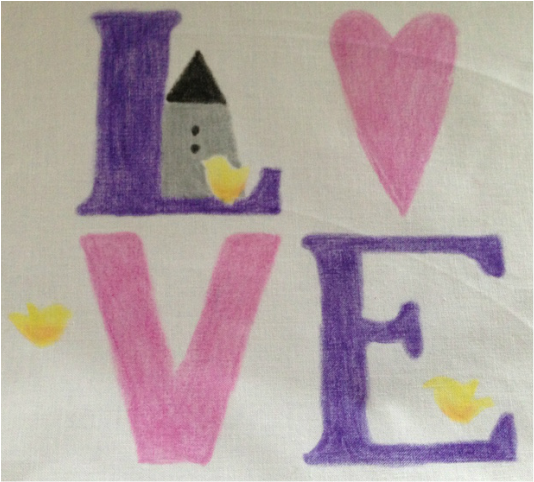
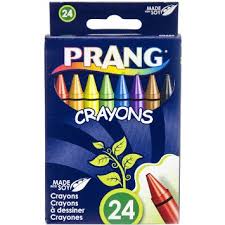
4) Colour in your letters/images with Prang Crayons (Prang are recommended as their pigment is excellent and works well with fabric). I used them at the demo last week and then ordered them and used them on this project and they are wonderful. The colour intensity is great and the fabric still feels soft after you colour with them. You can also use crayola, but do not use any other brands as the pigment may not be permanent. See below they are only $2.59 Cdn for a box of 24!
5) Turn your iron on cotton setting and turn image crayon side down onto 2-3 layers of paper towel (this will protect your ironing board and iron and absorb the wax). Press for about 20 seconds all over the crayoned area. The excess wax will melt into the paper towel and the heat will seal the pigment into your fabric.
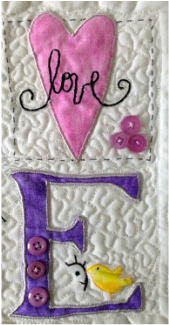
6) You may also wish to stabilize your fabric at this point prior to tracing any more items. I stabilized my image and satin stitched around my letters and free motion stitched my branches and birdies 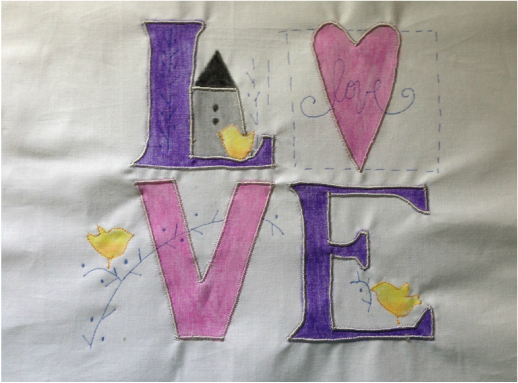
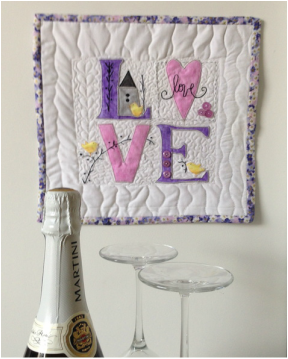
7) Make into a pillow, stretch over a canvas, make a wall hanging, quilt as desired, add buttons or embellish, it's ready for gift giving ( would be a cute shower gift too!)
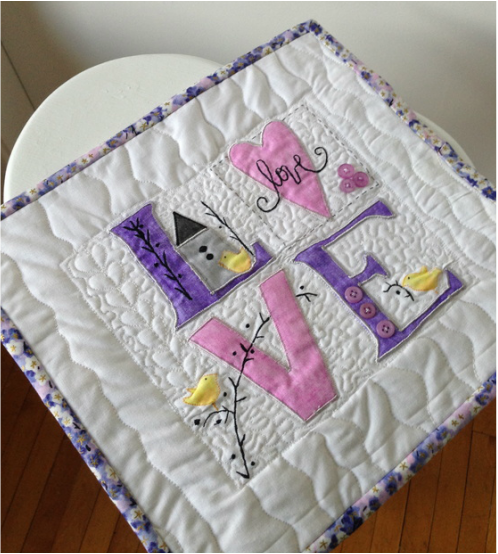
A cute, fast and easy "Crayon Applique" Project
Happy Tuesday!
4 Comments
Hi Everyone, I got many requests for the pattern for my 8 Pointed Star Quilt I posted in Saturday Jan 30th, I taught this as a beginner class many years ago in Windsor. It was not a copyrighted pattern at the time, but I cannot locate it, so I have just drawn in up inEQ 7 (Electric Quilt 7) and am providing the layout below. This quilt is made up simply of squares and 1/2 square triangles including the border! Very easy to make and suitable for a beginner. Give it a try!! How to make it:
1/2 Square Triangles Make 1/2 Square triangles by placing a 5 7/8" light fabric square with a dark fabric square right sides together, draw a line diagonally through the centre, pin and sew 1/4" out on either side of the line, cut down the centre only. This tool below makes marking so easy and highly recommended: Half-square and quarter-square triangle blocks are quick and easy with the Quick Quarter tool. Use the Quick Quarter II for marking multi-stitched triangle-squares. Simply place fabric squares right side together, mark center cut line and 1/4" seam allowances, sew and cut. Have a look at where to get it here 
Sew on the lines to the right and left of centre, cut down the centre and press to the dark fabric, these blocks should be 5 1/2" when pressed and 5" when finished (sewn to the next block)
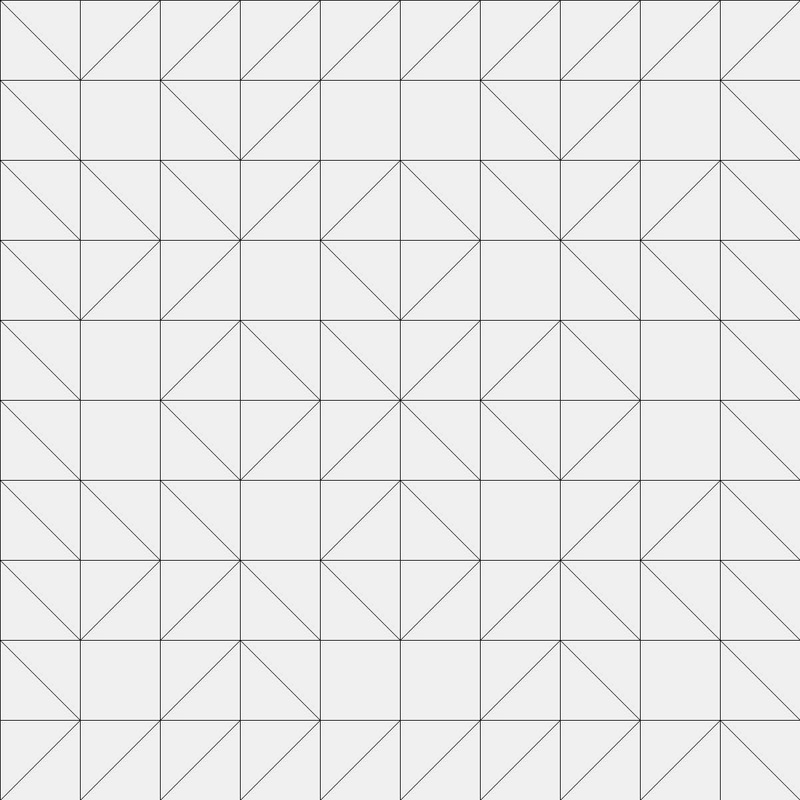
Layout
Drawing from EQ7 - Layout your blocks in horizontal lines to sew from the top down
Once all your blocks are cut and pressed lay them out on a flat surface to audition the lay out and then pin each square and 1/2 square triangle together from left to right and sew in horizontal rows (including the border) from the top down and quilt and bind as desired. I hope you enjoyed this tutorial and that you can make use of this pattern. Enjoy
I drew this up in Electric Quilt Today on my Mac, its available for PC's as well, it's wonderful and affordable software for quilt designing! If you think it would help you have a look at it below: 
Happy Monday Everyone, January is done!!
Have a fantastic week :) 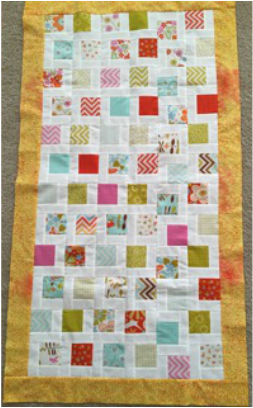 Hi everyone, I'm sure you are all busy with the last minute preparations that this time of the year brings.
I will be brief today, I Just wanted to share this with you. Beverly from Alabama USA sent me a lovely email thanking me for sharing my free pattern through Craftsy.com, you can check it out here or download it for free in my shop area on this website. Beverly made the table runner above for her daughter but decided not to do the quilt as you go method. I am honoured that she was inspired by my pattern. Her colours are vivid and really pretty. Her daughter is certainly a lucky lady! Great job Beverly and thanks so much for sharing your photo and efforts!! I encourage everyone who follows my blog to send me photo's of anything they have made as a result of following www.quiltingintheloft.com over the past year, I am happy to post and share as it too inspires others. Also check out www.craftsy.com for their classes, they are wonderful! Happy Monday! Only 4 more sleeps!! 
What tools do you use to help you to make things? I use classes that I take, quilting and sewing tools, a sewing machine of course, my own purchased patterns and free ones available on the internet of course etc. etc. etc.
Craftsy.com has an article about 7 Free patterns for DIY hostess gifts and in my opinion, gifts in general. Craftsy.com is very supportive of artists who write their own patterns and encourage them to share their patterns on their website. Although Craftsy is a business, in addition to making $ via their website and through artists who contribute to it, their support serves to assist up and coming crafters and artists who make their living via their talents to achieve success! I encourage you to check out this blog post where ironically they have my free pattern as their #1 DIY hostess gift. WOW I feel special! Thank you Craftsy.com and check out this blog post, you may find some last minute ideas to make this Christmas season. Check out the post here Craftsy also has a deep discounts on classes, a great last minute gift! Check it out here 
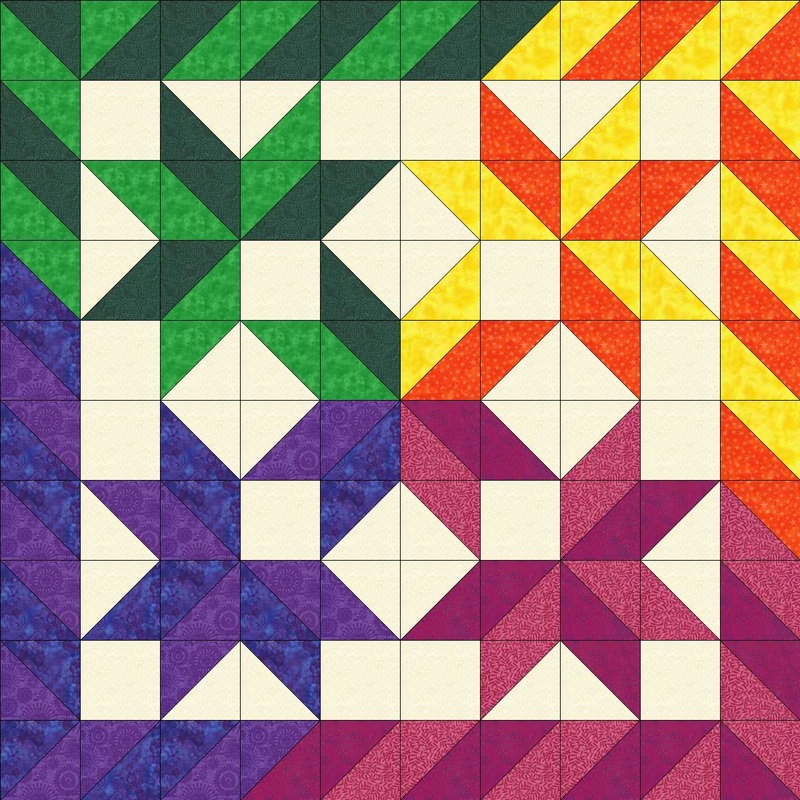
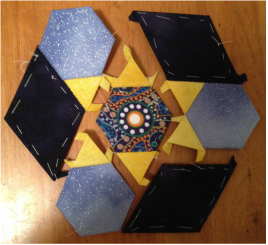
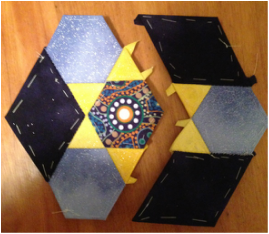
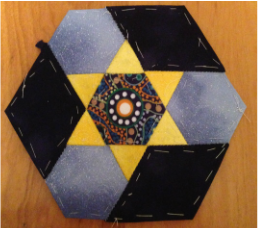
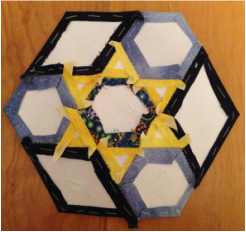
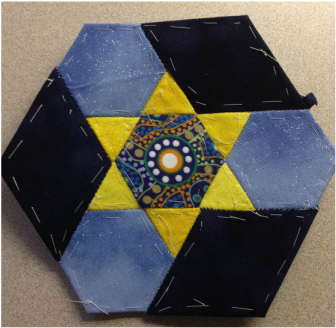 Isn't that an unusual and very precise block? I thought it was appropriate at this time of the year as it has a significant star in the centre and this is the month of the significant star! Yes it is English Paper Pieced. Did you know that most blocks can be English Paper Pieced? Because they are shapes, card stock templates can be made from them and then the fabric can be wrapped around the shape to baste it in place. So..... if you like something to keep your hands busy in the evening while watching TV or listening to music, English Paper Piecing is wonderful. Hexi piecing is all the rage right now and this is the same "EPP" technique. Check out the photos below to see how I put it together:
After the pieces are slip stitched together, the entire block will be pressed well and the basting will be removed once it is sewn into a project. This "project" will be revealed to followers of www.quiltingintheloft.com blog at a later date.
Wouldn't this be great with corners added for a pretty pot holder or made larger for a centre piece or candle mat ... or an entire quilt, the possibilities are endless and that is what is great about making blocks :) Want to give it a try? Download the free PDF pattern in the shop/free PDF patterns section of this web site, use the menu above to navigate to it. Print the pattern out on card stock. Cut your fabric pieces out a scant 1/4" bigger than your card stock. Baste the fabric to the card stock and slip stitch the pieces together. If you need help with the piecing there are many tutorials about EPP on the Internet. I recommend you make use of these tutorials if you are unsure. I sewed the block above together in an evening while watching "The Voice" - that means you can do it too! Enjoy and Happy Wednesday! 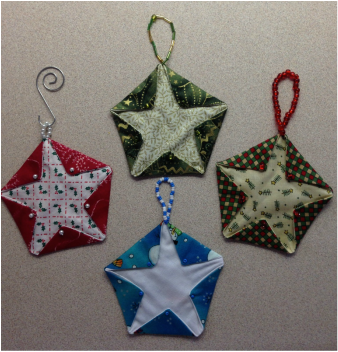 A great time to start getting ready for Christmas, the parties you will attend and the decorating you have yet to do! This tutorial shows you how to make a Star Pentagon Christmas Ornament that you can hang on the tree, attach to a gift or my personal favourite--- use it as a wine bottle charm! I hope you enjoy and are able to try making this easy little project! You will need to download and print the pentagon shape at the end of the tutorial from my shop/free PDF patterns page, please use the menu above to find this and print out the shape. Star Christmas Ornament (or Wine Bottle Charm) You will need: Small scraps of fabric – one light and one dark to contrast each other Thread Sewing Machine Scissors Beads Hand sewing needle Stretch Beading thread (optional) Ornament hanger (optional) Pentagon Shape provided To Make:
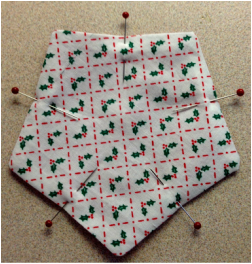 6. Fold the pointed edges down towards the center on the front evenly all around and pin. As you can see the star has emerged! See photo below: 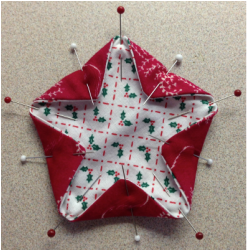 7. Using a thin hand sewing needle (or beading needle) and a bead, sew a bead at the inside point of the star you just created. See Photo below: 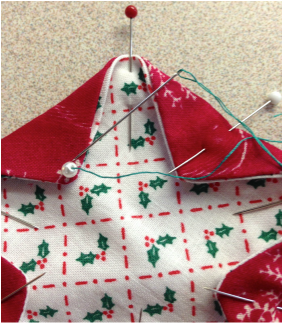 8. Remove side center pins as you go. 9. Sew all inside points as in 7 until they are all sewn down and secure. See Photo below 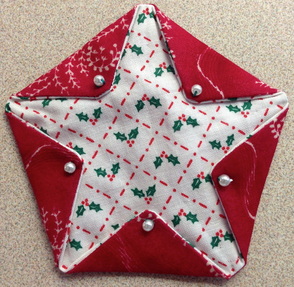 10. Make a bead loop with stretch thread or attach a ornament hanger to the top of your pentagon star, hang on the tree or attach to a bottle of wine ready for hostess gift giving this holiday season. See photos below and enjoy!!! 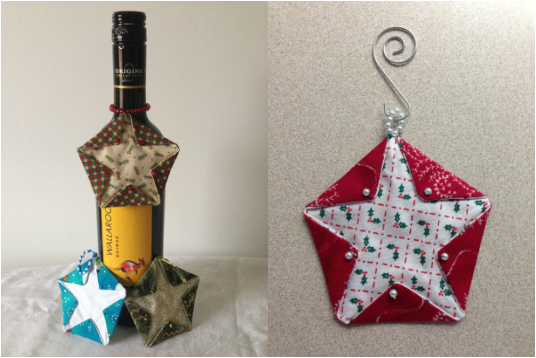 Wine Bottle or Gift Charms and/or Tree Ornaments *Don't forget to download the PDF pentagon shape in my shop area*
Enjoy, Welcome to December and Happy Tuesday! Free and Easy Stocking Stuffer!I know it's only November, but I would love for all to get their Christmas organized early so that they can truly enjoy time with family. So today I'm going to share with you a little project I made for a craft sale recently. See pic below: 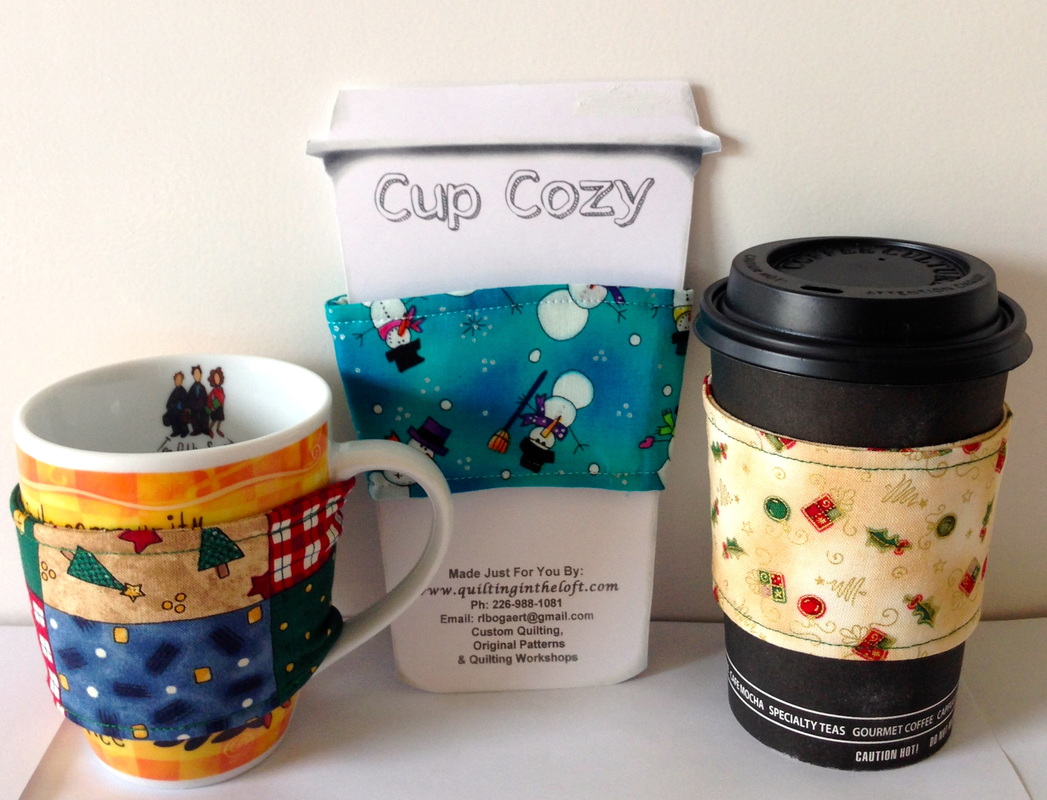 A Cup Cozy to keep warm beverages hot and to keep your fingers from burning This is made easily with 2 strips of fabric, a piece of batting and velcro, to get the www.quiltingintheloft.com free pattern please go here. I have made many of these in Christmas fabric perfect for a Christmas craft sale but you could make it in any fabric. This is a gift that would be great for all ages and slips nicely into a stocking or treat yourself. Why not , you deserve it too!
My first free pattern has been added to my website. It's free and downloadable. Click on Shop and the tab Free Patterns to view and download. Or click here. The new pattern is called Easy Crazy Patch Pin Cushion. There is no piecing required, so yes it is the easiest! A great gift to make fast! 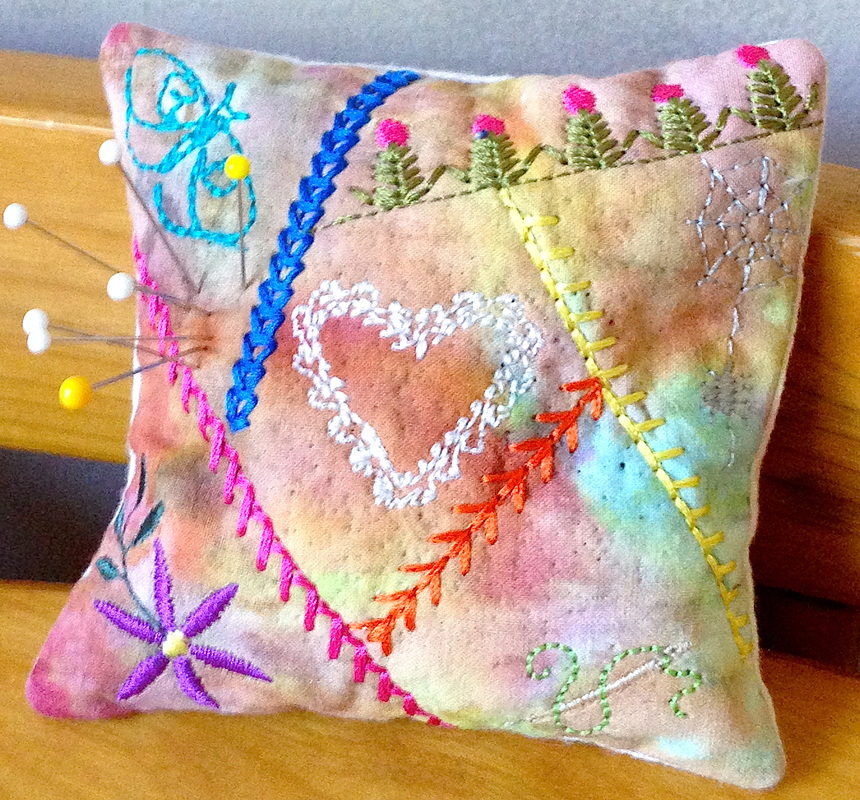 |
Follow Me:
Welcome!Hi I'm Robin and I am a professional long arm quilter, pattern designer and teacher. I am passionate about all things quilty!  
  Categories
All

Sponsors
This blog contains affiliate links. This means that we endorse products.
We do receive rewards for these endorsements and this helps to keep this site alive and well. We support products which we believe are the best quality and to inspire your creativity! |
 RSS Feed