|
Hi everyone, go on over to QUILTsocial.com today and check out this "Simple Essentials Tote" tutorial, an original pattern designed by yours truly and a very handy gift that could be monogrammed for someone on your Christmas gift list. This tote is a great for all ages, stylistically different from the usual travel makeup bags and a fantastic crafter's/sewist's tote! 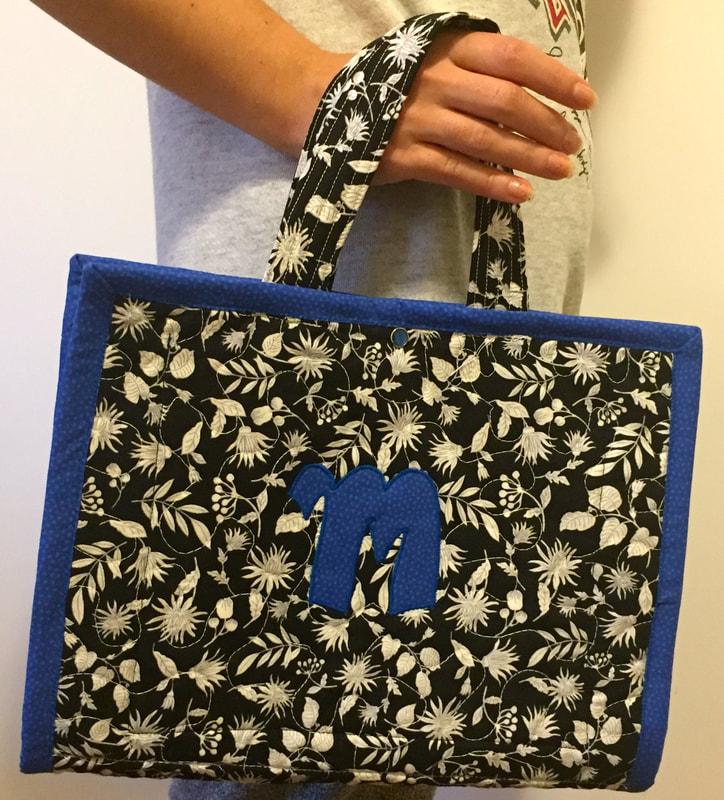 Personalized Simple Essentials Tote 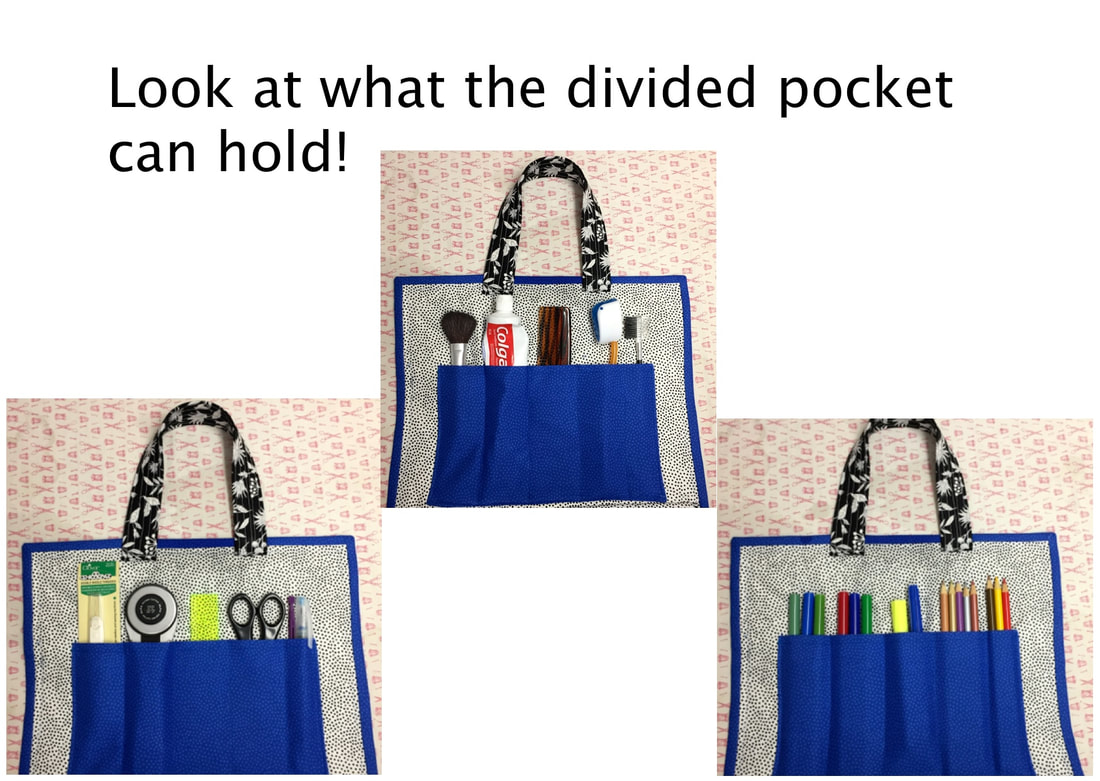 This tote has a divided pocket, 2 zipped pockets and another large open pocket, lots of room to organize your simple essentials Share with us your simple essentials tote once you try this pattern at QUILTsocial.com.
Have a great Thursday
0 Comments
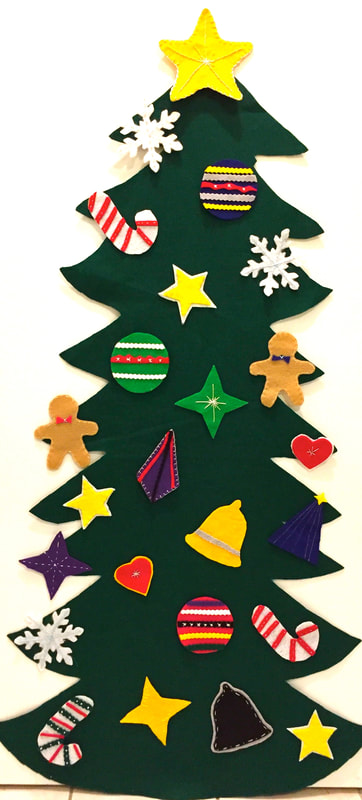 Felt Christmas Tree for Toddlers to Decorate- free tutorial at QUILTsocial.com 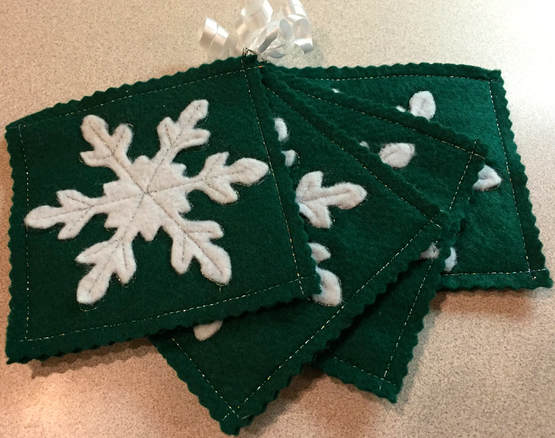 Felt Snowflake Coasters - Tutorial and link to free pattern download at QUILTsocial.com Hi everyone, today as guest blogger at QUILTsocial.com is a tutorial of mine for DIY felt Snowflake Coasters (a great hostess gift) and a felt Christmas Tree (for toddlers/or the young at heart) using Kunin PrestoFelt and Kunin Rainbow ClassicFelt. Easy projects, lots of fun! Enjoy this free tutorial and link to free pattern download here. Happy Tuesday! Happy Thursday to all of my blog followers and students from classes. I just wanted to let you all know that next week from Monday Nov. 12 to Friday Nov. 16, I will be a *new* guest writer at QUILTsocial.com. QUILTsocial.com is a daily quilting blog, monthly newsletter, FREE quarterly magazine, and FREE App focused on the love and art of making quilts. My topic for the week is "How to Make Your Holidays Sew Much Easier".  There will be 7 fun and easy projects over the entire week featuring notions, thread and fabric that will be sure to make your DIY gift giving not only look professional, but also very festive! I promise to share the links to my posts at QUILTsocial.com next week. Have a look now if you like 😊, there are always great projects and ideas featured on this blog. I look forward to your comments and I sincerely hope you try some of the projects (please share them on QUILTsocial.com if you do). I sure had fun making these great gift and holiday decor items!! Have a great day today , Robin  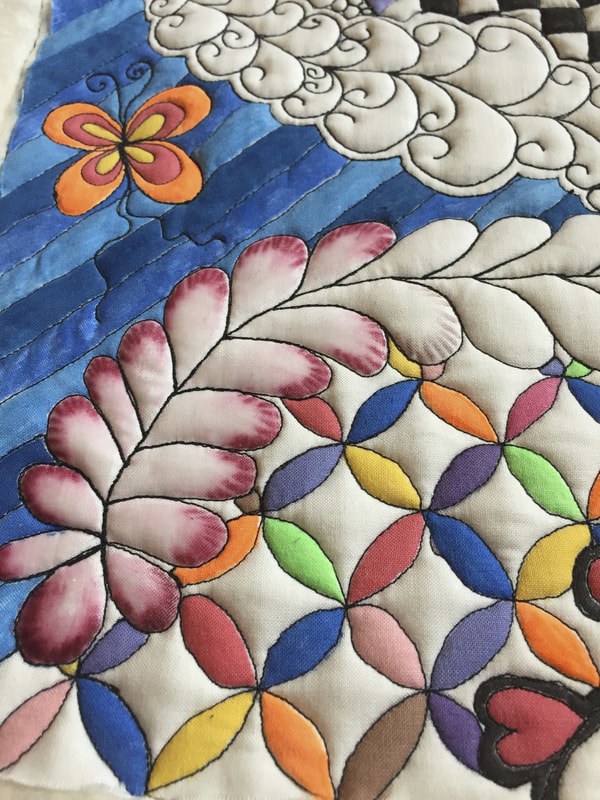 Happy Summer! Doodling in colouring books is all the rage. It is said that colouring is relaxing and therapeutic. I think summer is not only a time to relax and reflect, but sometimes that reflection can lead to more creative, outside of the box thinking. So why not doodling by machine? I made arrangements with a friend (Marg) to get together and try a new technique that I am calling " Doodling". You could call it "Zen doodling" by machine (it was fun and zen relaxing) and then you add colour to it. This project has repetitive patterning somewhat similar to Zen Tangling in pen and ink. Today I am going to share what I did, see below. 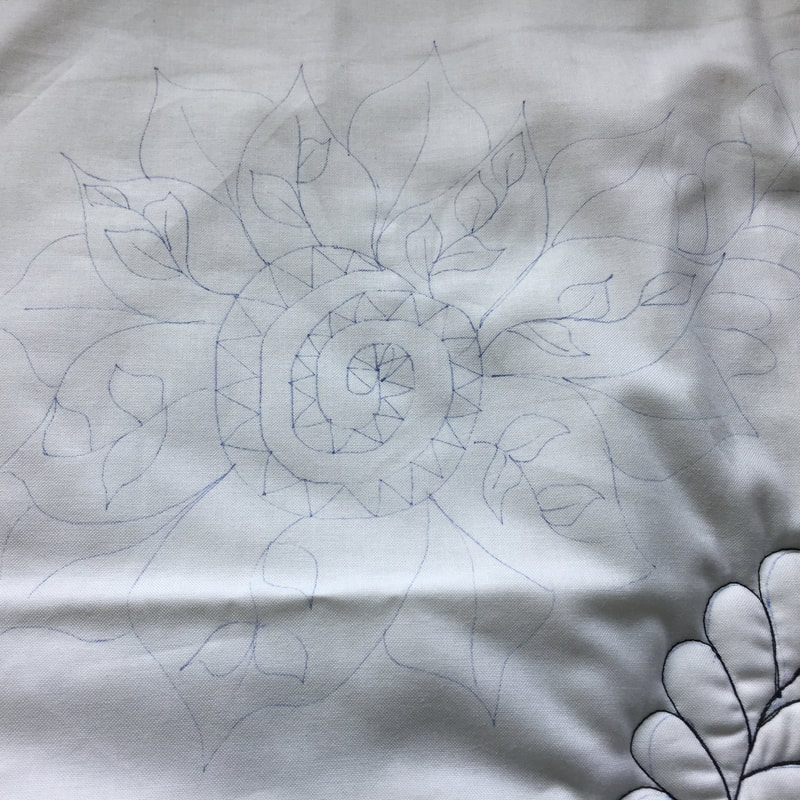 Draw your thoughts /doodle, designs, daydreams on 100% white or light cotton "quilt top" using a frixion pen (it heat erases with the iron) Sandwich your quilt top with batting and backing at this point, make sure to baste your layers! 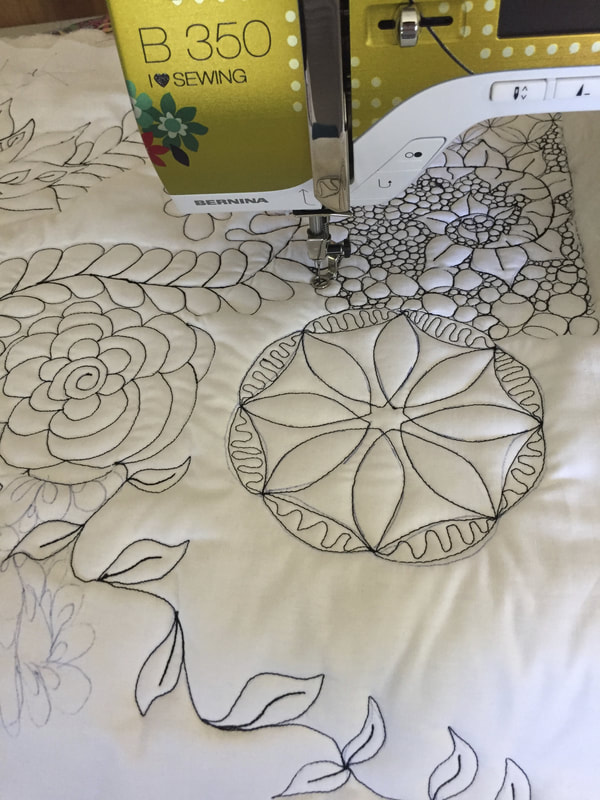 Free motion doodle on top of your drawn lines with a heavy weight (40wt or heavier) black cotton thread, Free motion foot on and feed dogs down. 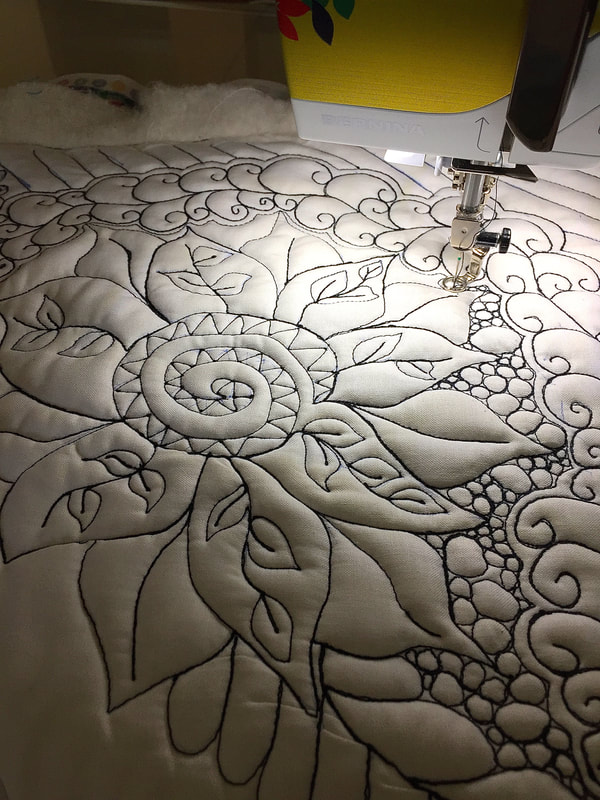 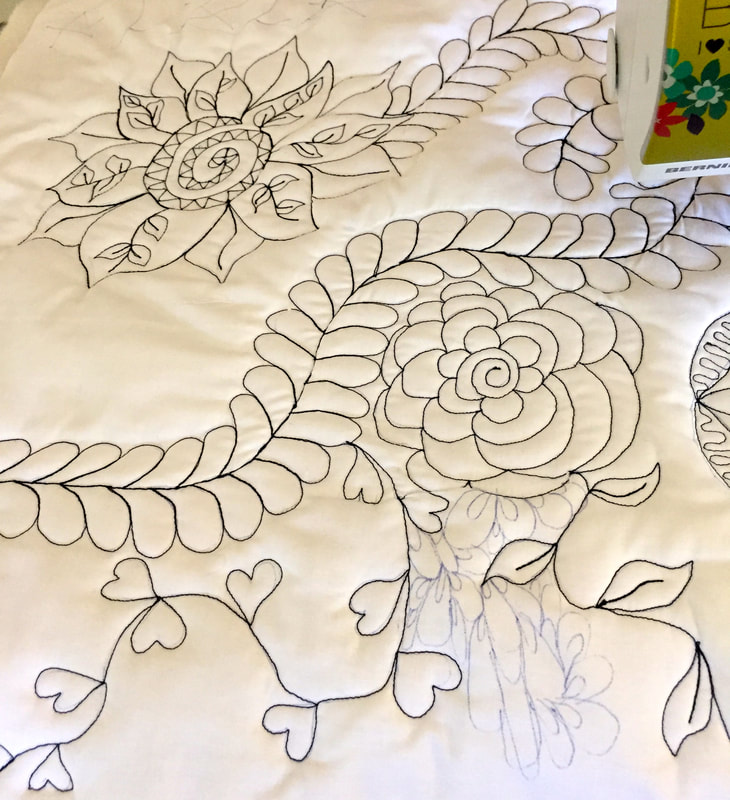 As you can see some of my pen doodles I did not like so I did not doodle them in by machine **Caution -use removable ink like a washout marker or frixion (heat erasable pen) to mark doodles on your fabric 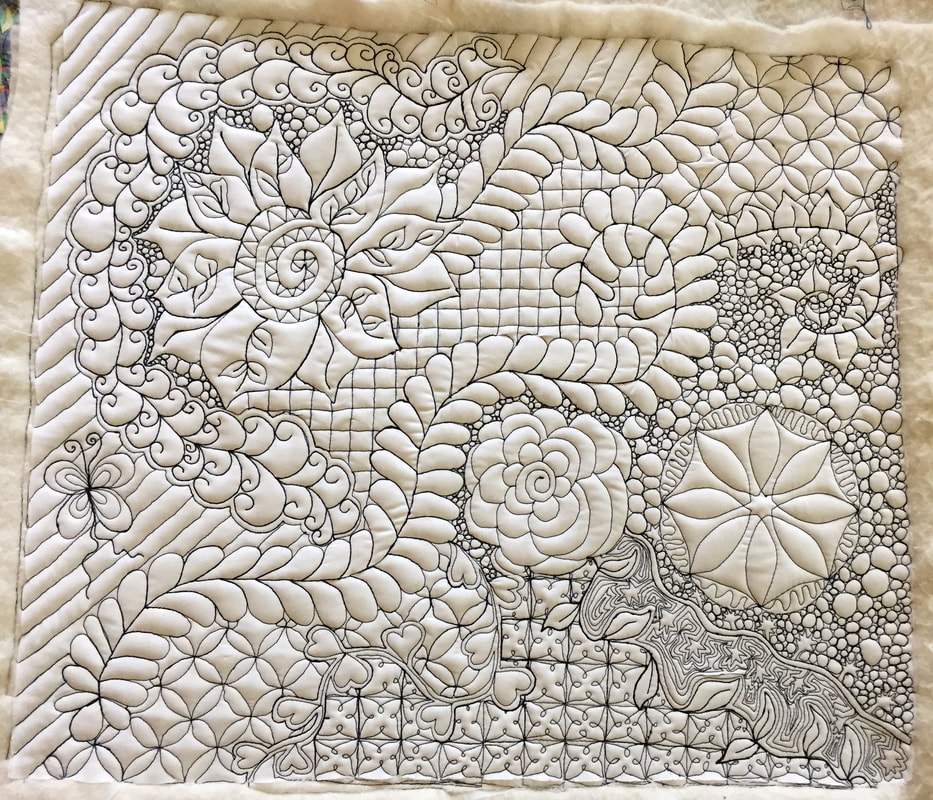 Black thread doodling completed! Time to add Colour! 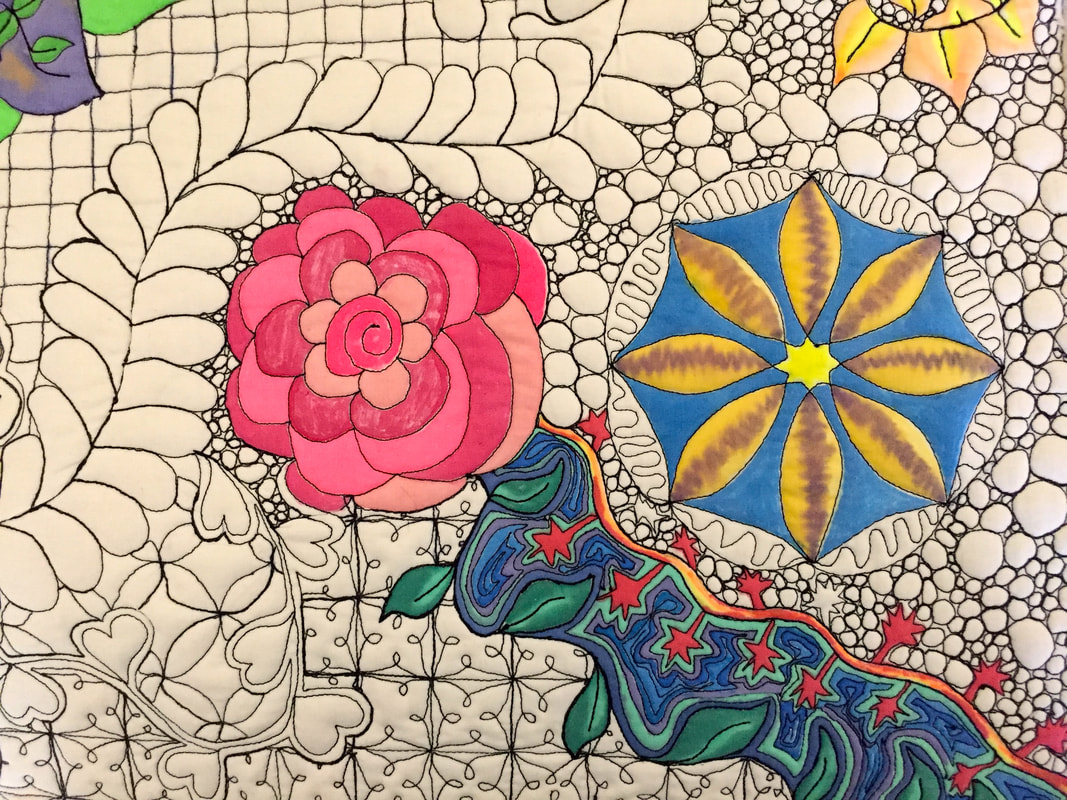 I used fabric pens and intense pencils, check out the resource list at the end of this post for where to find supplies 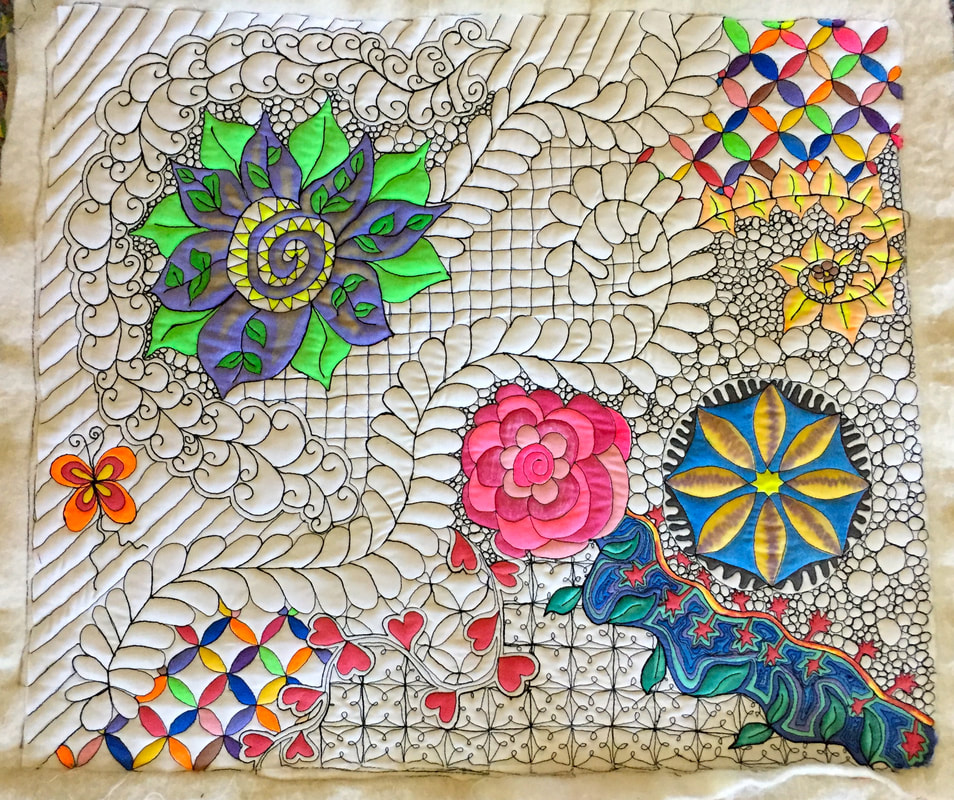 more colouring...  Check out my crazy backing fabric. Its effective at hiding all the dense black stitching! So very recommended  I added a black binding as it frames all the crazy colours, designs and allows your eyes a chance to rest TA DA! My finished Machine Doodled Quilt! 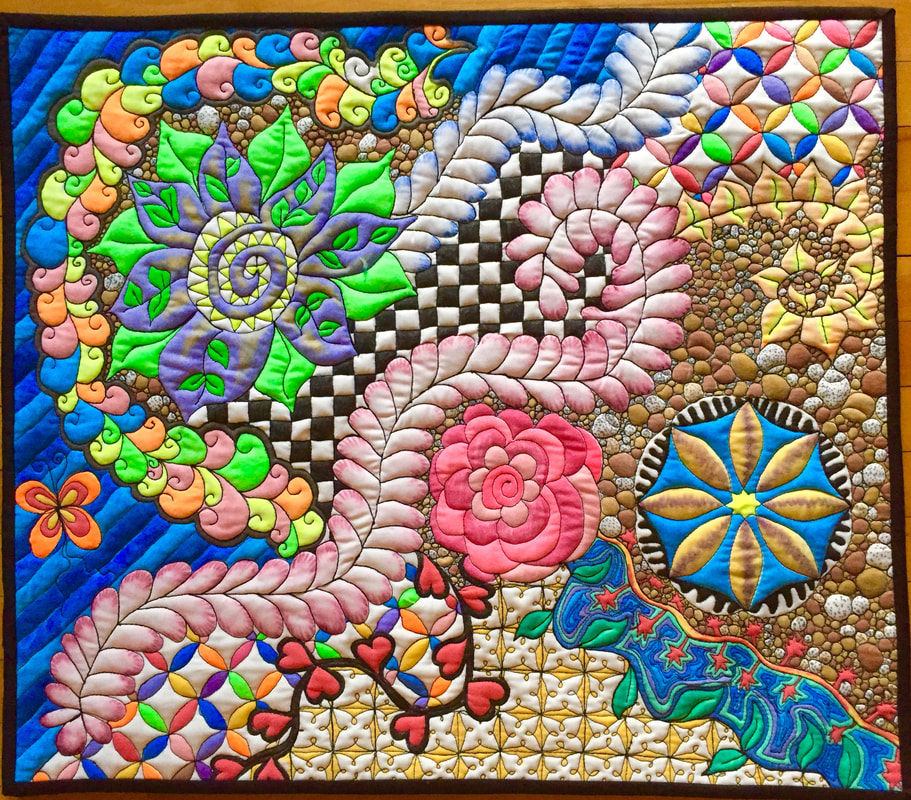 "My Secret Garden" 18 x 21" Resources (what I used):
Black thread from Connecting Threads Inktense Pencils Aloe Vera Gel (to spread out the ink from the intense pencils (use small paint brushes for this) Frixion Markers (to draw the designs on the fabric) Fabric Markers 80/20 Batting (2 layers recommended but well basted, makes your project have great texture) 505 Quilt Basting Spray Additional Resources Needed: An iron (used to remove any unwanted Frixion Pen lines) A ruler for grid patterns in the background A Sewing Machine in good working order (feed dogs down) A free motion foot Some Free Motion Experience A creative mind Allow yourself the time to do this! In the end it was a very enjoyable technique and I am sure I will try this more. I hope you try it (if you do send us your pictures to show and share) and have a wonderful week! ❤️ 
That is right crayons!!! They are a tool I personally use combined with quilting, last Thursday I showed you a photo montage of quilts completed with an abundance of crayon work and yes I use crayola crayons exclusively because the colour is vivid, gives off very little residue and is colour fast after washing (all with heat setting, this is a must, please keep reading for how to do this). I do not recommend other brands as I have tried others and they do not have the same quality results.
See photo montage of my quilts below: 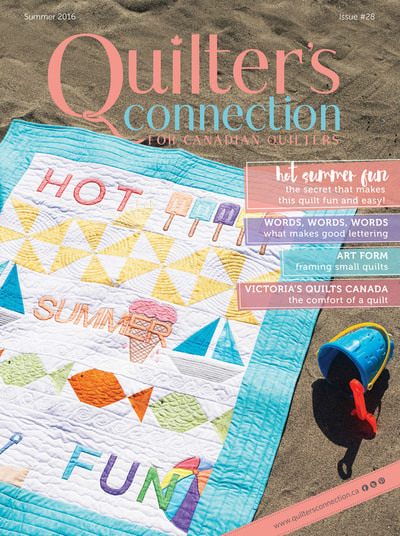
Hot Summer Fun featured on the Front Cover of Quilters Connection Magazine Summer 2016 Technique -Crayon Applique and Machine Piecing
My most recent crayon appliqué mini project is shown below:
Turning to the Sun - technique Using Fabric Transfer Pens, Crayon Appliqué and thread painted outlining
The above mini project was made for a recent demo I was asked to do for a local quilt shop.
How to do Crayon Appliqué? That is the Question
1. Find an image and transfer the design onto 100% cotton fabric (light coloured cotton background is recommended). See blog post here about pens for transfer design purposes. Colouring books with designs and web designs are everywhere but please be aware of copyright. Crayola also has some free colouring pages here
2. Tape your fabric with the transferred design to a hard surface (use masking tape) 3. Colour with crayola crayons, press as hard as you like and go over your colouring until you get the intensity of colour you want. 4. Once you are satisfied with the completed colouring, remove your design from the surface and place it on your ironing board. 5. Place 2 layers of paper towel on top of your design, coloured side facing upwards. 6. Press with an iron on cotton setting (no steam) hold for about 20 seconds. lift up the paper towel to see if there is residue from the crayons, if there is, get another 2 fresh layers of paper towel and press again for 20 seconds until there is no residue showing. (CAUTION: DO NOT MOVE YOUR IRON, PRESS ONLY). If you have used a lot of crayon, you may need to repeat this process, I usually only have to do it twice. 7. Sandwich your quilt or apply your design to whatever project you wish, the colour is now imbedded into the cotton fabric, crayola crayons are colour fast as long as you do not expose them to strong sun light and don't use harsh chemicals to clean with. You can also sew through the coloured area with no wax residue on sewing machine needles. 8. There you have it, enjoy working with this wonder tool! Who knew a child's colouring tool invented in 1903 could work for quilting? Get the Crayola Ultimate Crayon Collection with 152 Colours in a durable Caddy Case with a Sharpener below:
I hope you enjoyed this tutorial.
If you try this technique, please send us a photo of your work we would be happy to share and post! Have a Happy Thursday!? 
The above mini quilt/mug rug was part of a demo on Saturday at Hummingbird Sewing in Barrie, where I talked about the how to and the tools to make easy modern circles. I really love modern quilts with circles and consider the above mini quilt a precursor to circle quilts that I hope to make in the future.
Check here for an article in the Craftsy blog "5 Circle Patterns to Try" for even more inspiration 
Photo courtesy of Craftsy Blog post 5 Circle Patterns to Try
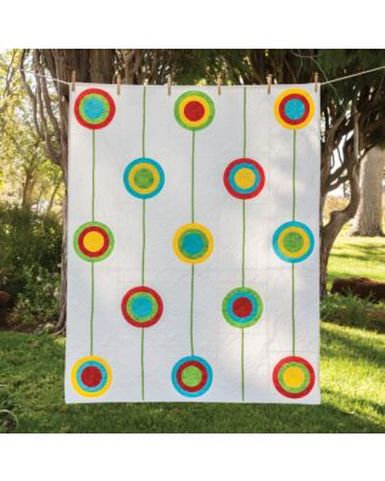 Go! Retro Circles Quilt Pattern from AccuQuilt Go! Retro Circles Quilt Pattern from AccuQuilt
Also have a look at this Free Pattern Download for GO! Retro Circles Quilt Pattern at AccuQuilt. Also another easy way to cut out circles. Click on the image to visit this site and download it for free! 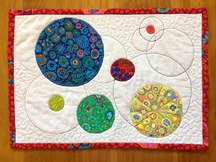
Tutorial
Modern circles for an adorable mug rug or mini quilt
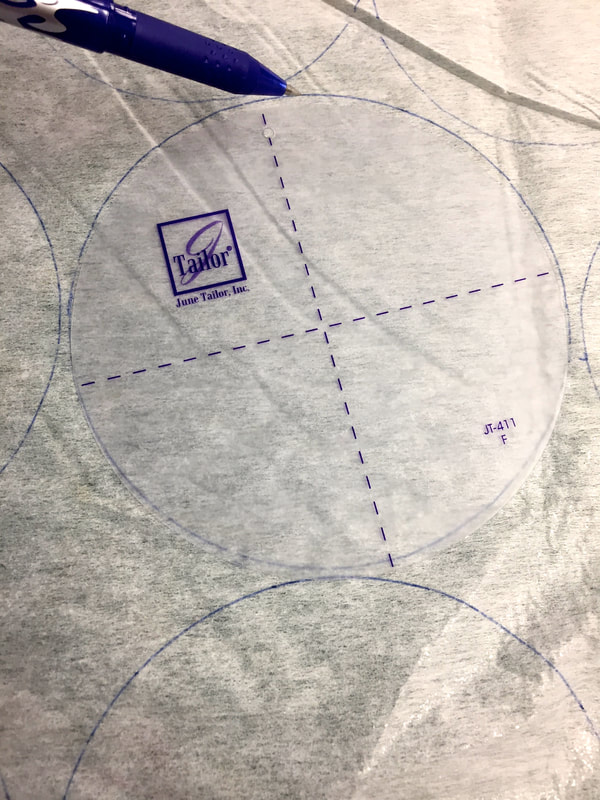
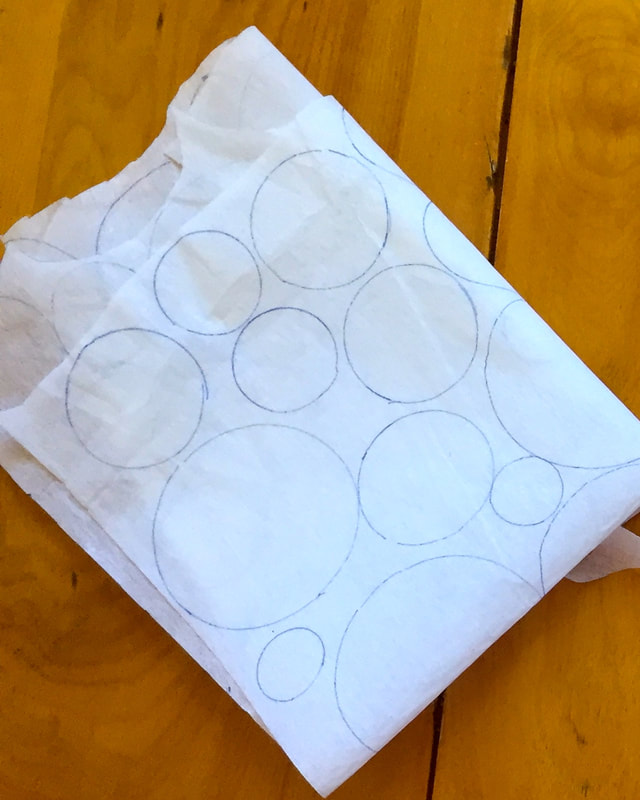
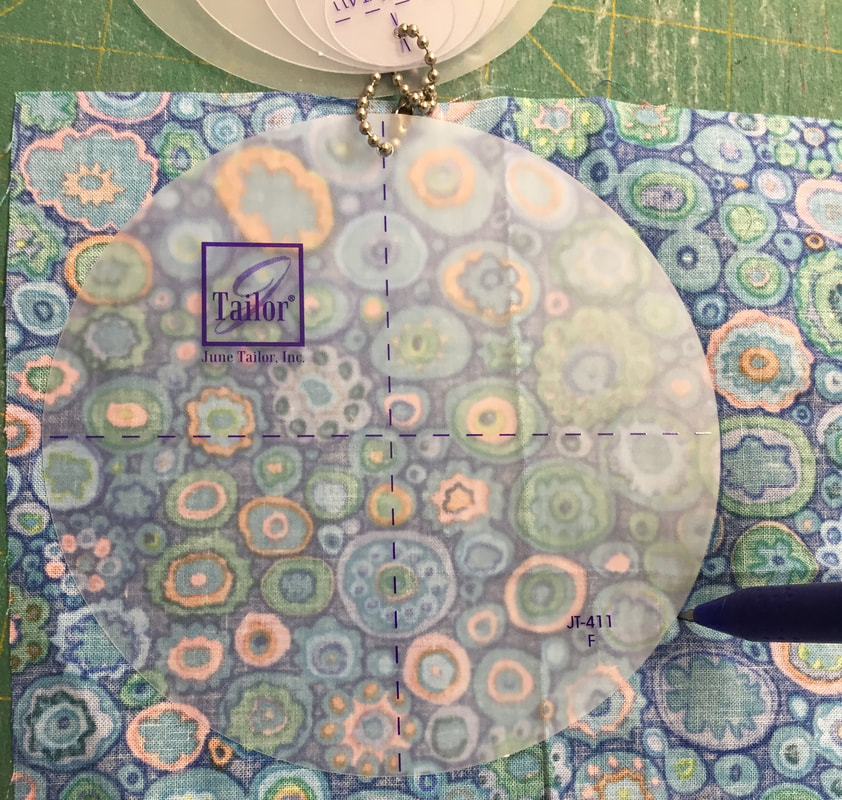
1. Draw circles with June Tailor Circle templates. See below:
Draw these circles out on the non fusible side of light weight fusible web with a pen or pencil.
I use Pellon Fusible, the sheer weight fusible one that can also be used for shirt collars below:
See a close up of my "Swiss Cheese" drawing of circles below:
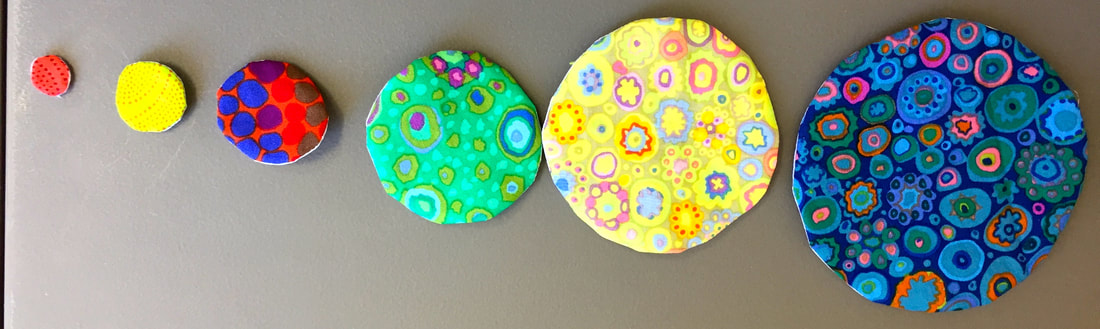
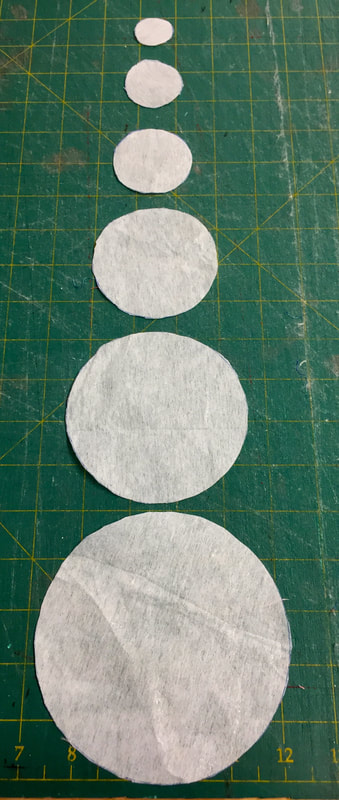
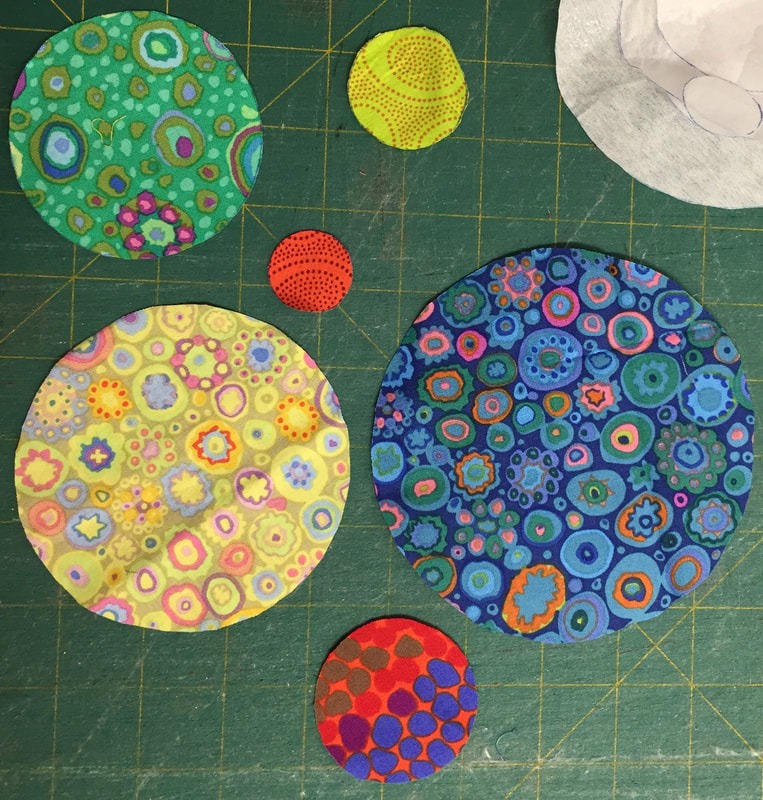
2. Use the circle templates again to trace and cut out fabric circles.
3. Lay your fabric circle right side together with the fusible side of your Pellon Interfacing (it will have a shiny, fusible side). See below (matte side is facing out):
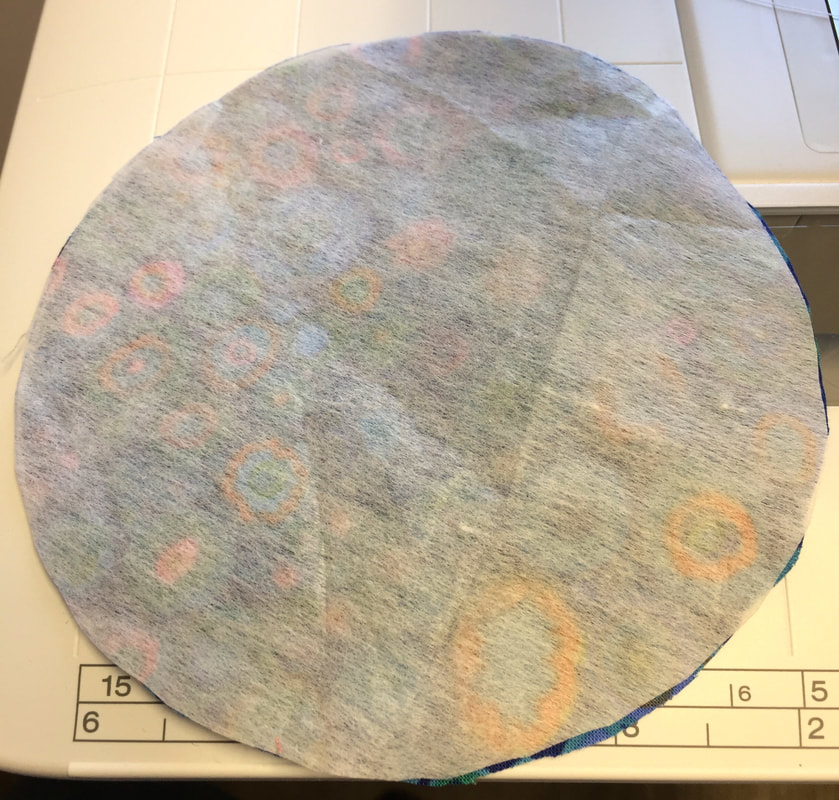
4. Sew 1/4" from the edge all the way around (do not leave a gap for turning)

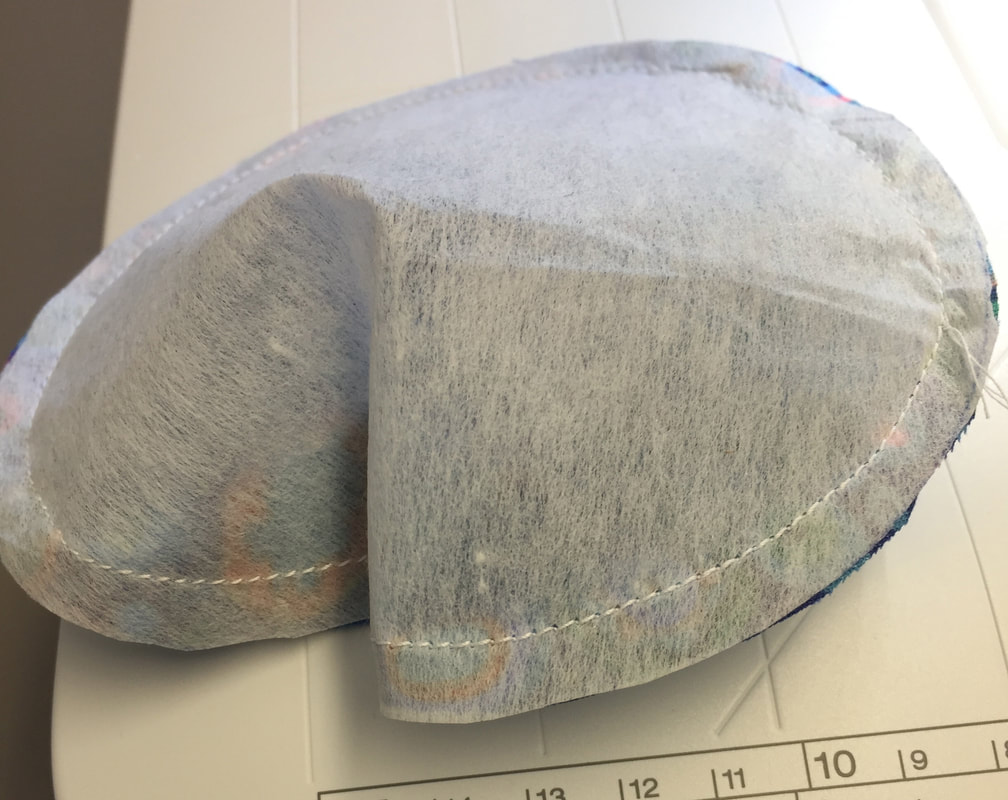
5. Pull the interfacing away from the fabric as shown below (it will look somewhat like a fortune cookie).
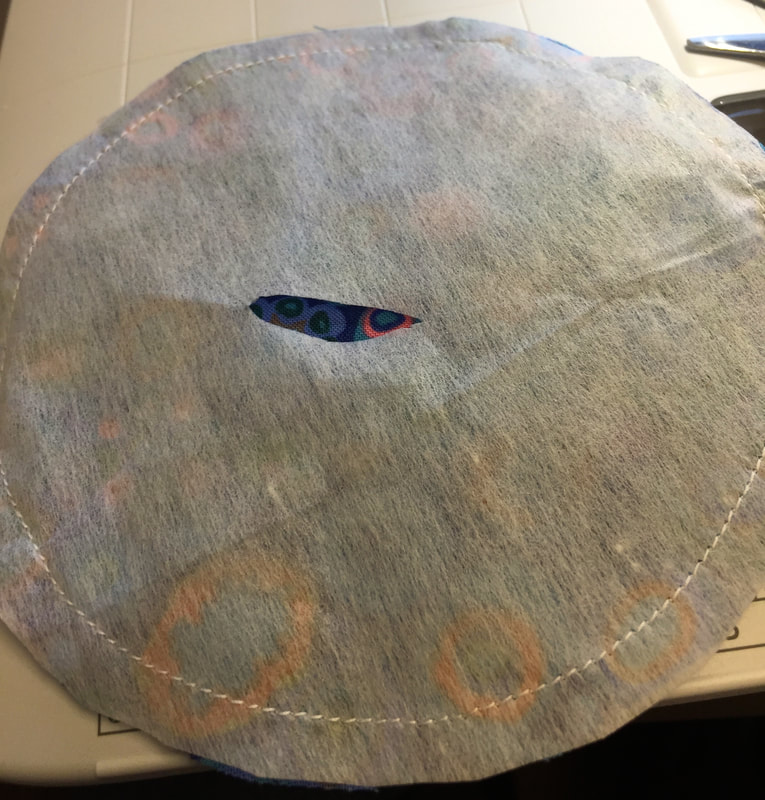
6. Cut a slit with scissors in the top centre of the interfacing only about 1.5", be careful not to cut fabric.
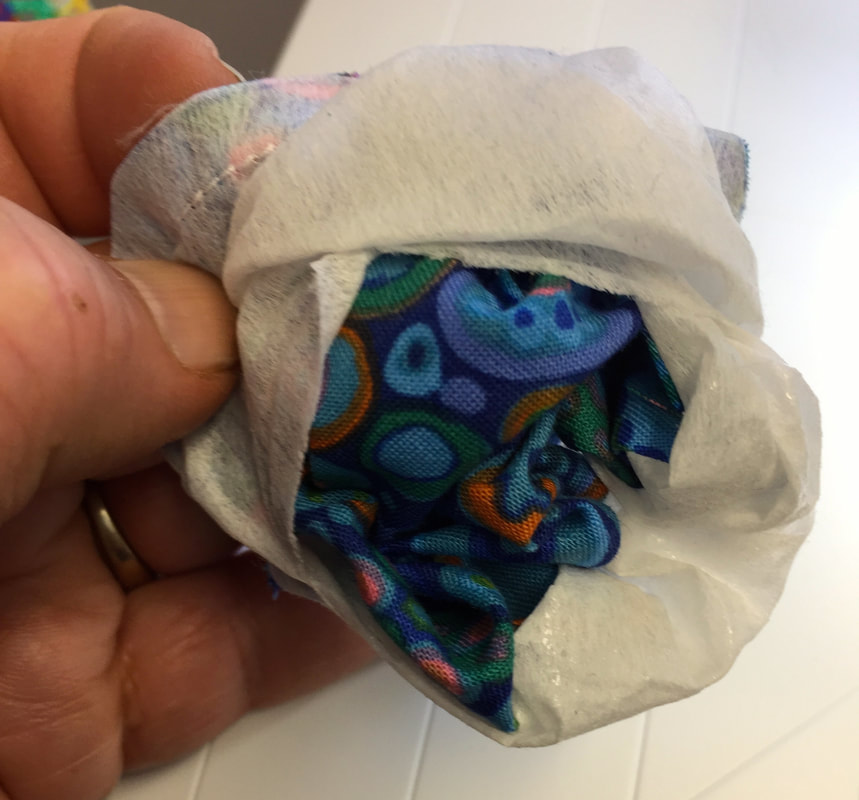
7. Turn your circle to the right side gently through the hole you just created.
8. Use a turning tool or Purple Thang (recommended) to smooth out seams, be gentle so that you don't rip through the interfacing. Once you have a nice looking smooth and flat circle set it aside and make more, DO NOT PRESS!
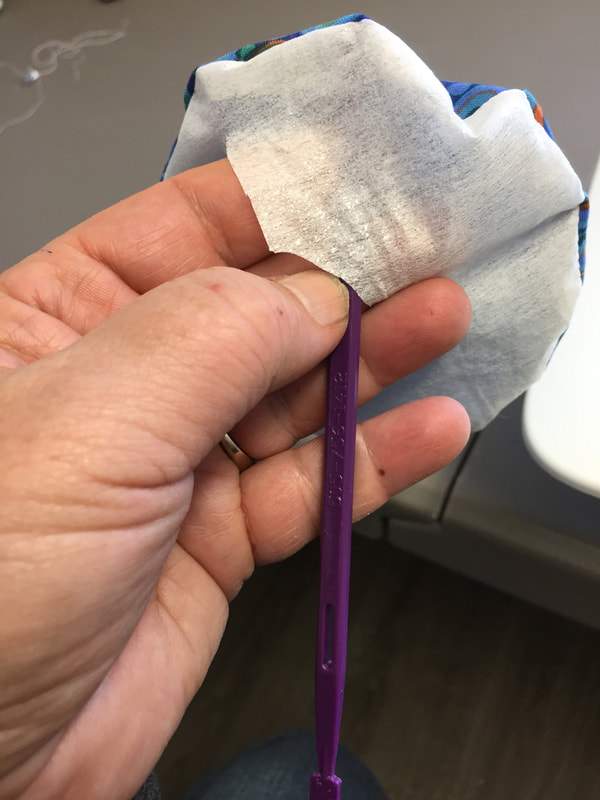
See where to get this awesome tool, that I use all the time below:
It's also a 1/4" measuring tool, bodkin, stiletto and turning tool! So handy in my sewing studio!!
9. Lay out your many circles and audition them on your background, press them down to the background once you are satisfied with the arrangement. Do not use steam but use a hot cotton setting. Press also on the wrong side of the background to insure the fuse is working.
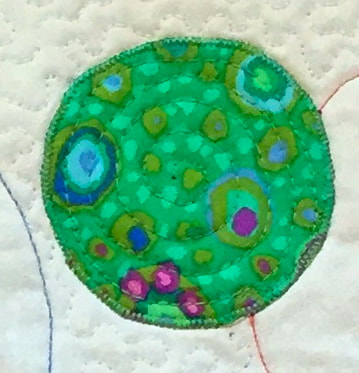
10. Applique your circles to your background using monofilament thread and a zigzag, matching coloured thread and a blanket stitch or appliqué method of your choice. You will also want to stabilize your background while appliquéing. I used white freezer paper ironed shiny side down to the back of my project and tore it away after my appliquéing was completed. See my blanket stitch (very close together) and coloured thread below:
11. Mark circles for quilting on your background with your circle templates and a wash out marker and sandwich your quilt.
12. Quilt (free motion) your marked circles ( I used many thread colours) and meander around the circles, Quilt the circle appliqués as desired. See below for inspiration only! Try your hand at your own method and imagination!! 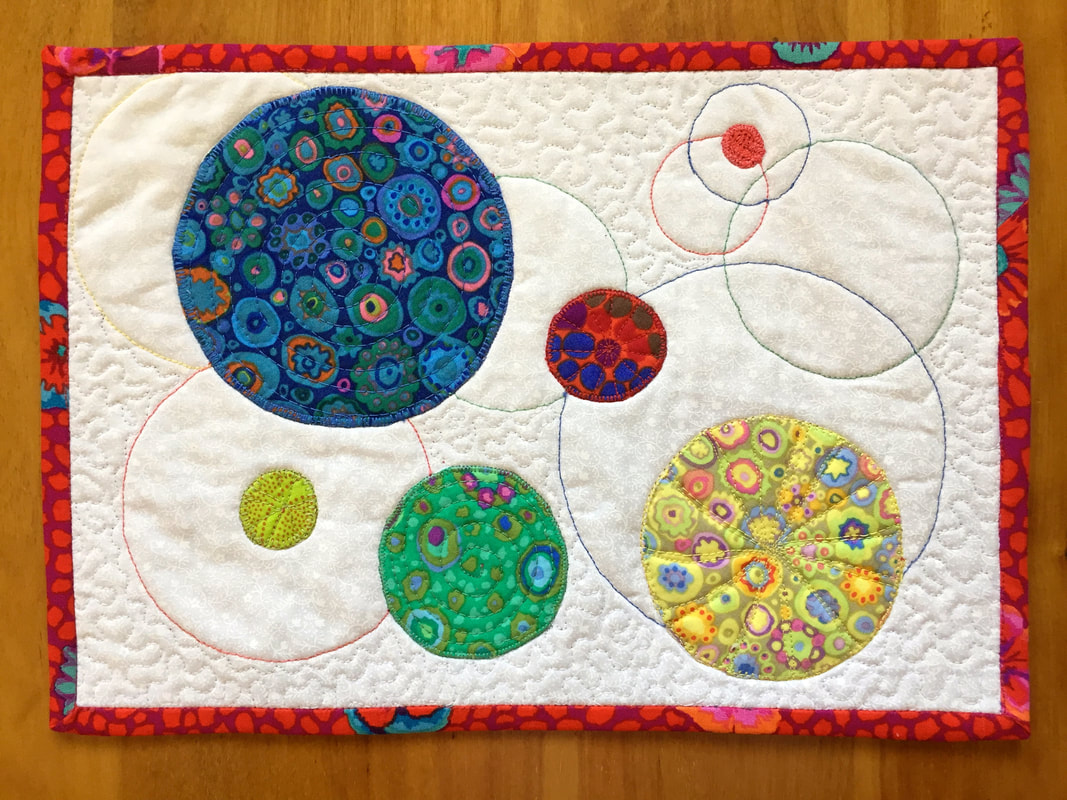
I hope you try your hand at this method and send us photos of your quilt project to share with our readers!
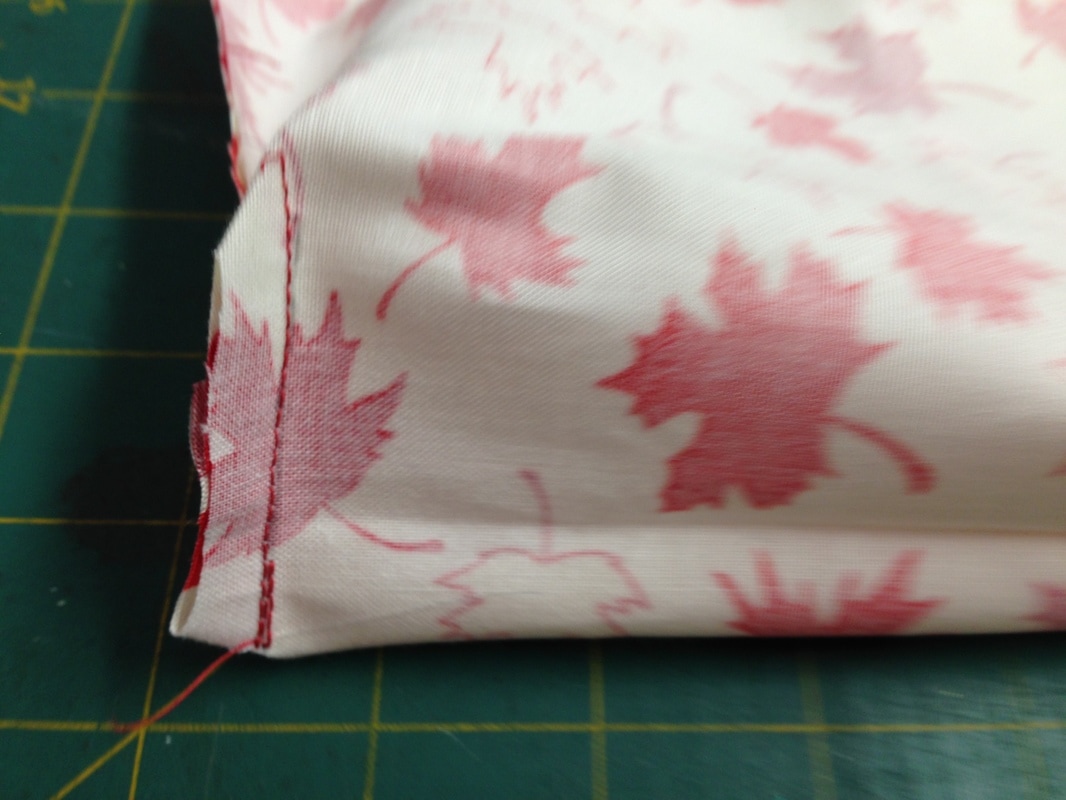
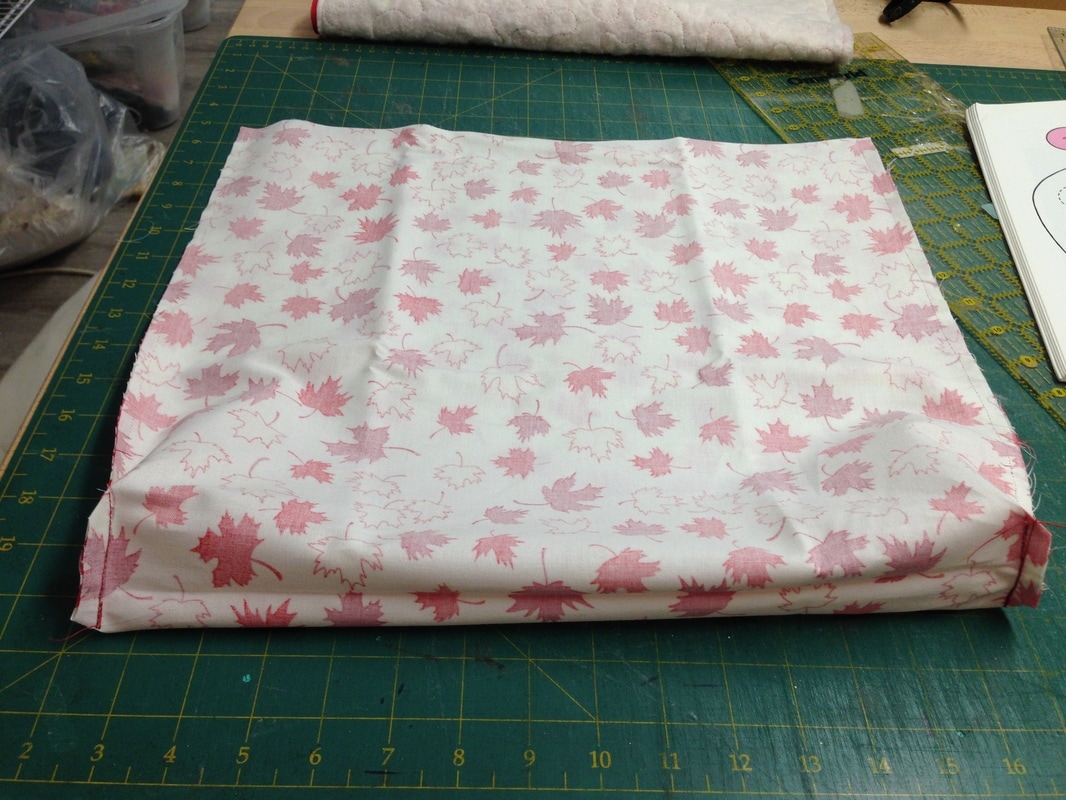
Happy Thursday! ? 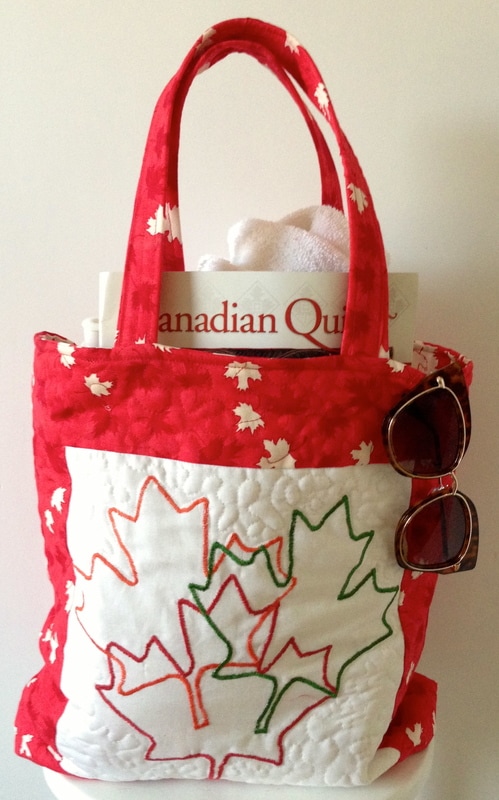 Canada Day Bag Ready for the beach Sorry folks, I have been away for a few days because of recent trunk shows in New Market (Region of York Quilters Guild) and Cambridge- Busy Hands. I was also teaching in Barrie, completing some custom quilts and some wedding prep for our family (my daughters) wedding June 24 (Yikes). Also, I just recently I found out I have a pinched nerve in my neck. The good news is I will survive, albeit I have been told to take it easy !! I am finding that this is not an easy thing to do! Just not in my nature!! 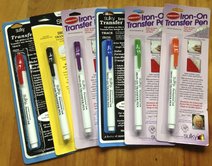 Remember these pens I spoke about in the previous post and the Maple Leaf satin stitch block I did with them? As you can see above I made them into a simple tote. I thought I would share how I made it .... and a great technique for making ultra simple and strong handles for all bags! Simple Tote Tutorial What you will need: Front of bag: 10 3/4" square, orphan block or make the Maple Leaf Block shown above from blog post 05/02/2017 2 Strips 3 1/2" x width of fabric for sashings around block Back of Bag: 16 3/8 x 16 3/8" square of fabric for back of bag Batting: 34 x 18" piece of batting Lining: 32 3/8" x 16 3/8" rectangle of fabric Handles: 2- 3 1/2 x 20" rectangles of fabric 2 Pieces of webbing (nylon or cotton) 1" x 20" How to make this simple tote: Cut your 2- 3 1/2" strips for block sashing as follows: Cut 2 strips 16 1/2 x 3 1/2", cut 2- 10 3/4" x 3 1/2" Sew the 2- 10 3/4" strips to the vertical sides of the block, see below: 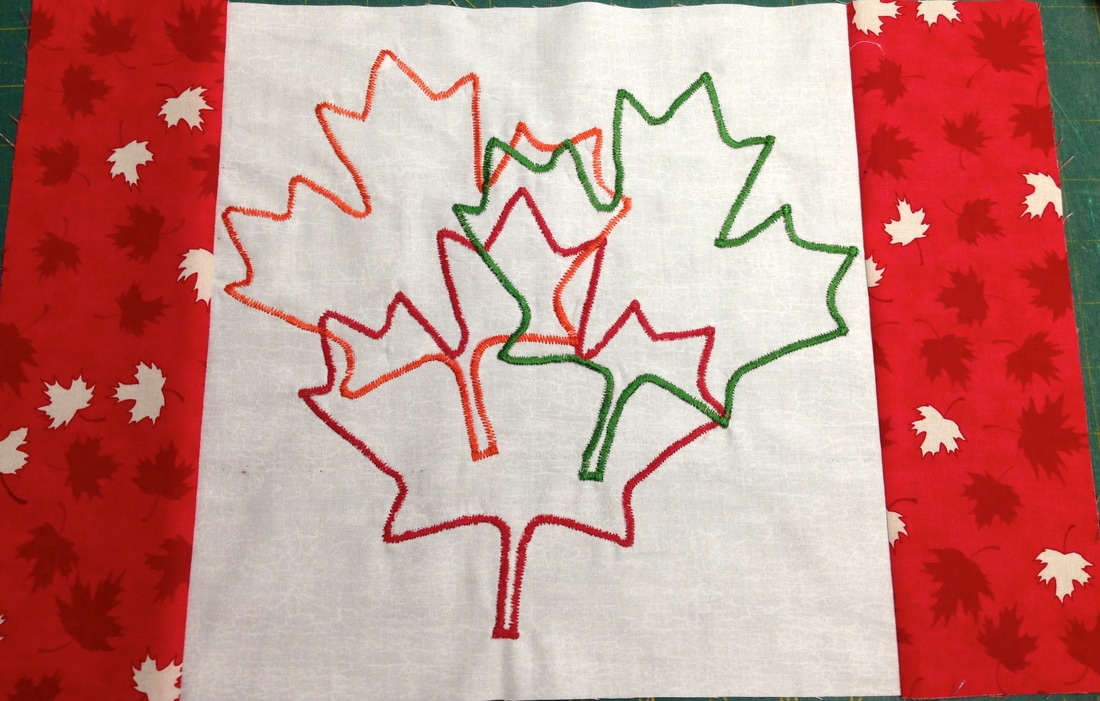 Sew the 16 1/2" strips to the top and bottom of your block, see below: 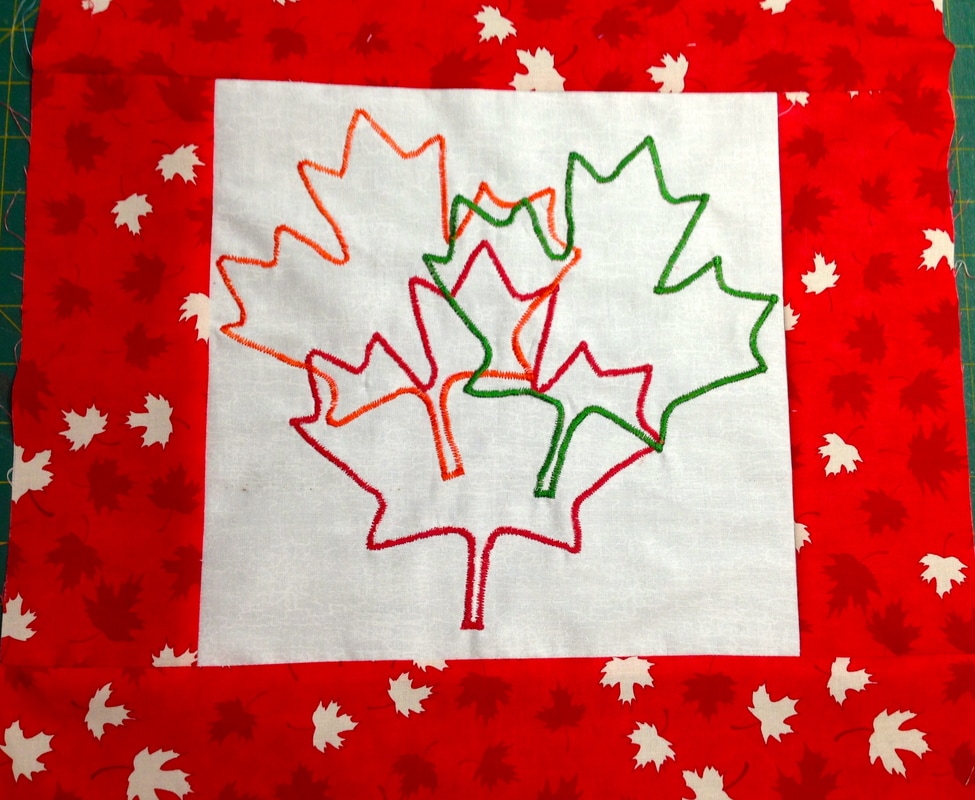 Your front of bag is completed, square it up to 16 3/8" x 16 3/8" Sew your back square fabric to the bottom of the front square right sides together. See below: 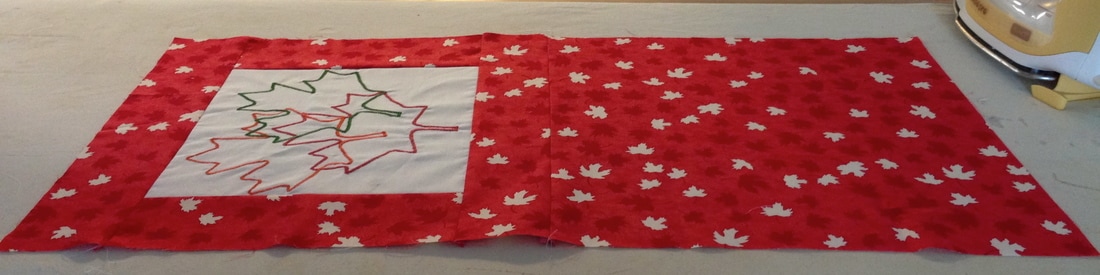 Quilt your top only to the batting with any pattern you desire, I just meandered mine. You could also just use fusible interfacing if your do not want to quilt it. Interfacing will give it body as well. See below: 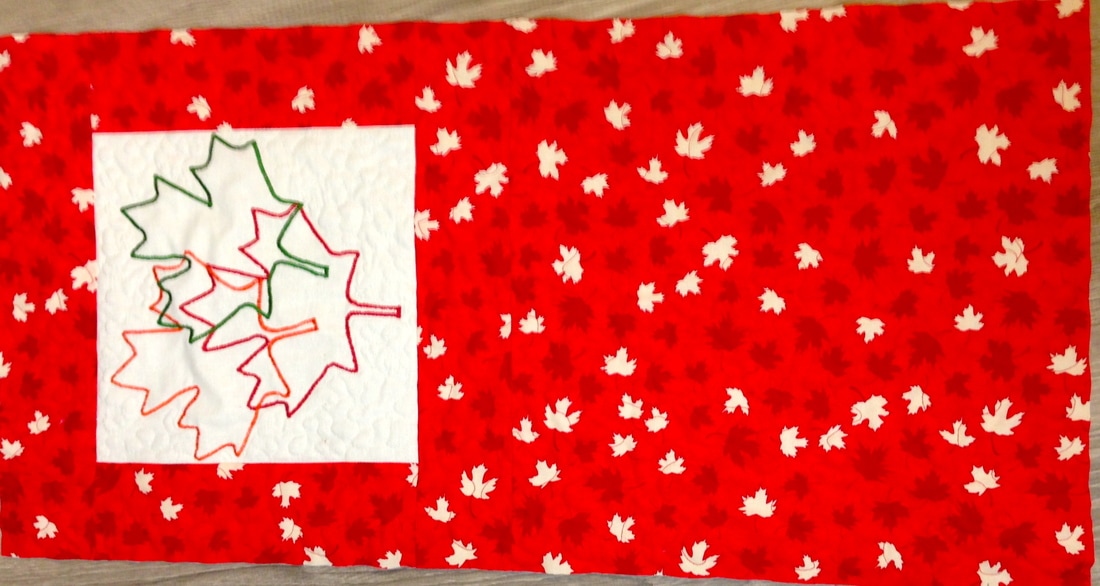 Fold your quilted/interfaced bag front in 1/2, right sides together and sew up the side seams. See below: 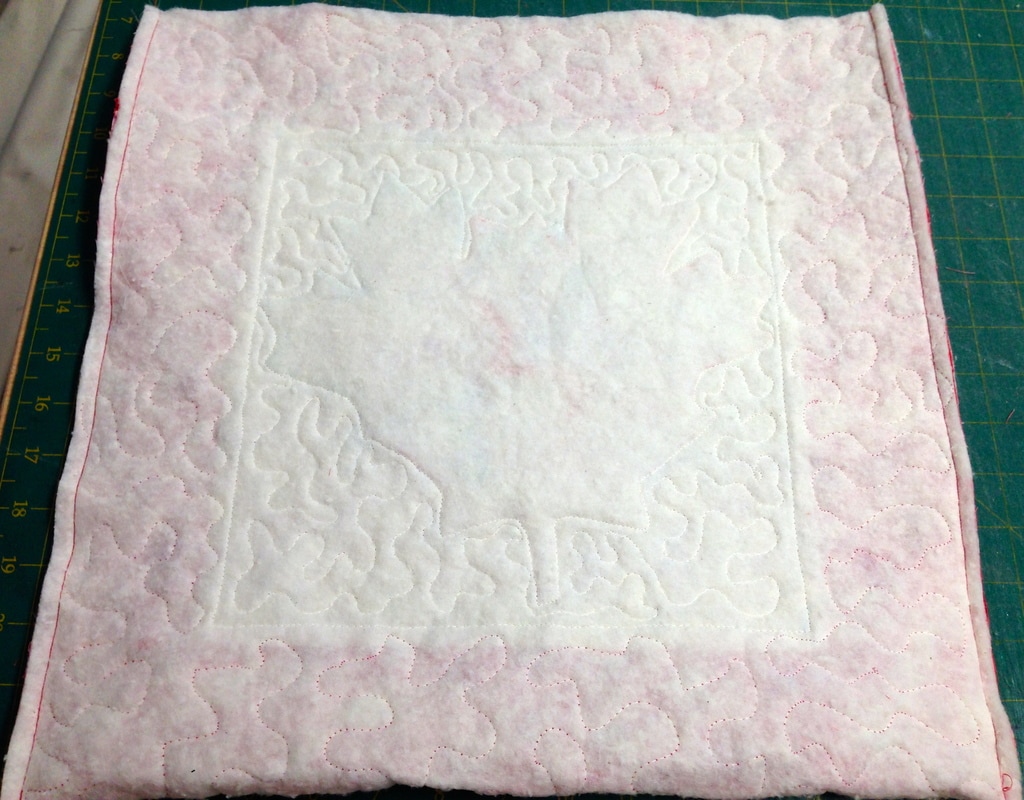 To box the bottom of your bag, mark a line 1" Up from the bottom corners of your bag on both sides. Sew on these lines and clip corners. See below: 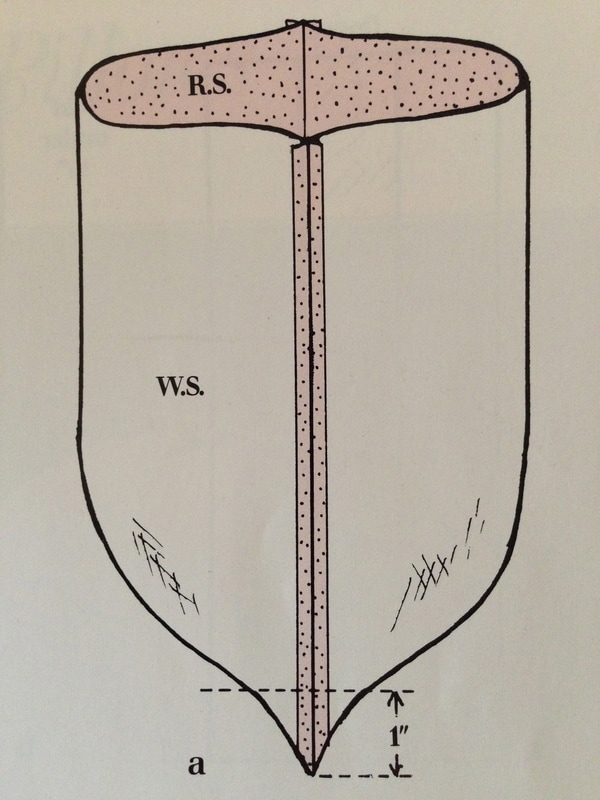  Fold your lining piece right sides together and sew up one side. On the other side sew, leaving a 3" gap for turning. Box the bottom corners as you did for the outside of the bag. See below: To make your handles, pin your webbing piece in the centre of your 3 1/2" x 20" handle fabric (wrong side) and sew it down the centre. See below: 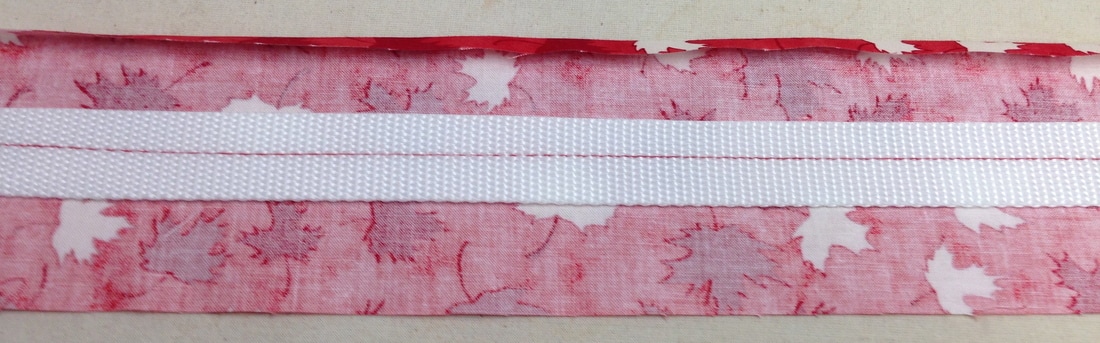 Press one side down 1/4", see above photo: Press the raw edge over the webbing, See below: 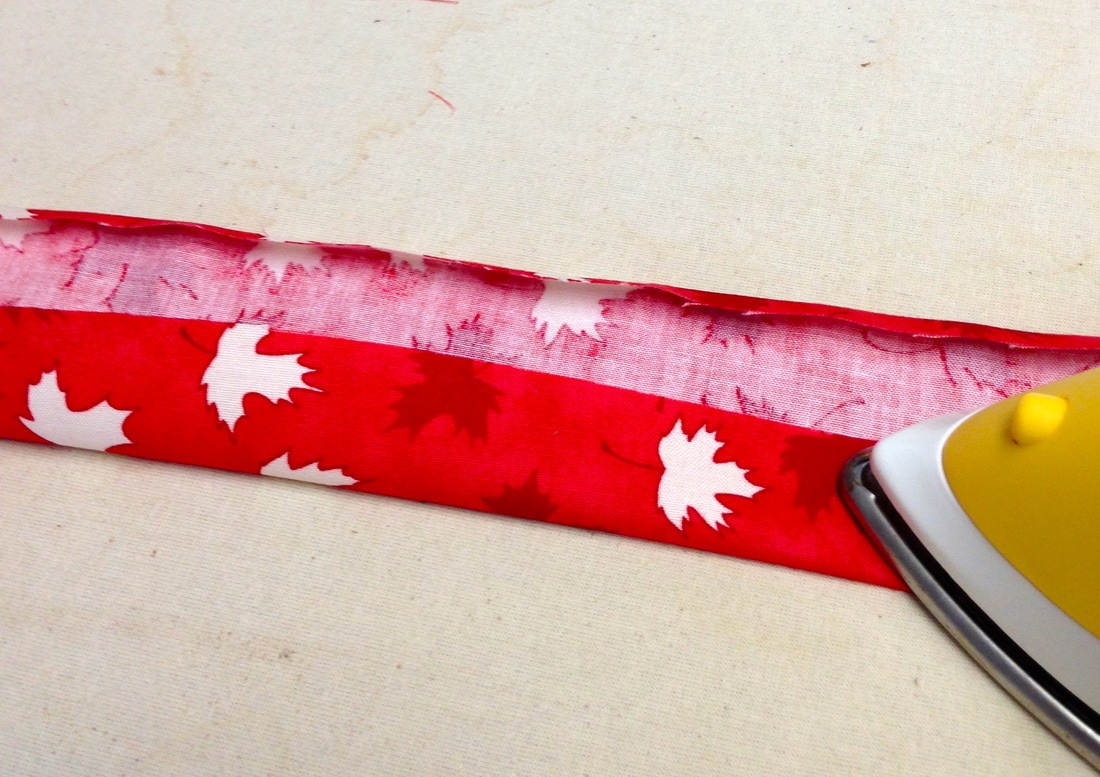 Press the 1/4" folded edge on top of the raw edge as below:  Top stitch to catch folded edge and alternate side (about 1/8" from edge). See below:  I was able to machine stitch through all layers like butter. If you have any issues with the thickness, change your needle to a top stitch or jeans needle as they will be stronger than quilting needles. Make 2 handles this way. You now have 2 very strong handles and it's a simple method for all bags. These handles are also very flexible. Pin and sew your bag handles onto the right side of your bag front and back 5" in from the corner on the right and left side & 1/8" from the top of the bag. Make sure your handles do not get twisted. See below: 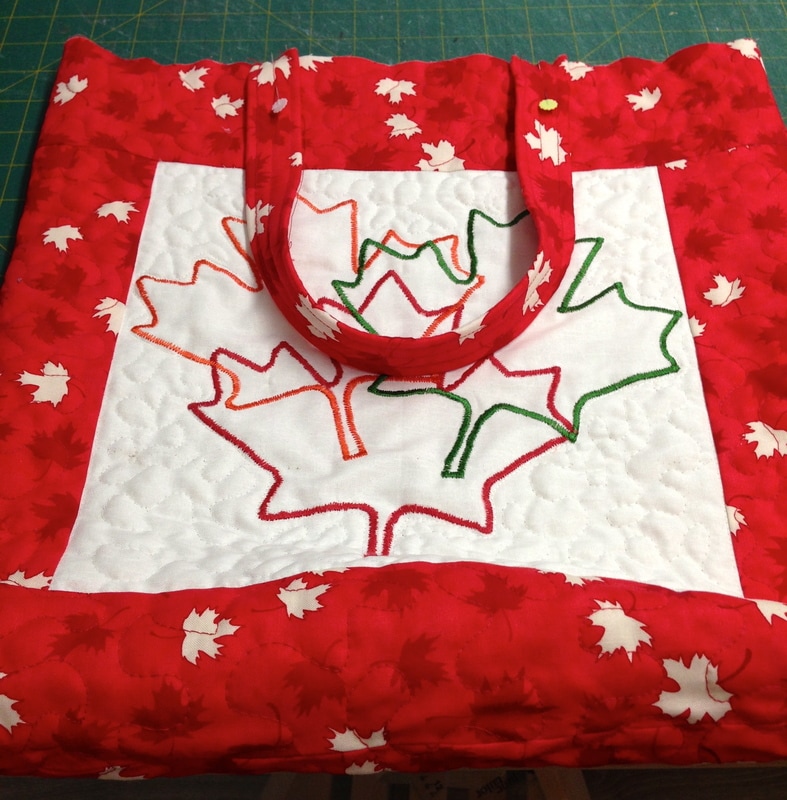 Front of bag 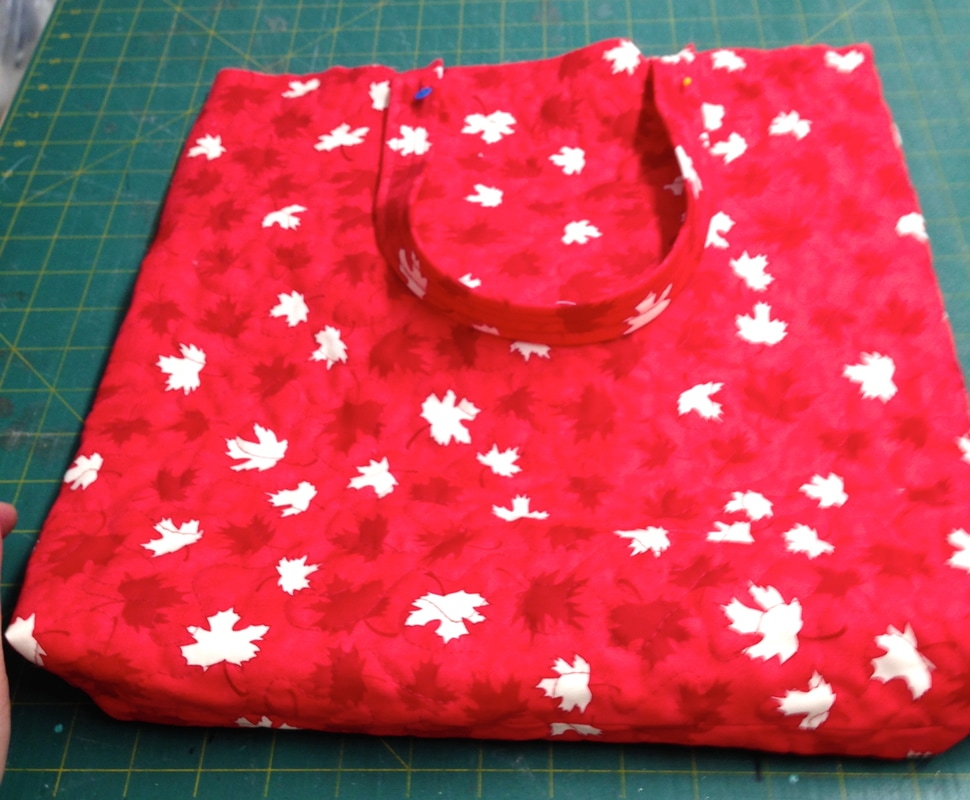 Back of bag 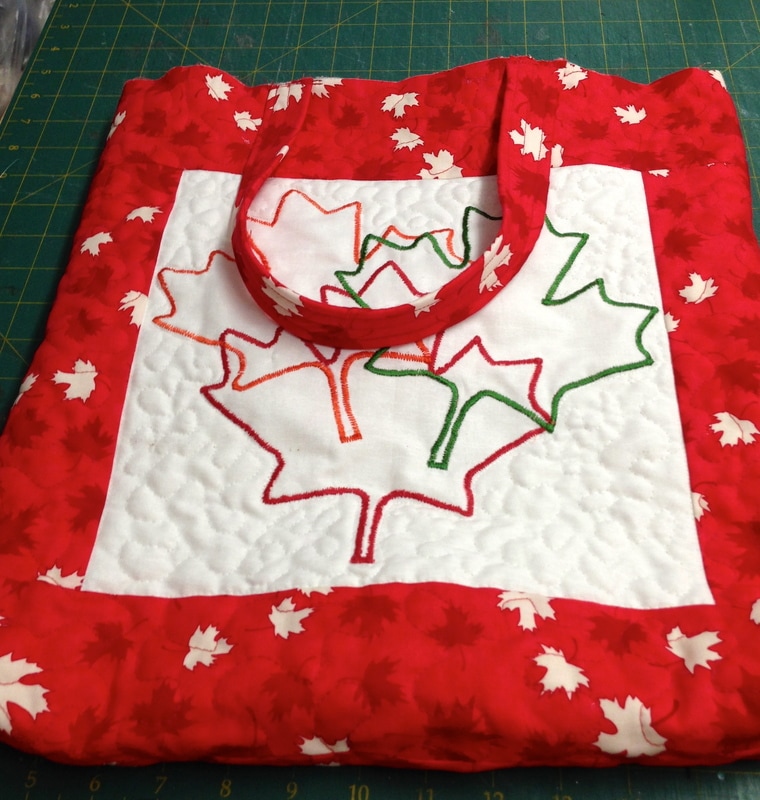 Sewn 1/8" from the top edge Insert the outside of your bag (right side facing out) inside the lining with right sides together. This will seem weird but trust me it works. See below: 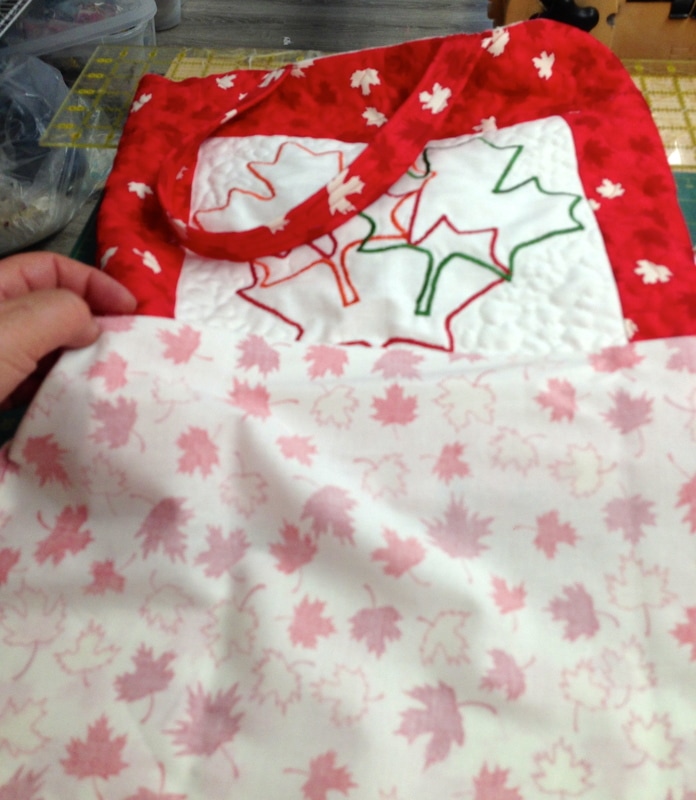 Make sure the handles are facing down and pin all side seams to match, pin around the top edge of the bag and sew. See below: 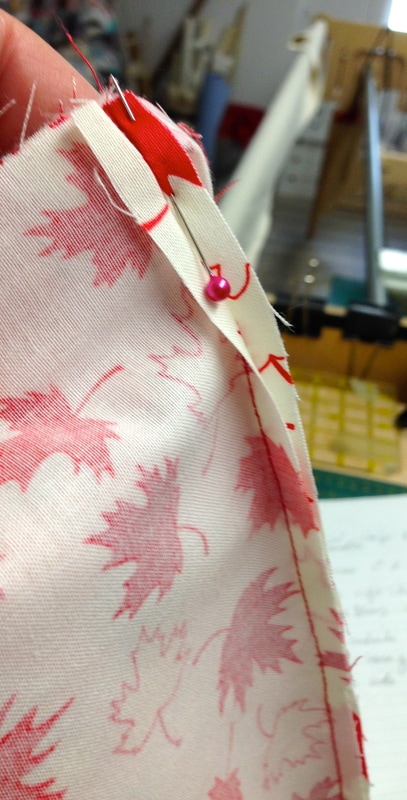 Lining seams and outside of bag seams pinned to match 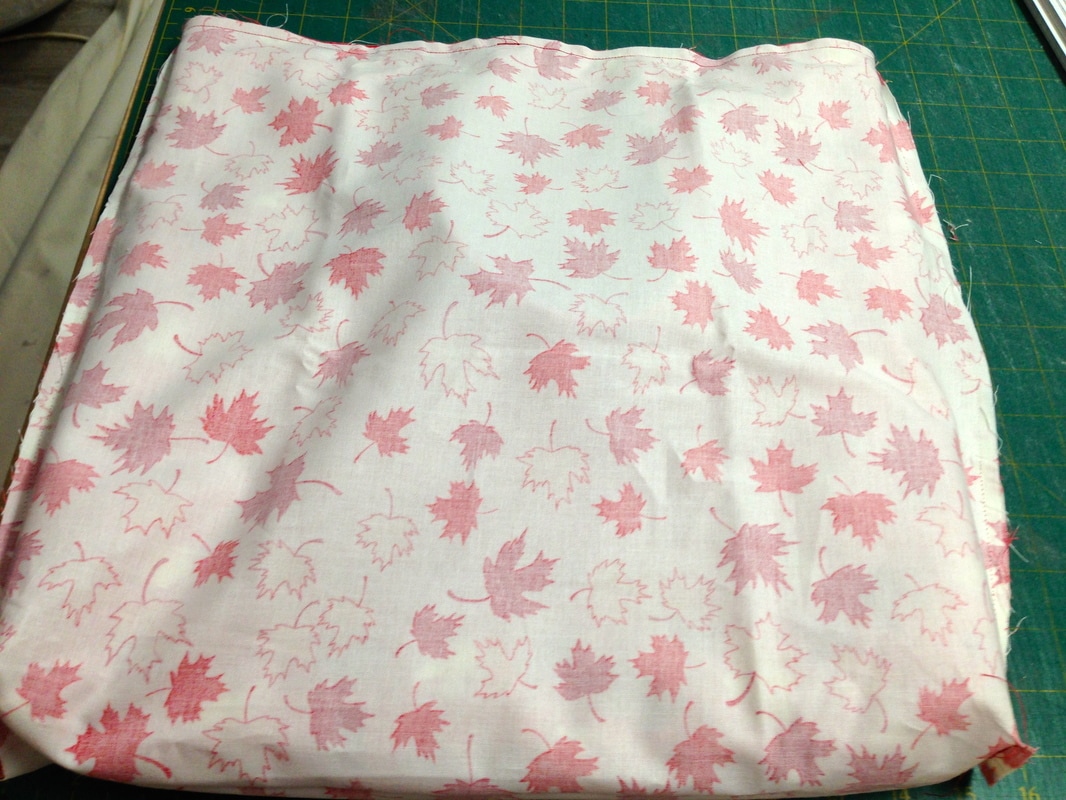 Top edge is sewn Using the gap you left in the lining pull your outside of the bag through the opening. See below: 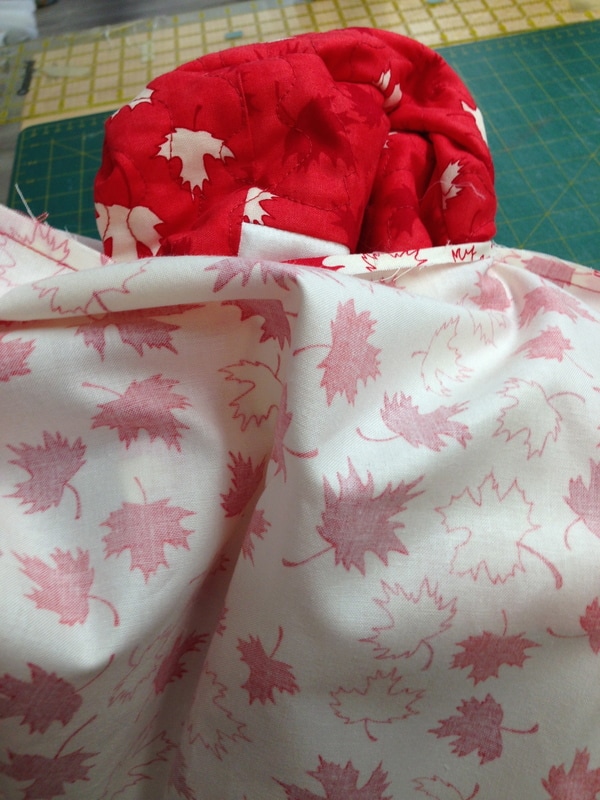 Once you have the entire bag out, tuck the lining back inside the bag, it's permanent home! Sew the gap closed on the lining inside by hand or by machine, your choice. Press the lining down towards the inside and top stitch all around the top edge of the bag to finish your bag. Admire your efforts! 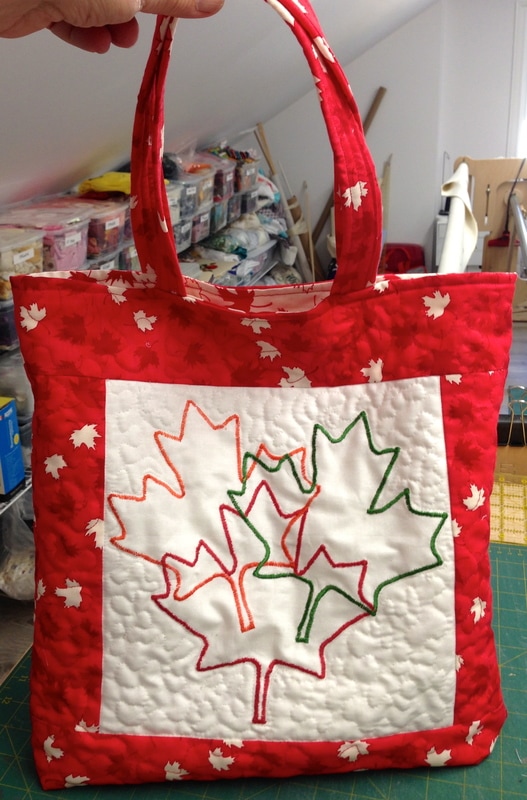 🍁You now have a sturdy bag to go to the beach, holiday or celebrate Canada Day!
I sincerely hope you enjoyed this simple tote tutorial and that you will try my handle method! Happy Friday! Enjoy some lovely weather this holiday weekend!
I recently attended a sewing and quilting event and saw the below amazing IRON ON Transfer Pens being demonstrated and decided I "NEED" them!
LOL, yes I definitely can use them. Wow I am so excited about what I can do with them. Check out a picture of them below: 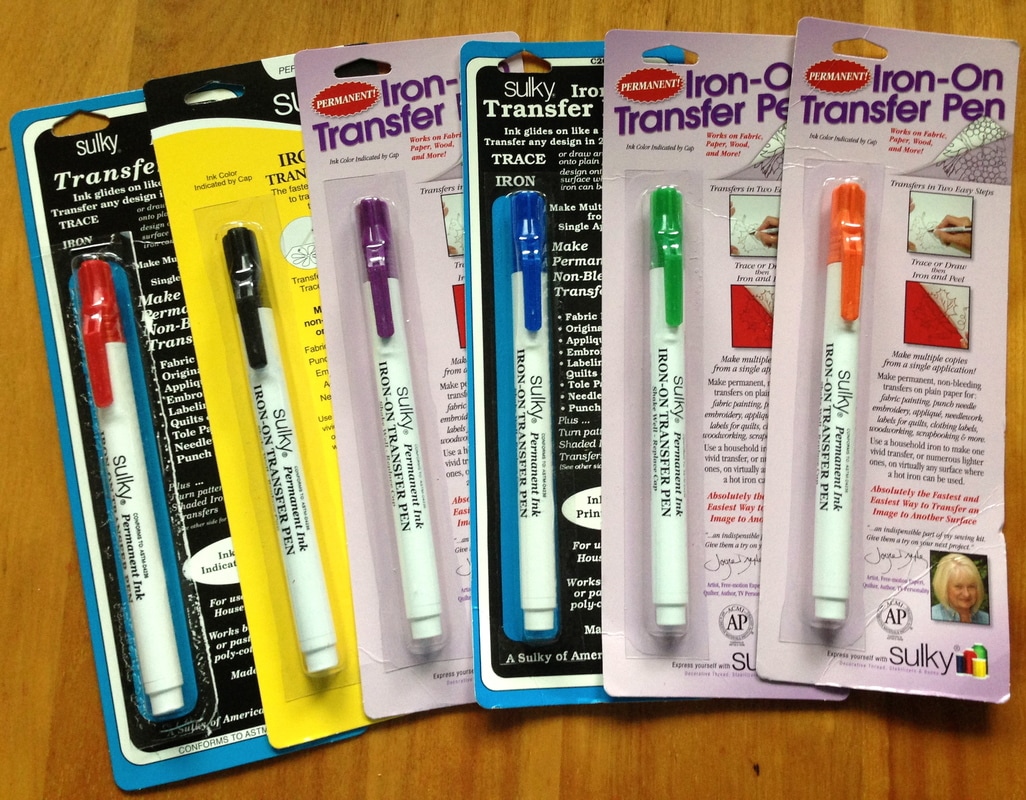
The above are pens I purchased, yes in all different packages because I wanted all of the colours the store had and therefore I had to settle for new and old packaging but they are by Sulky. (All are working great even older packaging).
Now you are wondering .... What to do with these??
I will show you below how they work first and in future posts, what I will be doing with them.
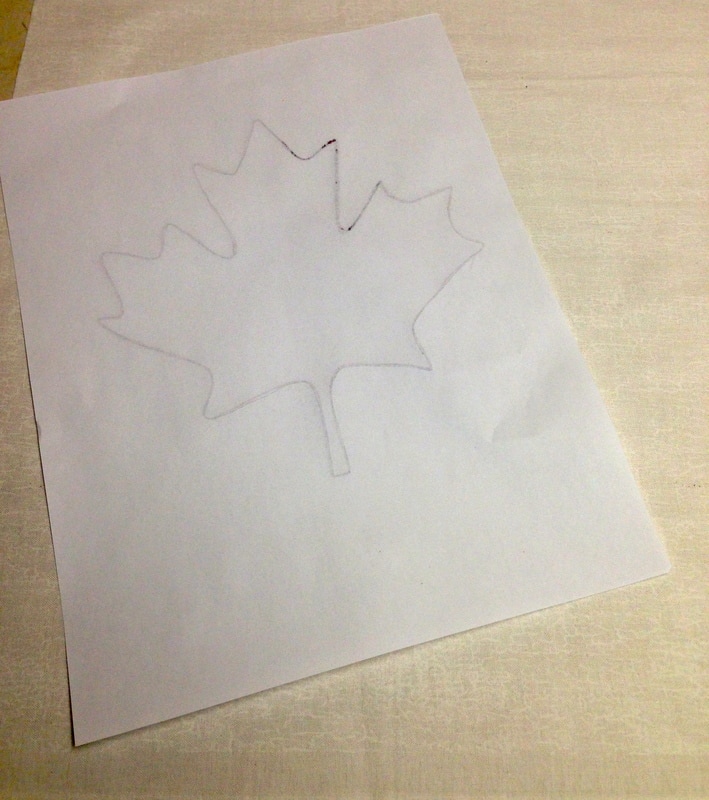
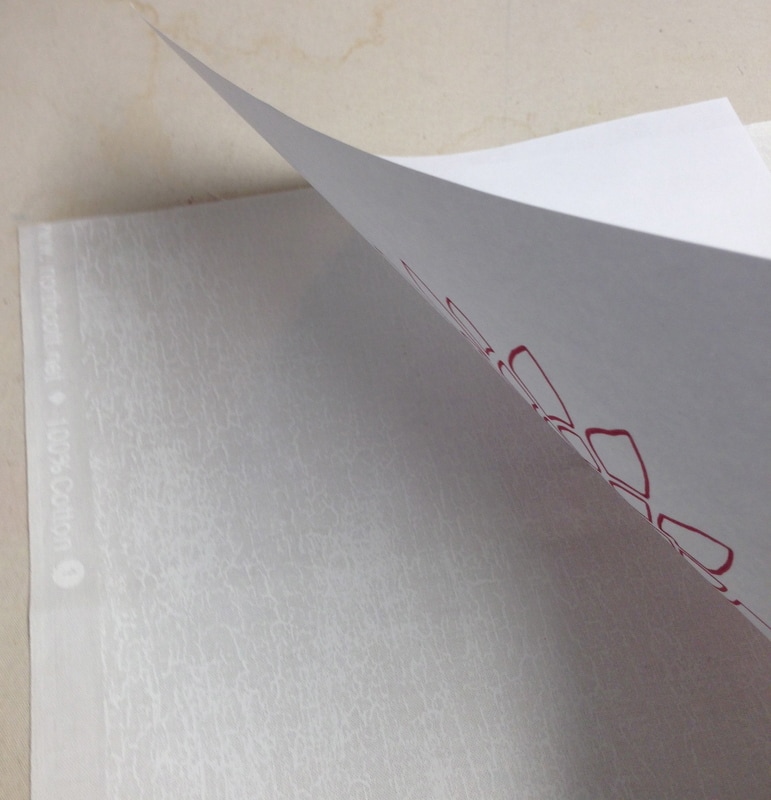
1. Draw out a black line design. There is a free PDF download of a maple leaf in the Shop/ Free PDF Patterns section of this website here. This is the design I am using first. You could use any design or stencil you already have as well. I have a project planned for the maple leaf so this is why I am using it. See below traced out black line design:
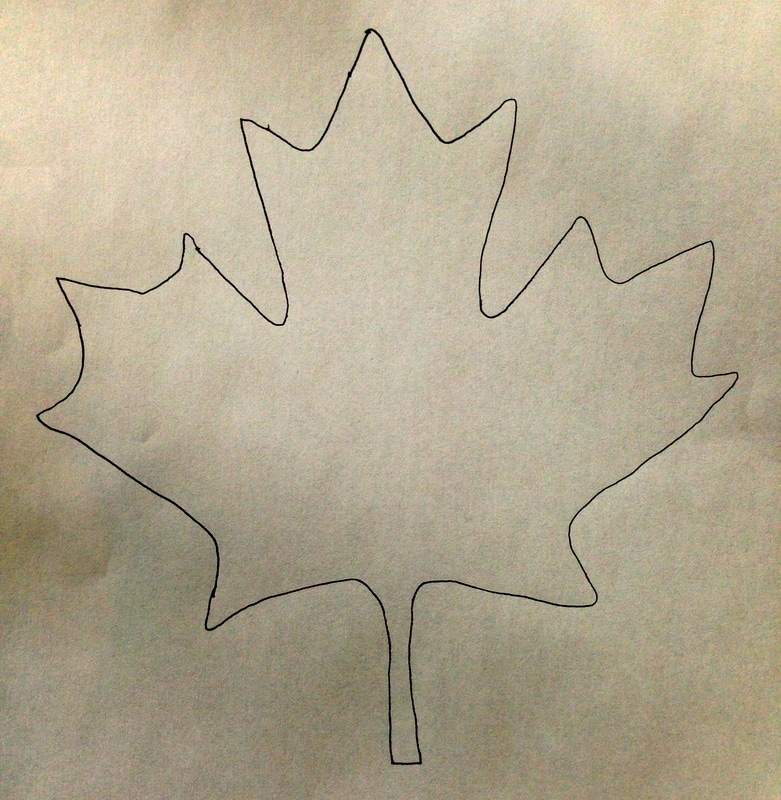
Maple Leaf Pattern Traced out on white paper with a black sharpie marker
2. Cut out a piece of fabric you would like to transfer your design to. I am just going to use a piece of white fabric because I will later insert it into a project. See below:
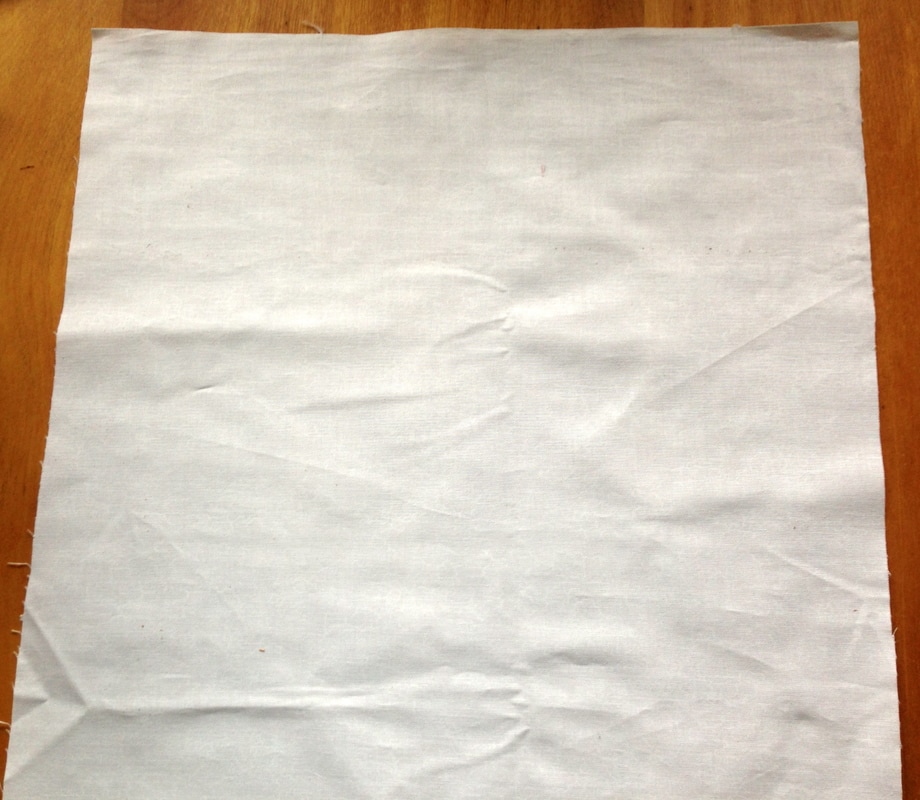
14 x 14 cut square of fabric (bigger than what I need so I can play!)
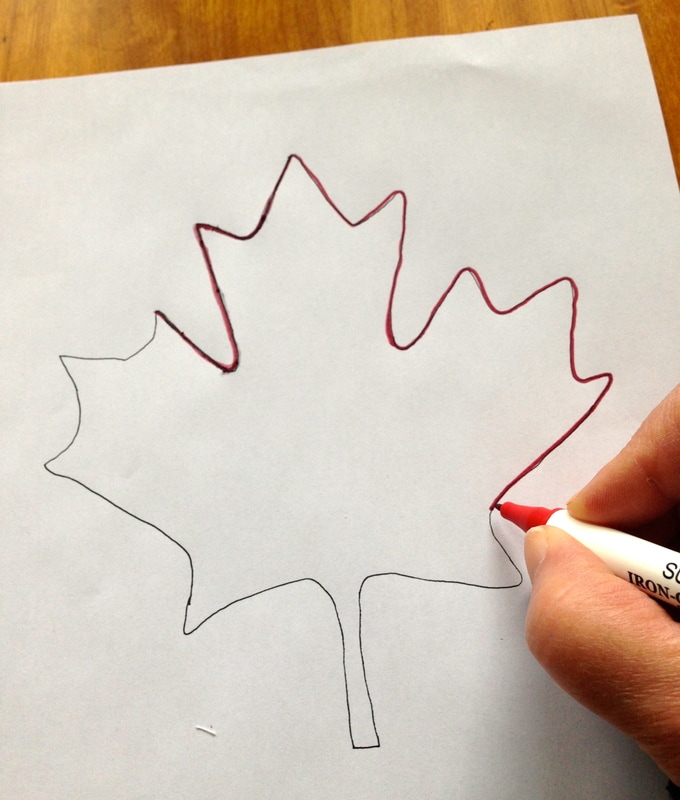
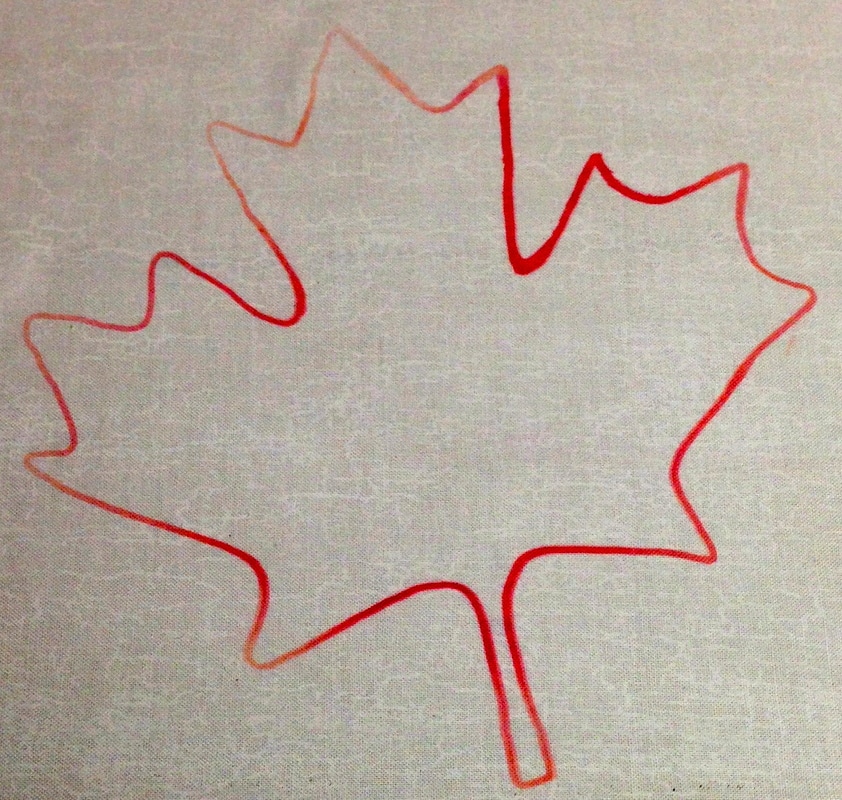
3. Shake up your pen and draw over your black line design with a sulky iron-on transfer pen ( I used red for the first maple leaf).
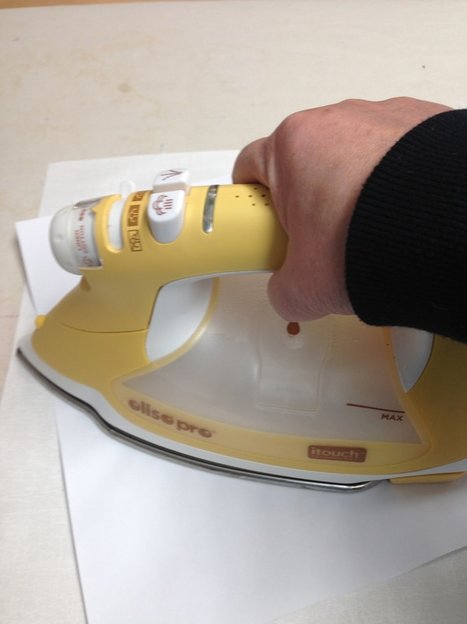
4. Heat set your fabric with an iron. Simply iron over it to warm it up to prepare it to take the ink.
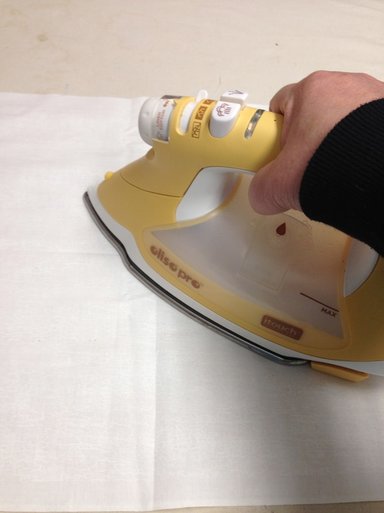
5. Press your image ink side down to right side of your fabric and press. Do not slide your image or iron, press in all areas of the design with a cotton heat setting (if using cotton). Works best with cotton and cotton/poly fabrics per instructions on package
6. Check it out below! The ink is vivid and red and lovely, I am really impressed.
7. So I pressed 2 more with the same inked image (inked only once!). The instructions states you can use the inked image 3-4 times.
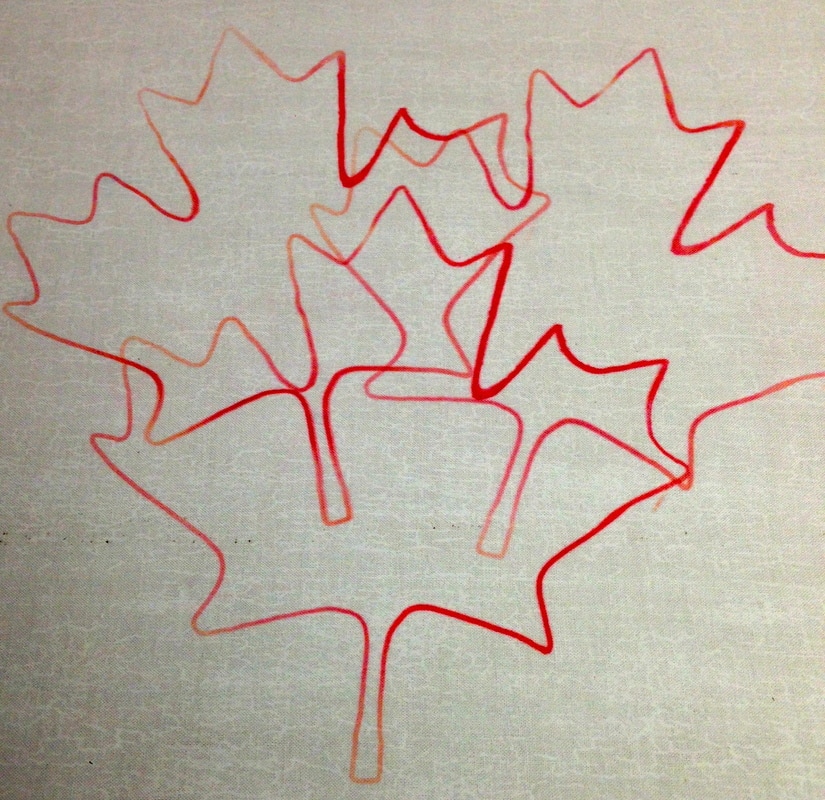
8. I decided to use the pens as a marking tool only with this project. See how I satin stitched these leafs below:
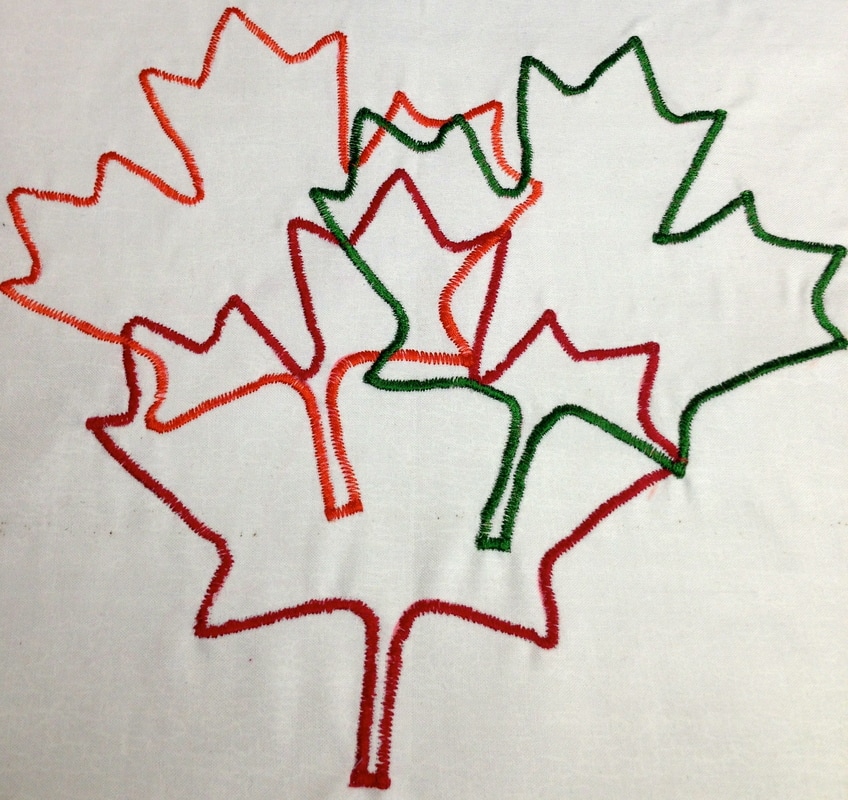
Maple leaves drawn with Sulky Iron-on Permanent Ink Transfer pens and then satin stitched.
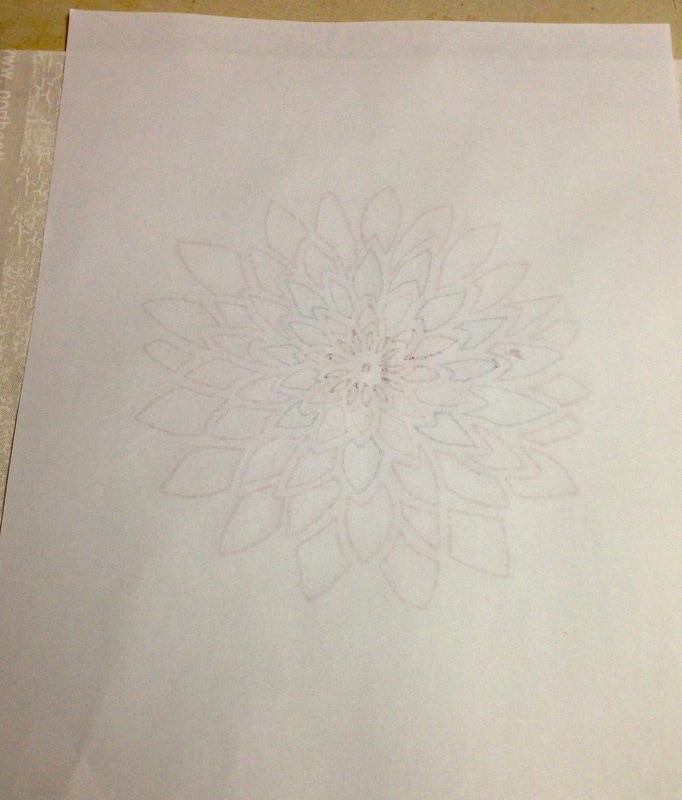
Another wee project idea... use your quilting/scrap booking/craft stencils, ink the design directly onto paper (no black line drawing needed as the stencil is your guide) and then transfer to fabric. See below photos where I am using the ink purposely to make it be the design element. Its easy as 1, 2, 3
#1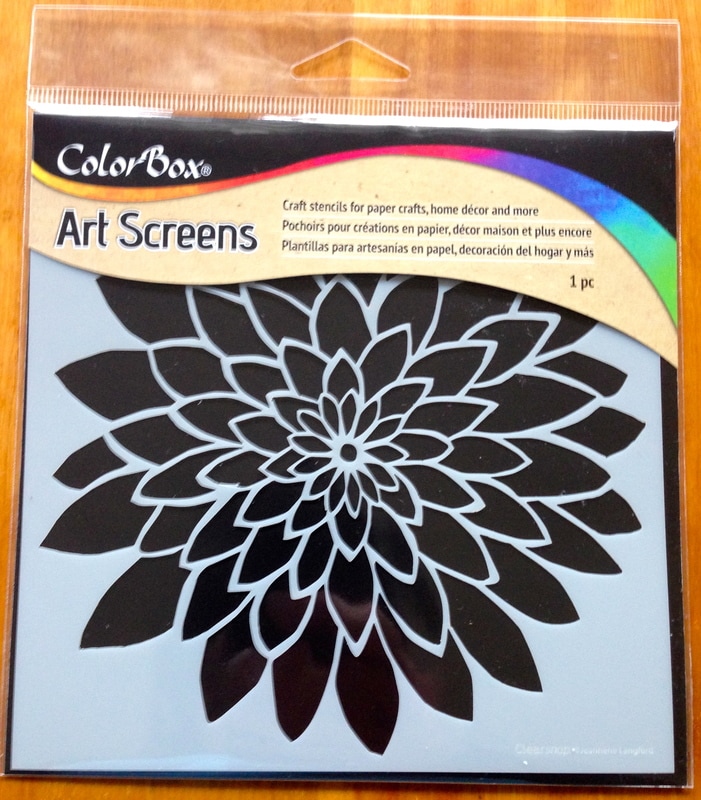
choose a stencil
#2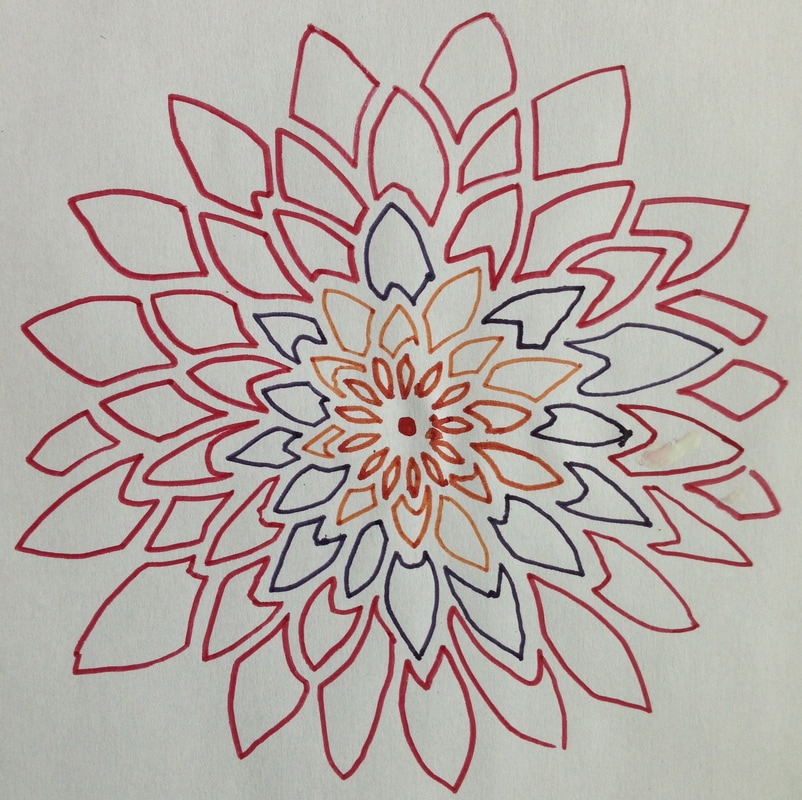
Trace out the stencil with your transfer ink onto paper
#3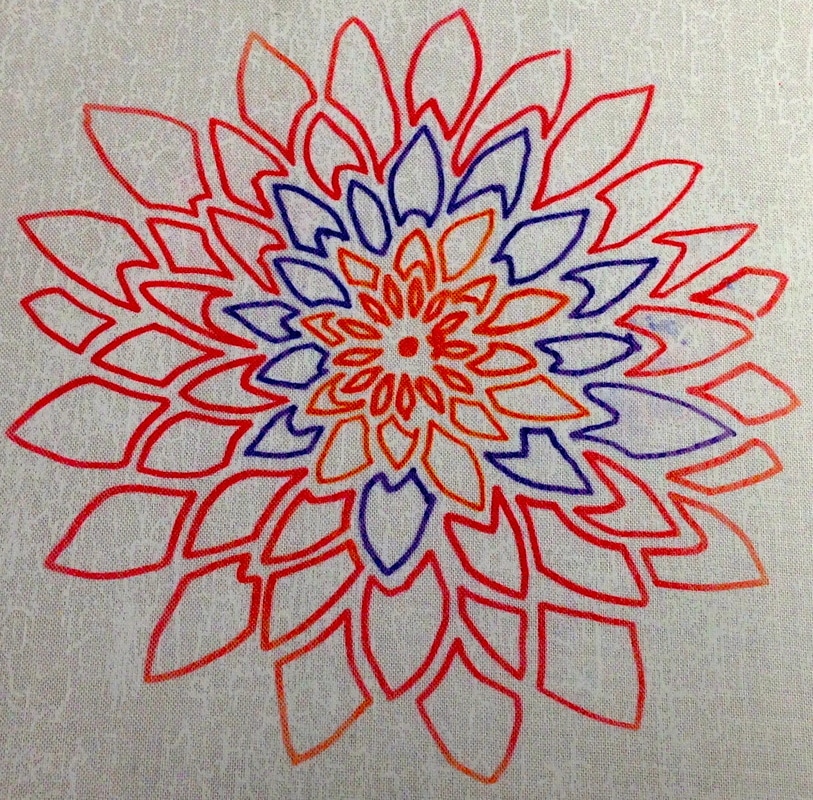
Heat set blossom design with an iron and transfer ink onto fabric
There are many possibilities with both of the leaf and blossom image, I could use them as quilt blocks, embellish something with them ... a pocket, a bag front, pillows, make quilt labels, home dec etc. The sky is the limit!
The important thing is these Sulky Iron-on Transfer Pens allow you to transfer images with ease and no printer required unless you want to search for images on line and use them. They are awesome! 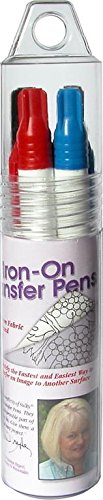
You can purchase them as one colour or as sets
Check back over the next few weeks to see what I do with the above images.
I hope I have inspired you today in some way! Happy Tuesday ☀️Hoping for sun! Need to make many "make ahead gifts" for Canada's 150th birthday celebrations? It's coming fast and furious this July 1- don't let the snow here is Canada fool you! Time has a crazy way of getting away from us. This is a quick idea, a heat resistant pot holder. Tie on an authentically Canadian recipe, add food, decorations and activities and your party is planned! I made these 10 pot holders for an upcoming ladies event I will be attending where we will be entertaining another group of ladies and the theme is Canada Day. The pot holders will be their take away gift. There is a free PDF download of the maple leaf appliqué available here. 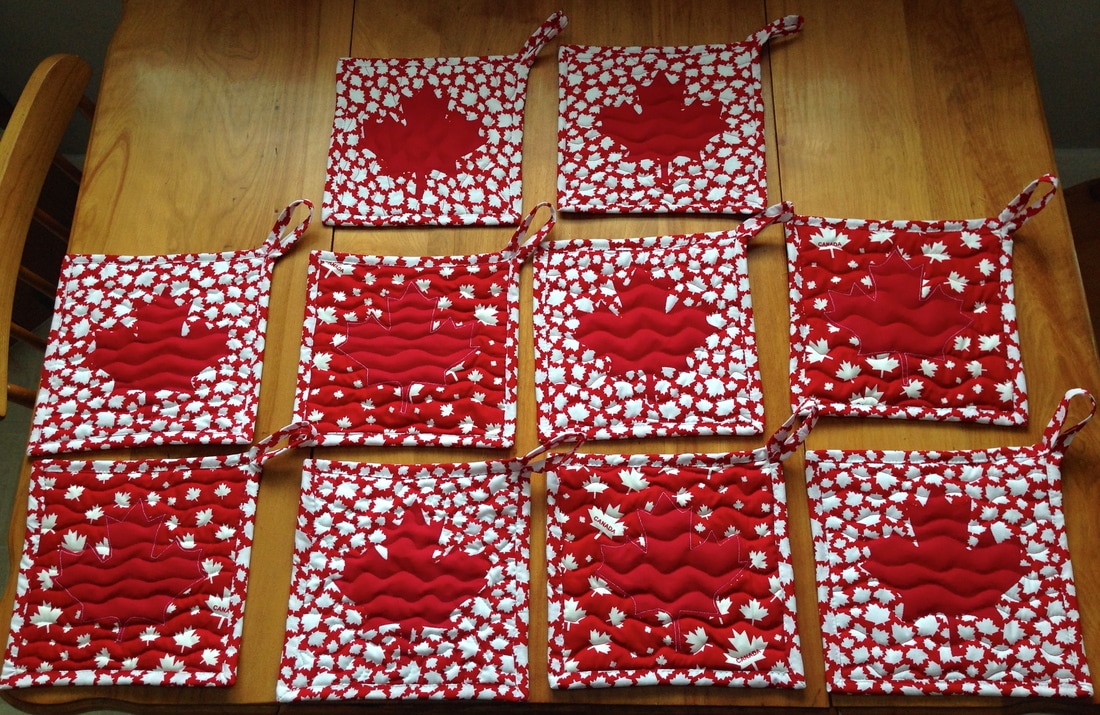 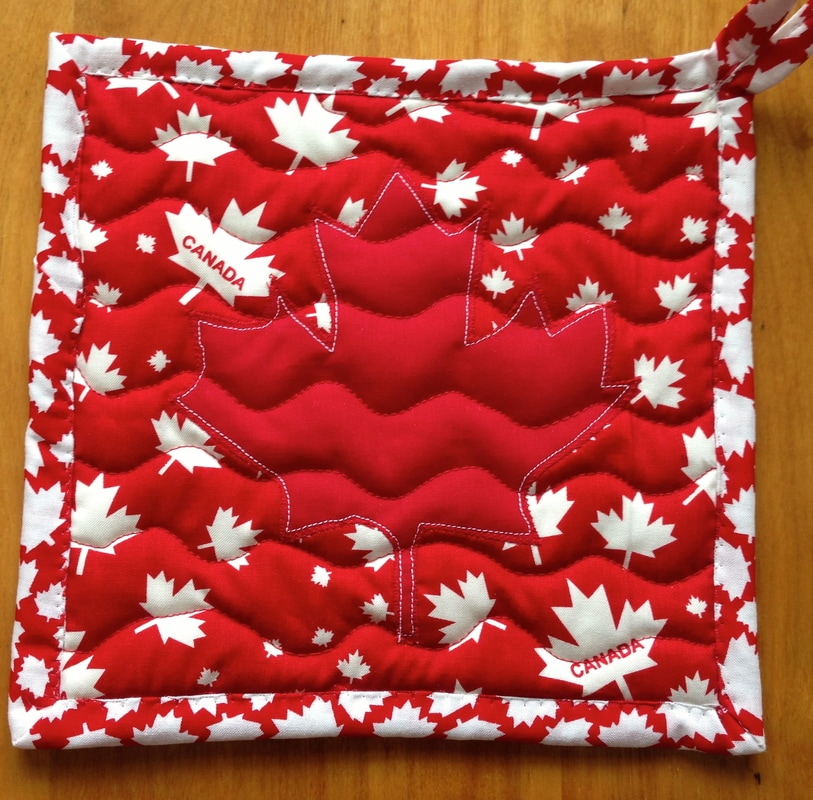 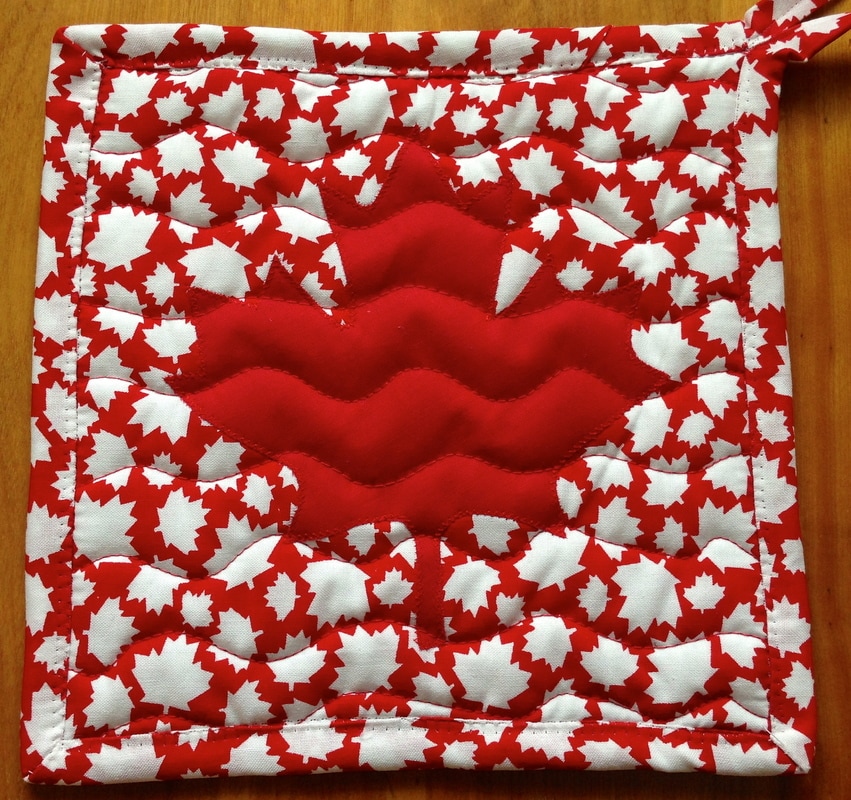 To make the pot holders: 1. Cut a piece of backing fabric, Insul-Bright and front fabric - 9 x 9", Cut one strip of binding fabric 2 1/2" x width of fabric What is Insul-Bright? Insul~Bright is a needle-punched, insulated material ideal for crafters. ... The needled material is breathable and won't break down with washing. The polyester fibers resist conduction while the reflective metalized polyester film reflects radiant energy, hot or cold, back to its source. I know I have talked about this product before (ad nauseum!) but it is wonderful for use on pot holders, trivets, oven mitts etc. Anything where you need to protect your hands from heat. It is also relatively inexpensive and quilts just like quilt batting. I would never be without it! If you follow my blog, this is what I used for my double ended oven mitts. See what it looks like below: 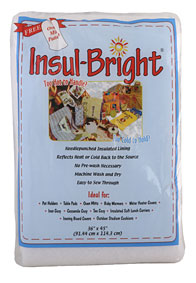 2. Download my free maple leaf appliqué here or get it by clicking on the
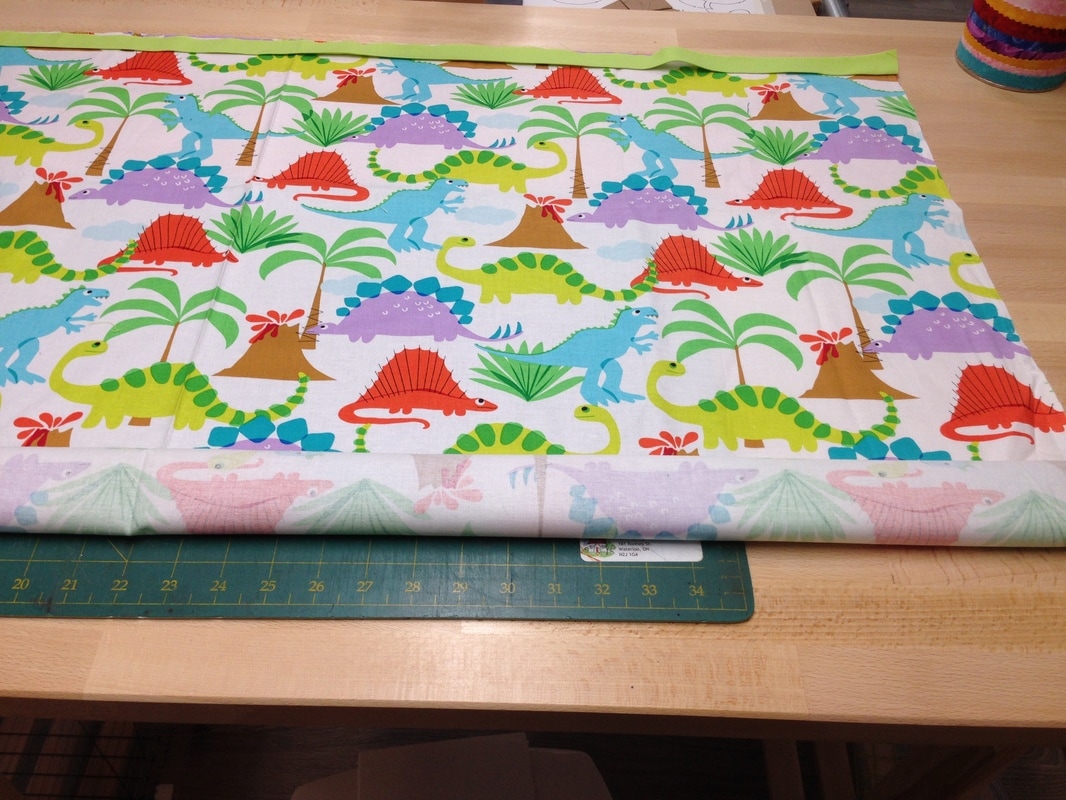
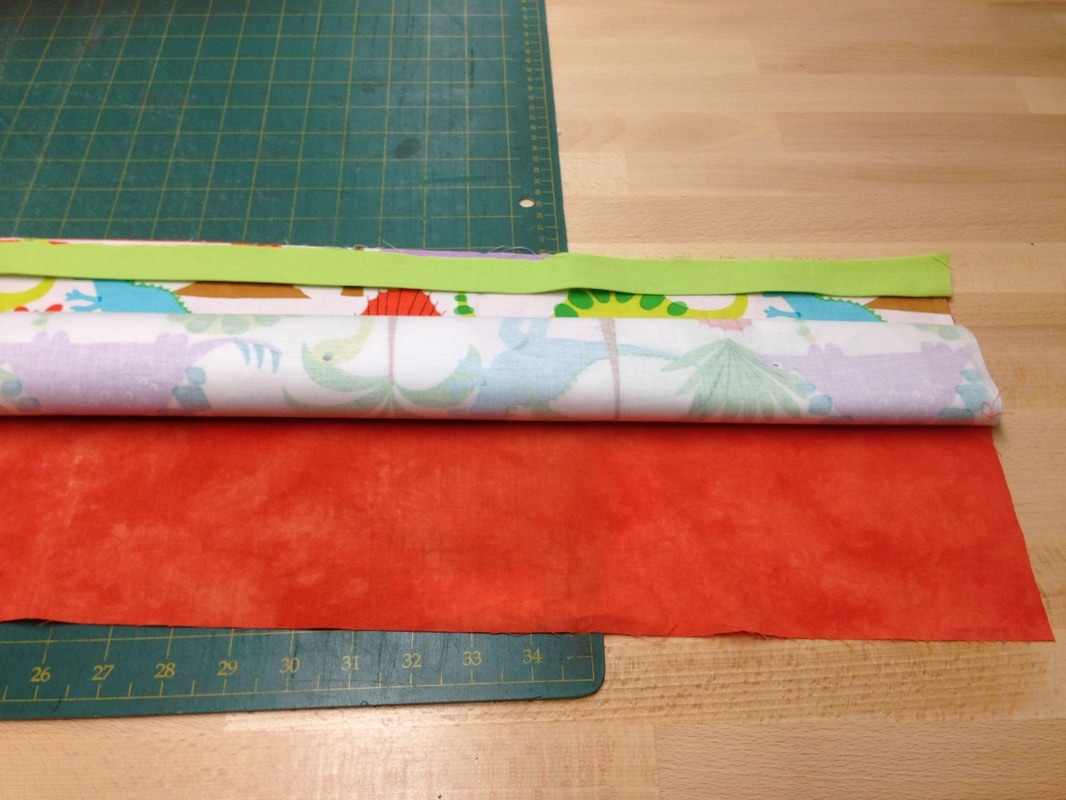
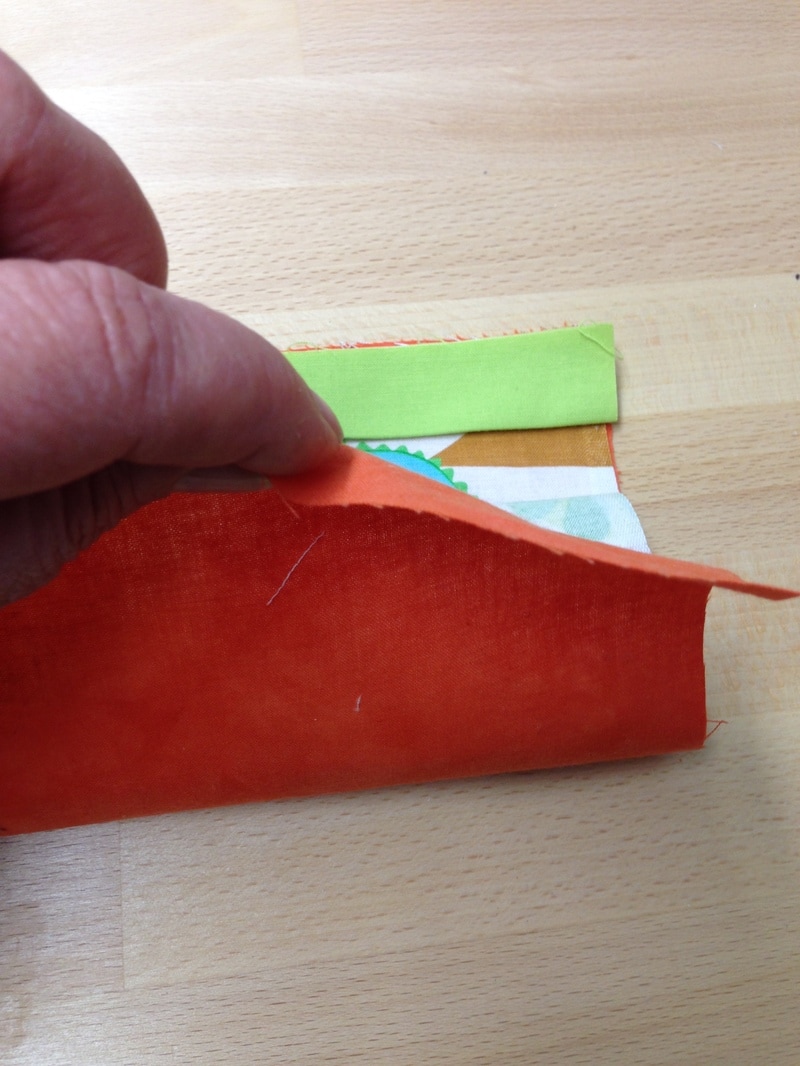
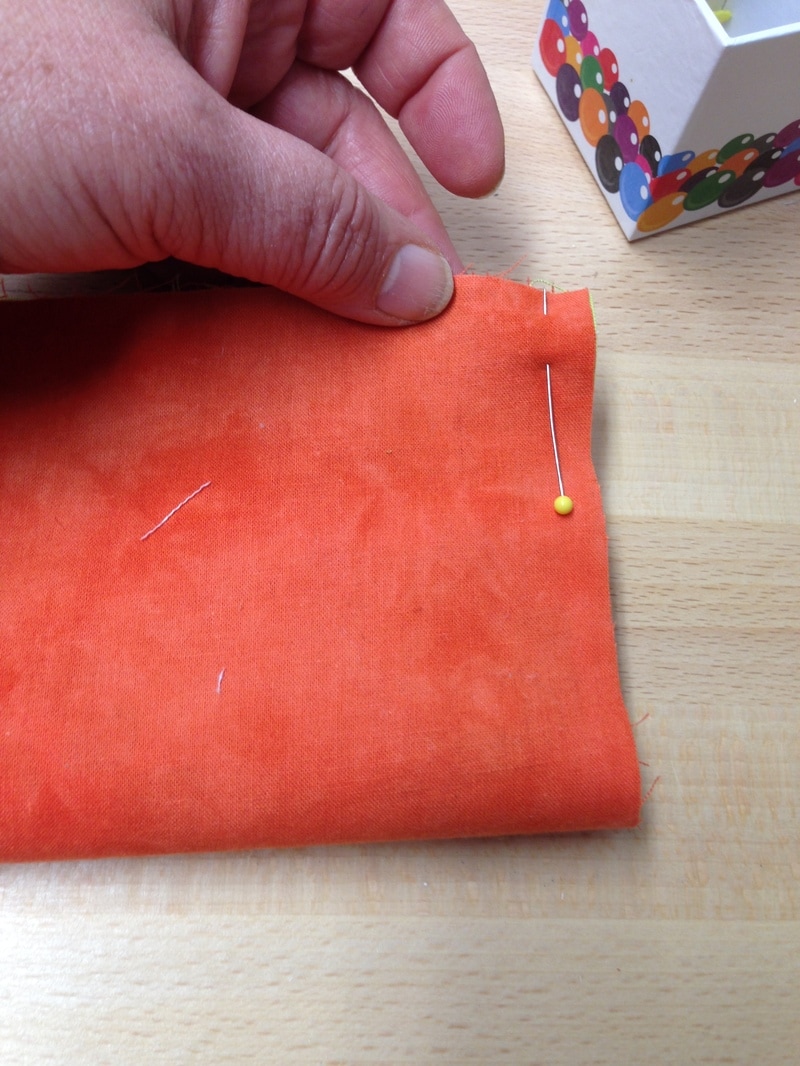
"shop" in the menu above and look for free PDF patterns. Appliqué this with your method of choice to the front right side of your pot holder. 3. Sandwich all 3 layers together as cut, baste and quilt (mine are just wavy lines). 4. Add a binding and I added a loop with 6" of extra binding fabric (folded in 1/2) and integrated into one corner. 5. Attach a "Canadian" recipe with curling ribbon to the loop and you have a unisex gift ready! (Or make a Canadian Apron for those Macho men!) I hope you enjoyed this wee tutorial! Send in pics of your Canada gift ideas, July is coming (we hope after this Noreaster we are about to experience) and I will be happy to post and share!! Happy Tuesday! 🍁 I hope you are enjoying your day! I have been looking at my stash of kids and baby fabric lately and realize I need to use up some of this fabric just sitting around waiting for it to be used. So I am on to another "stash busting" project! What better way than pillow cases? A pillow case uses up about 1 yard (close to 1 meter) of fabric and it's an easy way to have a gift ready for family. It does not have to be made out of "kids' only fabric. It can be made for people of all ages and you can personalize it with a name appliqued or embroidered on it if you like. Todays tutorial is simply how to make the basic pillow case. This "tube" method is so fast and easy, I will never make a pillow case any other way! This is the fabric I chose to get started with: 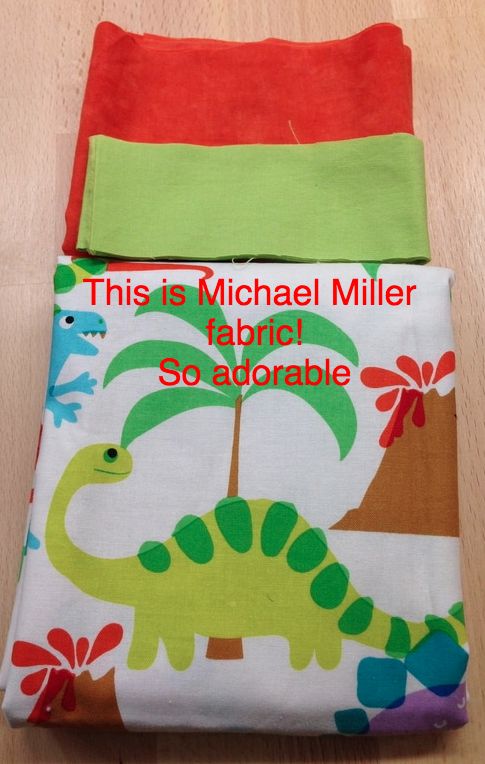 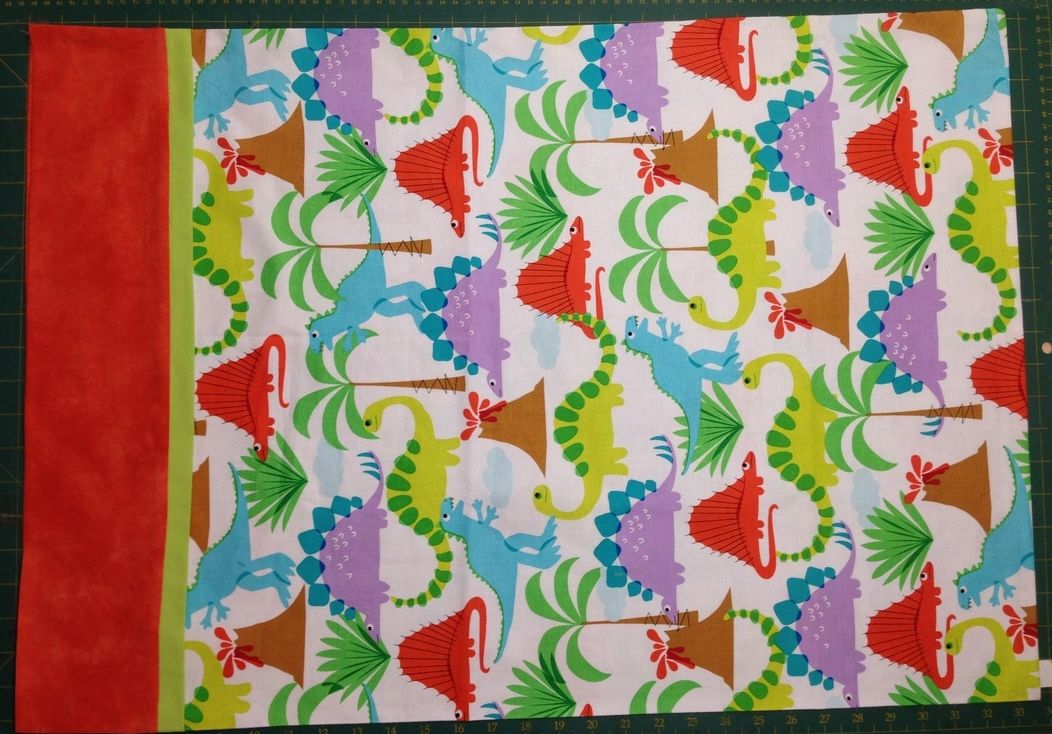 How to make the pillow case: 1) Chose 3 coordinating fabrics and cut 27"x width of fabric of main fabric (dinosaurs), 9" x width of fabric for a cuff, 2" x width of fabric of piping. 2) Lay the fabric on top of each other matching fold lines and cut off selvages through all layers so that you know that all 3 fabrics are exactly the same size. 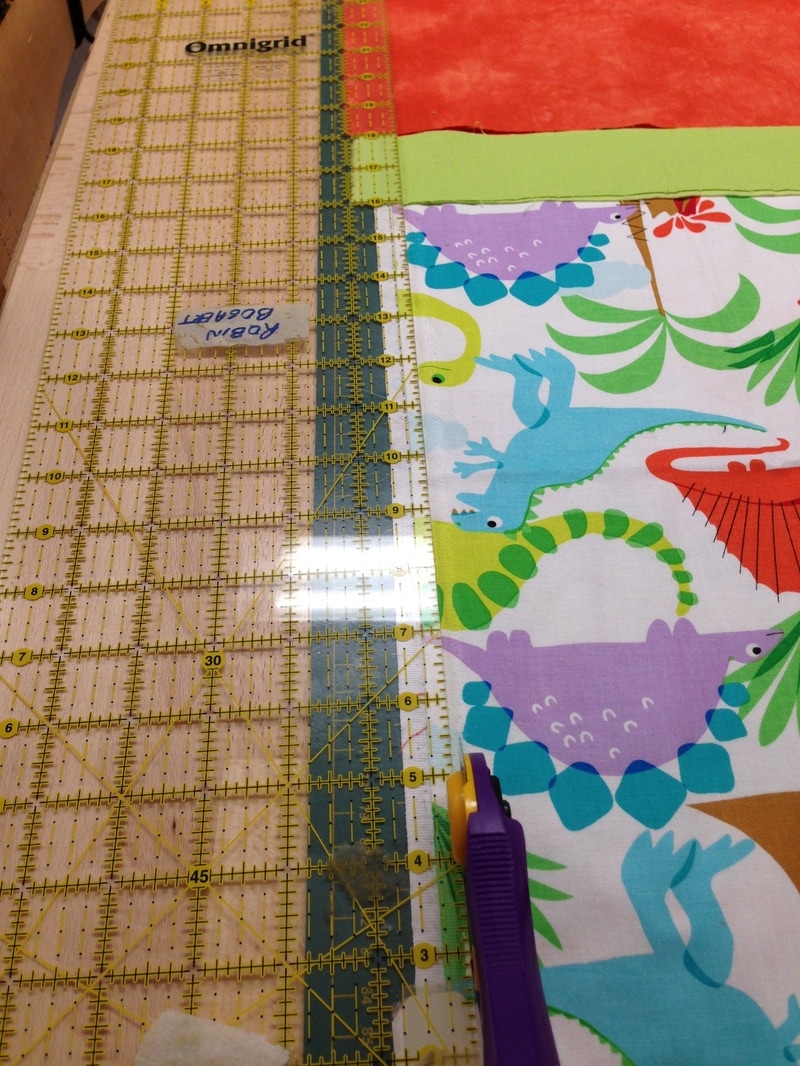 3) Fold the 2" piping piece and the 9" cuff piece in 1/2 on the long side and press well with wrong sides together. 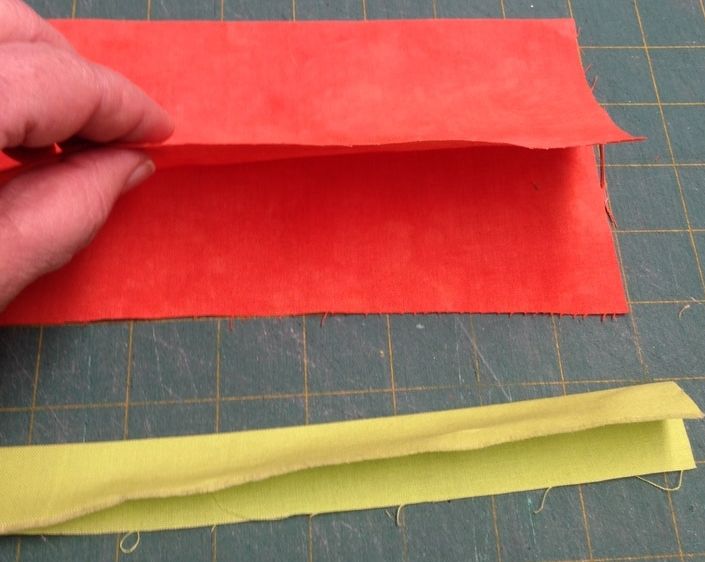 4) Open up your 9" cuff piece and lay it on a flat surface right side facing towards you. 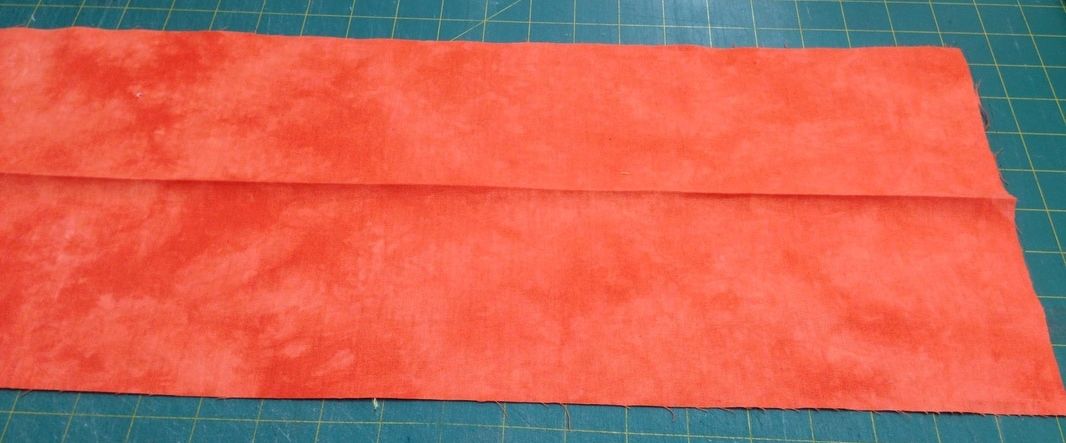 5) Open up and lay your 27" main fabric right side facing up on top of the cuff fabric (I know this seems wierd with wrong side facing right but bear with me!). Match your raw edges. 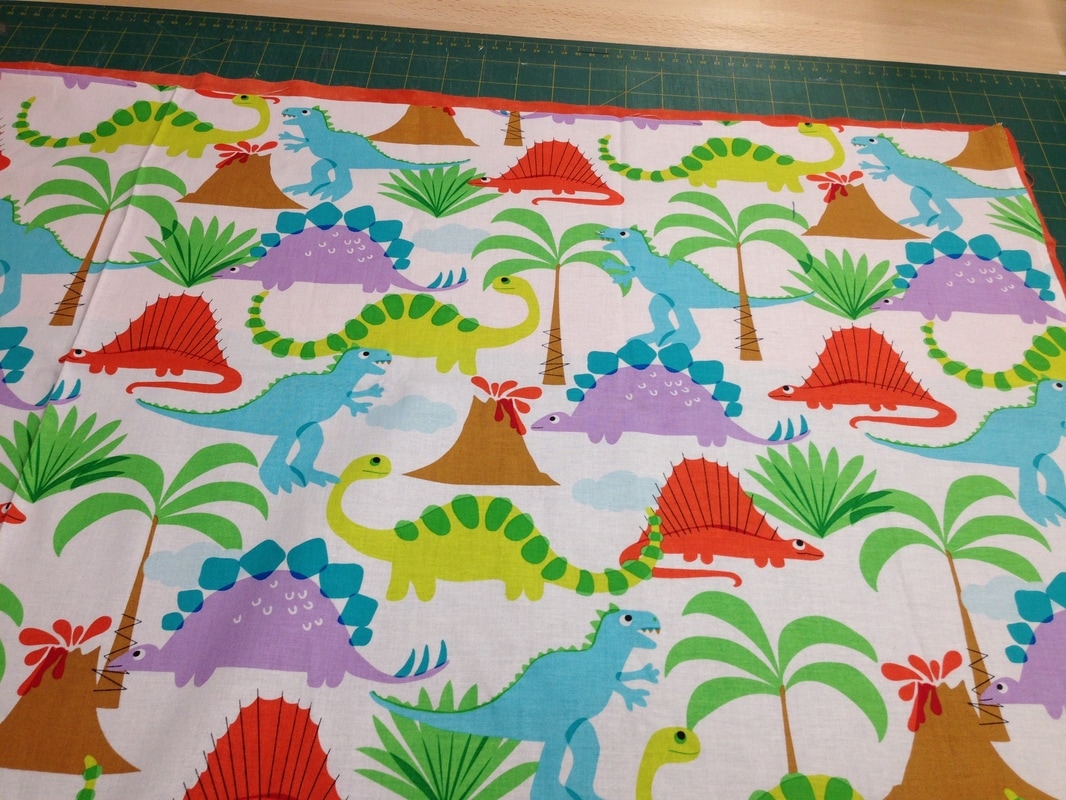 6) Keep your 2" piping fabric folded and lay this piece on top of the other fabrics matching raw edges 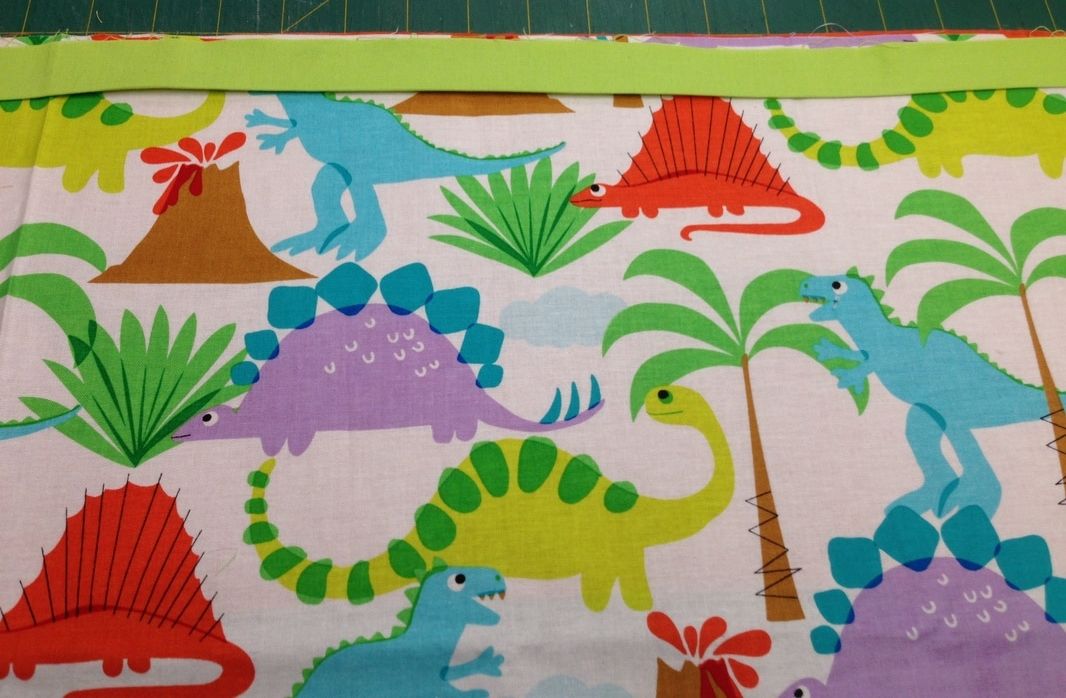 7) Start to roll the bottom edge of your main fabric up from the bottom towards the top edge of all fabrics until you can see the cuff fabric showing underneath your fabric roll. 8) Carefully pick up the bottom edge of the cuff fabric and bring it over top the main fabric roll and piping fabric and pin this bottom edge through all 5 raw edges of the piping main and cuff fabric. You will have a "Tube" 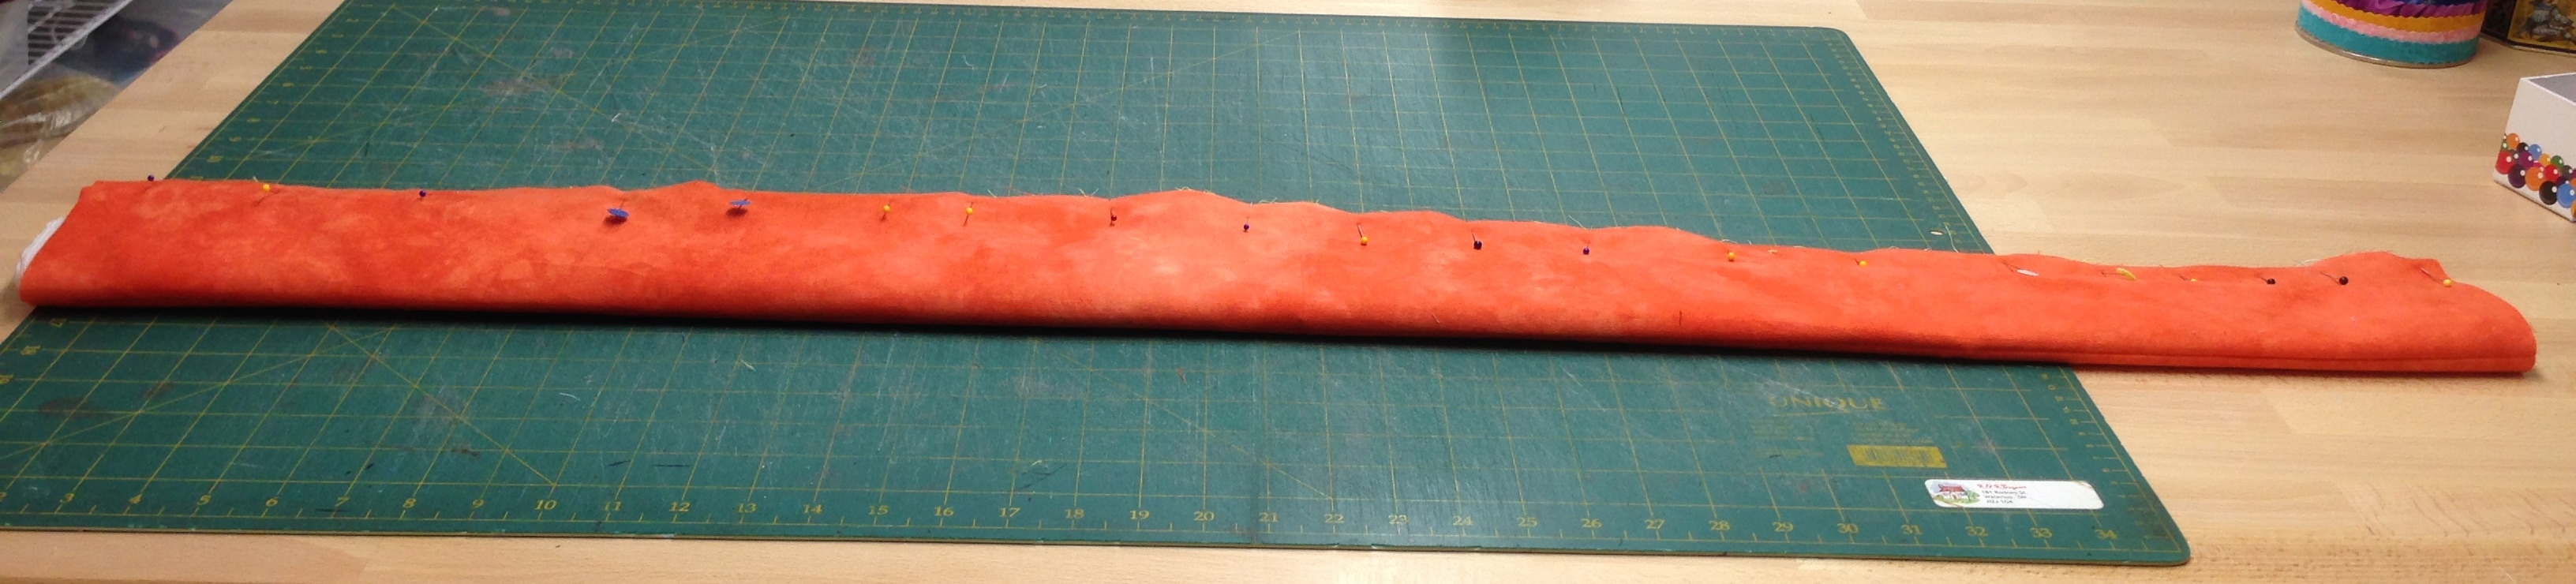 You now have a long tube pinned together 9) Sew 1/4" from the pinned raw edge of the "TUBE" 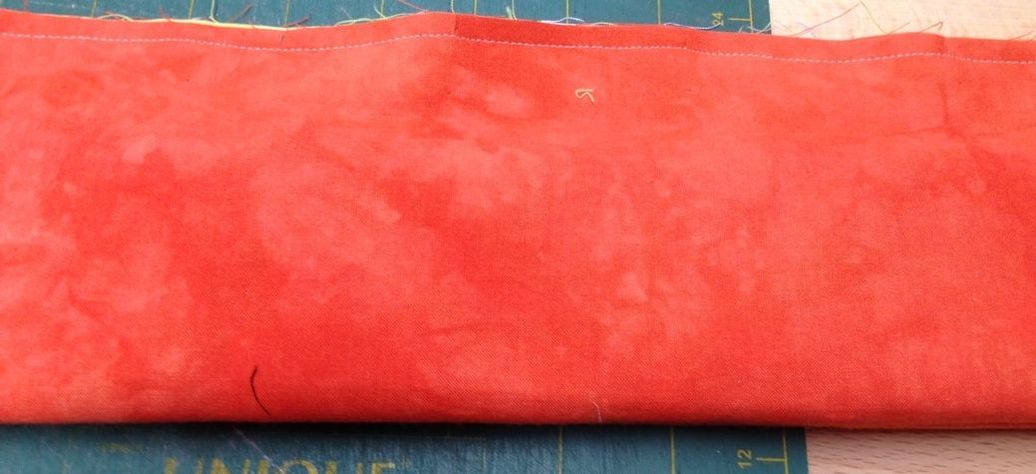 10) You will now turn/pull your fabric through the tube to the right side 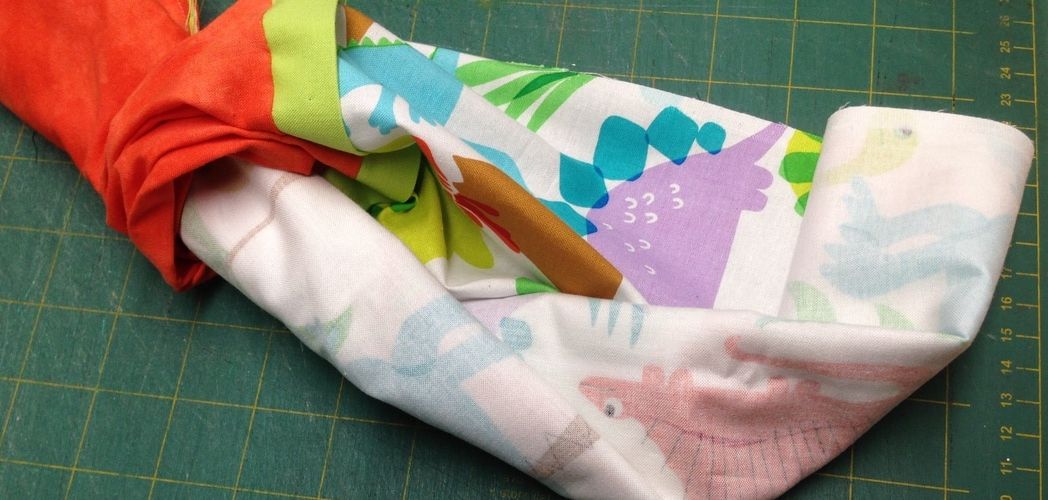 11) When it is all pulled out it should look like this: 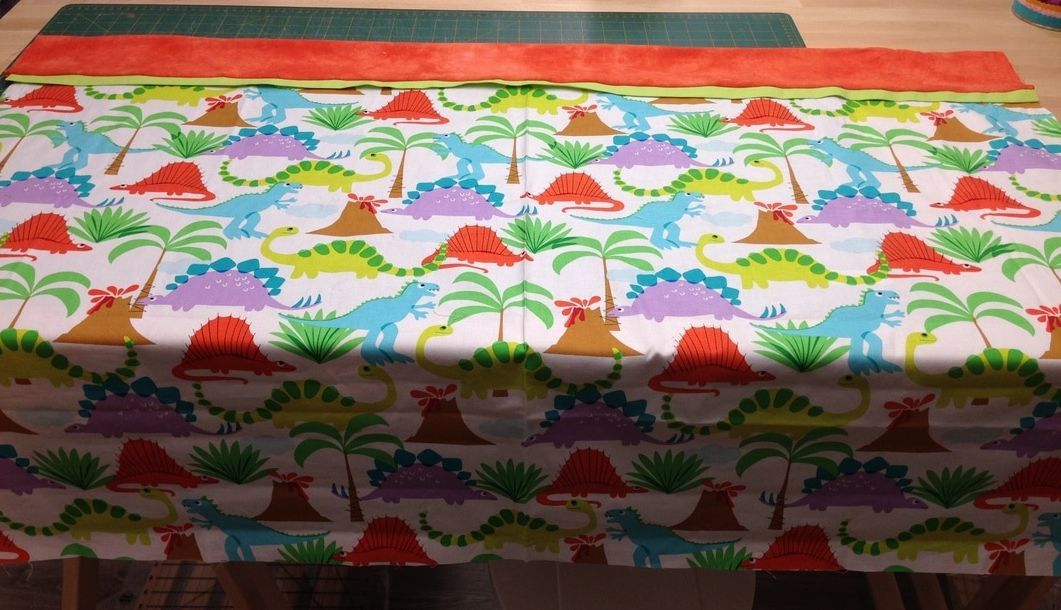 12) Fold your pillow case now right sides together so that piping and cuff match at the sides and pin to secure. 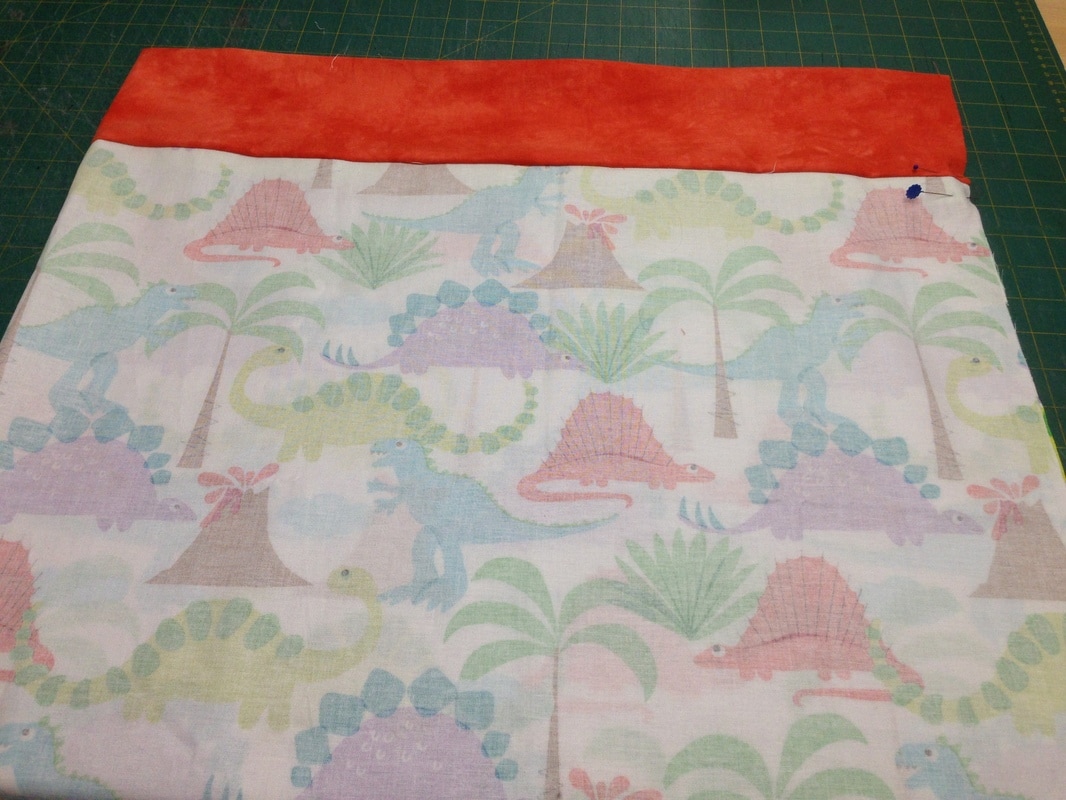 13) Sew down the side and across the bottom with a 1/4" seam allowance (you could also serge it at this stage as well if you have a serger). If you sew, you may also want to zig zag your raw edges to avoid fraying after sewing. 14) Turn your pillow to the right side and you are done! Admire your efforts! 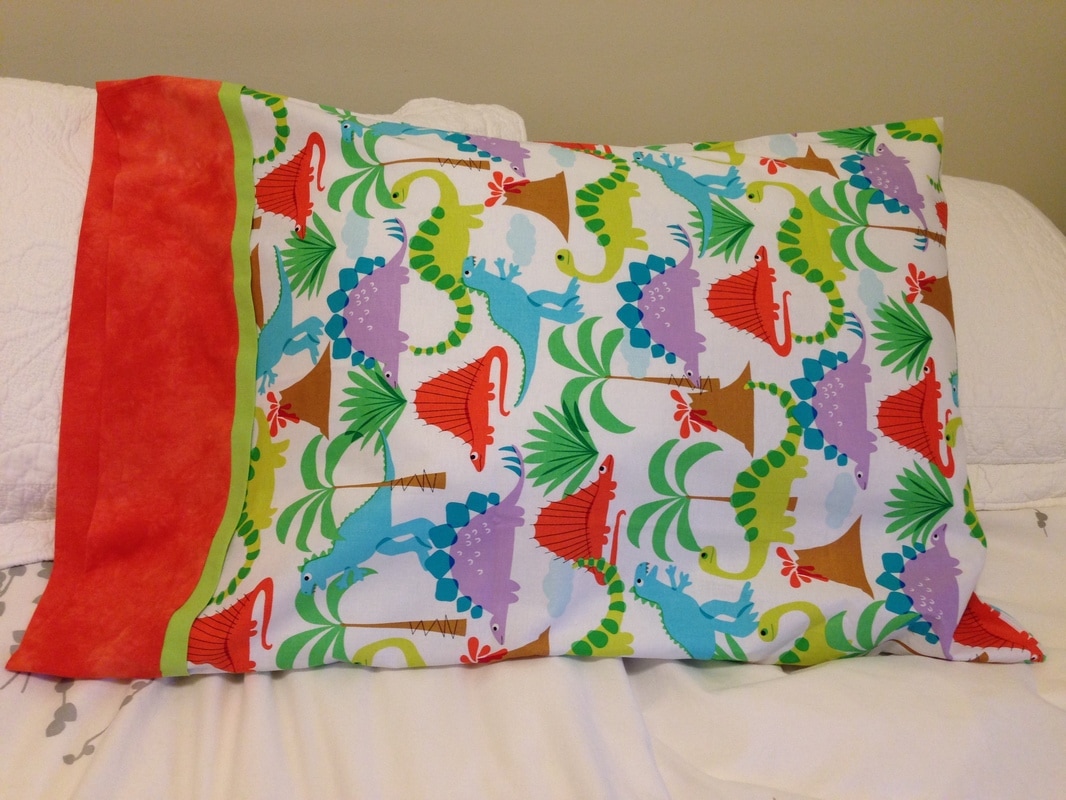 Your pillow case is now ready for gift giving! Some Show and Tell: Thanks to Mabsy for sharing her work and her photos! Mabsy makes these frequently as gifts and now that I have discovered this method, I will too! (I know now why she loves to make them!!)
Using quality quilting cotton (boutique,quilt shop cotton) makes an even longer lasting pillowcase than a purchased one. Choose fabric that is personality specific, embroider it and you have a wonderful gift and you have started to use up your stash! Have a great Tuesday! Stay Warm⛄️😊 |
Follow Me:
Welcome!Hi I'm Robin and I am a professional long arm quilter, pattern designer and teacher. I am passionate about all things quilty!  
  Categories
All

Sponsors
This blog contains affiliate links. This means that we endorse products.
We do receive rewards for these endorsements and this helps to keep this site alive and well. We support products which we believe are the best quality and to inspire your creativity! |


 RSS Feed