|
Hi everyone, so sorry I am really late on this one, the last day of the week and I am finally posting the block ( I have actually had it done for weeks) but summer got in the way!

#30 Debbie
If you are interested in learning about how to make these blocks, look for the book below at your local quilt shop:

.... or you can get it at Amazon by clicking on the link below:
I hope you are having a great Sunday! ❤️
0 Comments
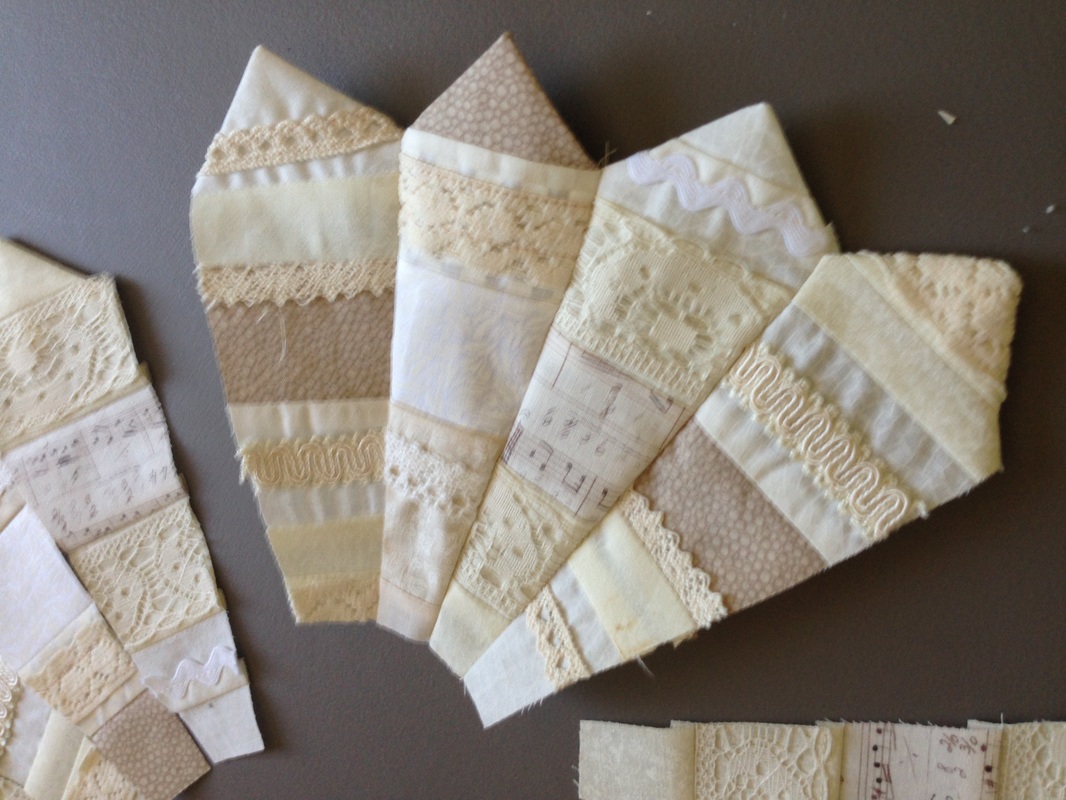
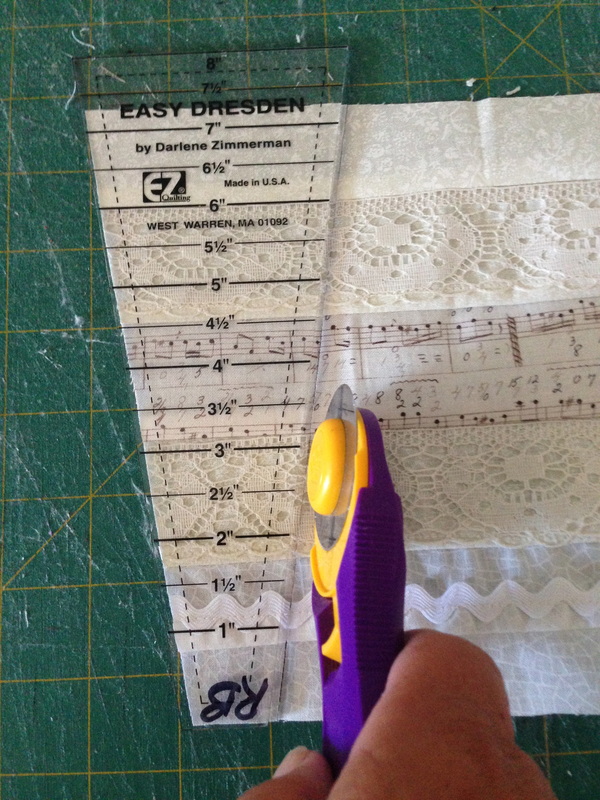
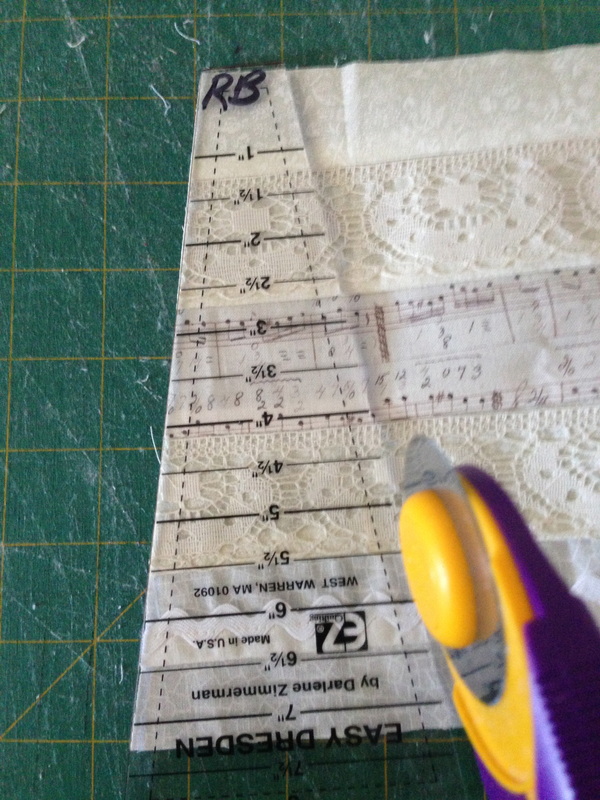
I decided recently that I wanted to do a dresden block project combining vintage flair and modern construction. This is what I came up with:
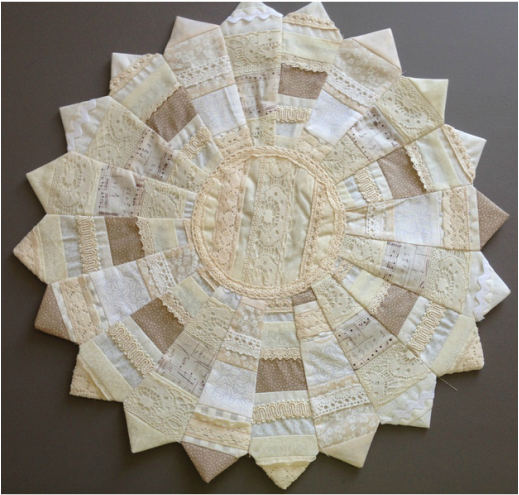
"Stratified Dresden"
How I made this?
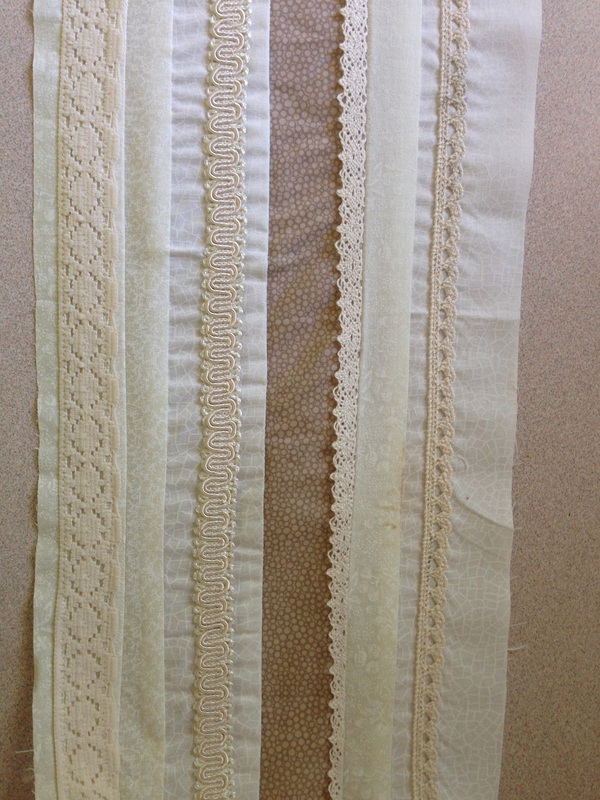
Lace top stitched to strips and strips sewn together to make a "Strata" of Fabric
and then cut out Dresden shapes from the strata above using:
Like the images below:
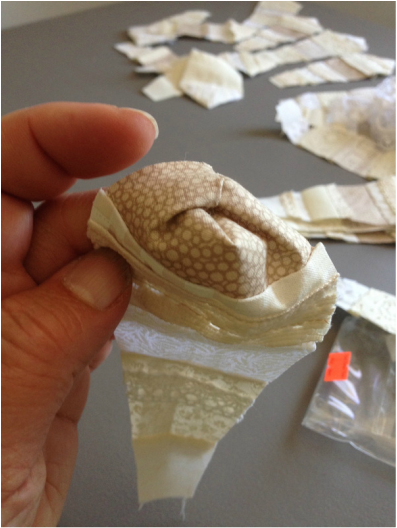
This ruler, the (Wright EZ Quilting Easy Dresden Quilt Tool Set) is awesome and makes the job so easy!!
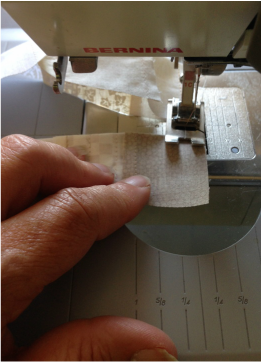
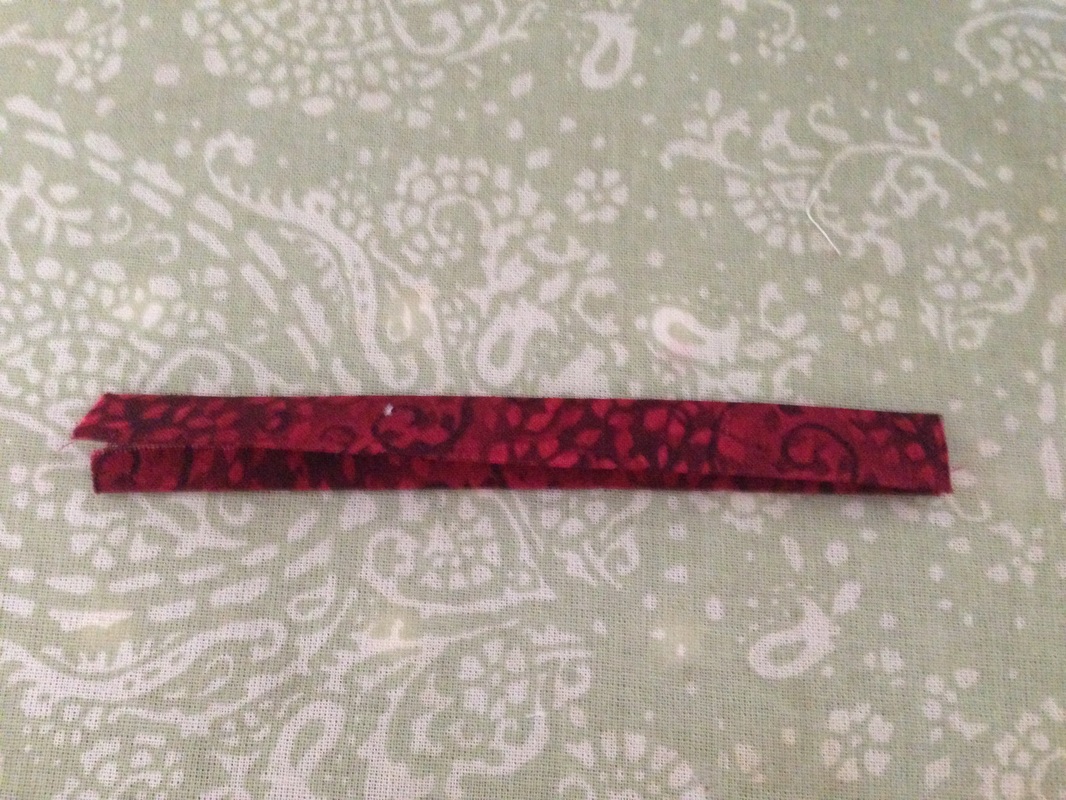
Fold the wedges right sides together at the wide top and sew 1/4" from the edge.
Turn all your Dresden points to the right side and clip the point to the stitches
Sew 20 of these Dresden shapes together to make a Dresden block/round/flower
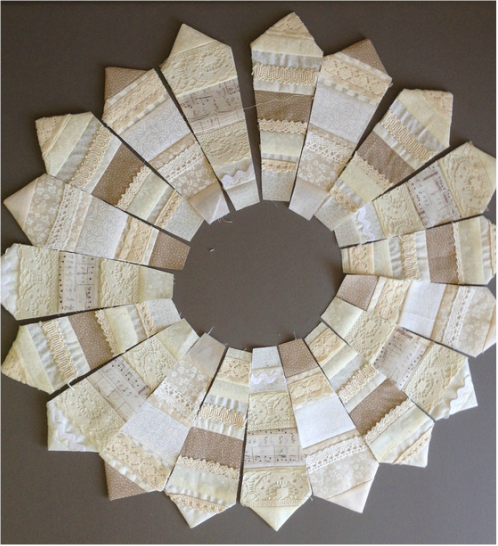
"Audition" them first
+
=
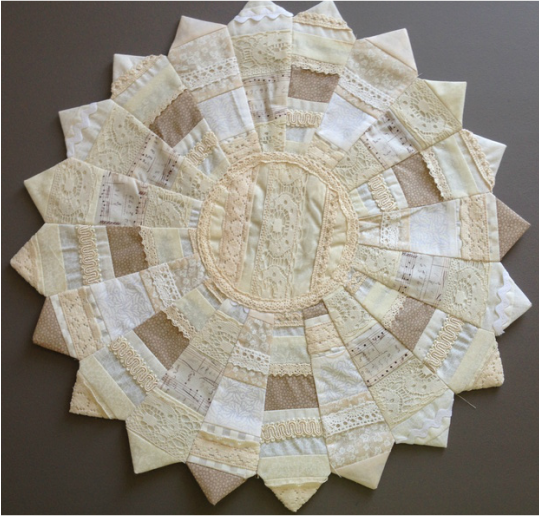
I covered the centre with a circle also covered with lace and top stitched to the middle of my block/round/flower.
Your Dresden is ready to appliqué to wool felt (for a candle mat or centre piece) or to background fabric. Vintage, Easy Dresden! I hope you are all having a great Tuesday!❤️ 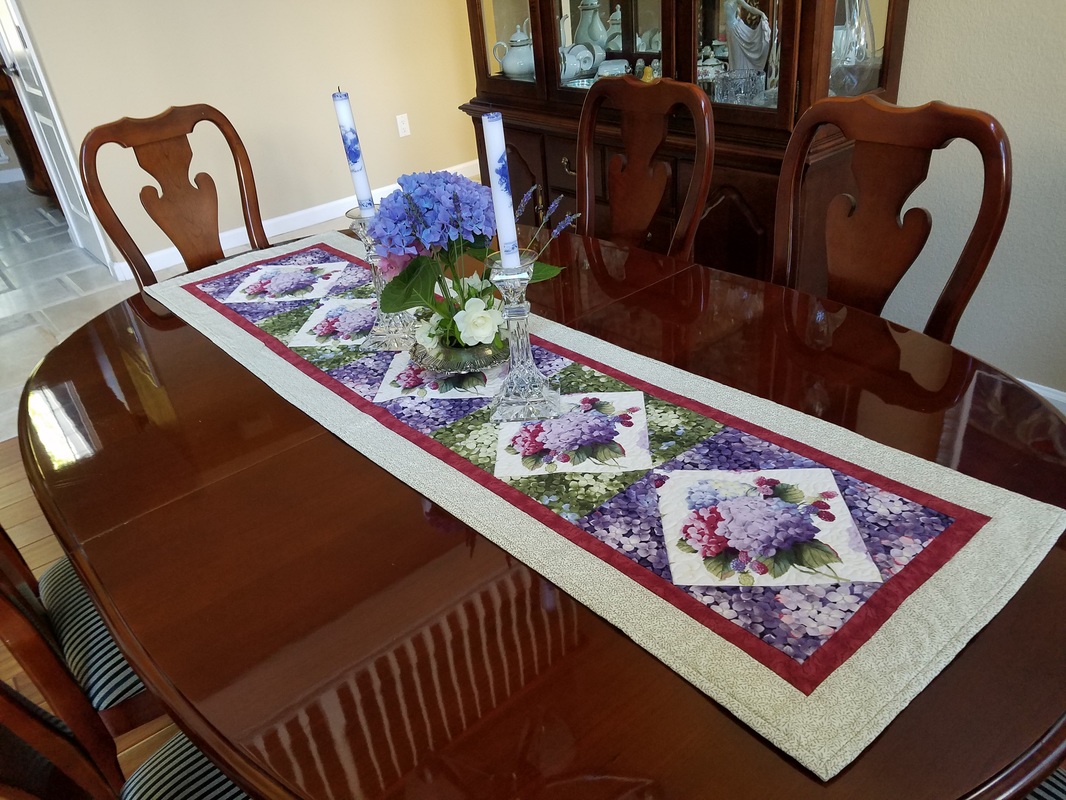 Summer Table Runner- A Gift for Marj The above table runner was made several years ago, I'm thinking maybe 2005? But not actually sure of the date.
I just wanted to share this summer fresh quilted piece of work with you today. This table runner was made by myself for my sister-in-law Marj (who lives near San Francisco) and she just sent me a photo as they were hosting a dinner party and had it on the table again. Marj loves hydrangeas and I believe this it the prettiest of hydrangea fabric I have ever seen. Don't you just love it when people you have gifted your handiwork to, actually appreciate it and make use of it? Also, what is interesting about this table runner is: It was not a pattern, I designed it simply to highlight the beautiful fabric and centred it in the squares on point and then added connecter corners and accent borders to give it width and length. Sometimes it is very important to let your fabric be centre stage. Thanks so much Marj and Howard for sharing this photo, using, caring for and loving my work! It looks lovely on your table! Have a great Thursday everyone! 😊  #29 "Bev" I really changed up the colours on this one and was thinking "Victorian Inspired" when choosing the fabrics. If you would like to find out how to make these blocks, click on the book below to purchase this very affordable book: 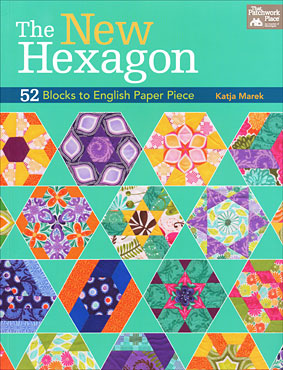 Check out our original blog post where all of this got started HERE
Have a great Wednesday! Stay Cool ☀️ 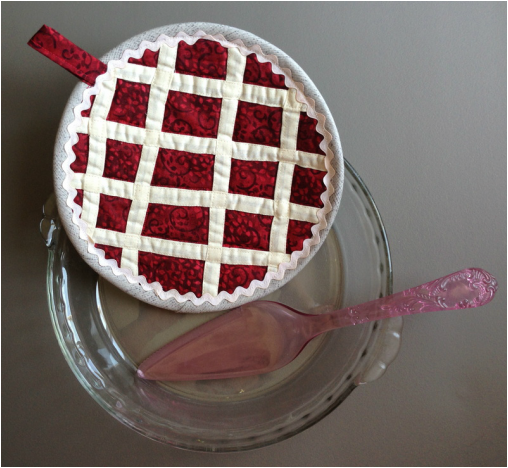
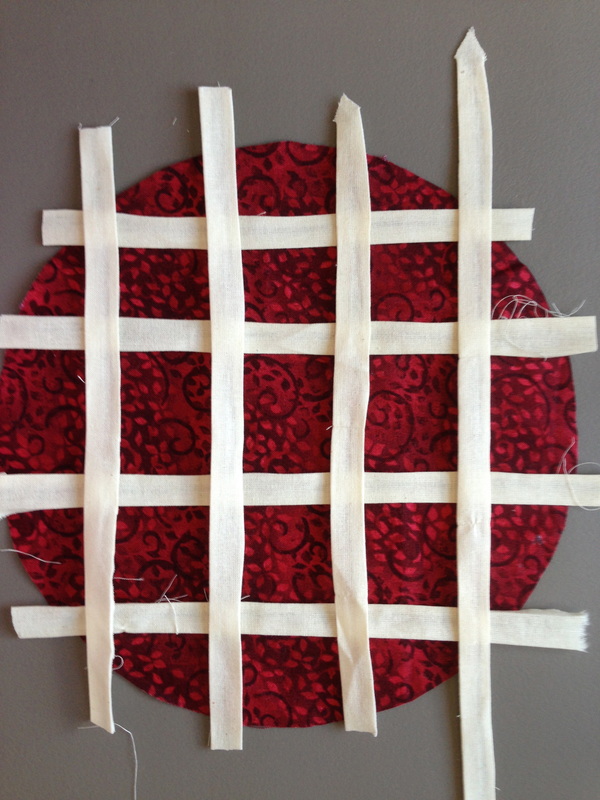
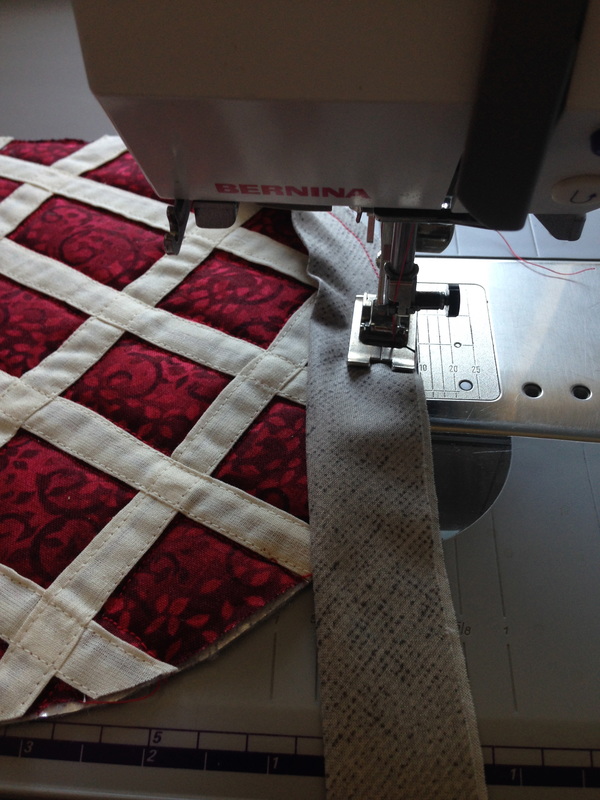
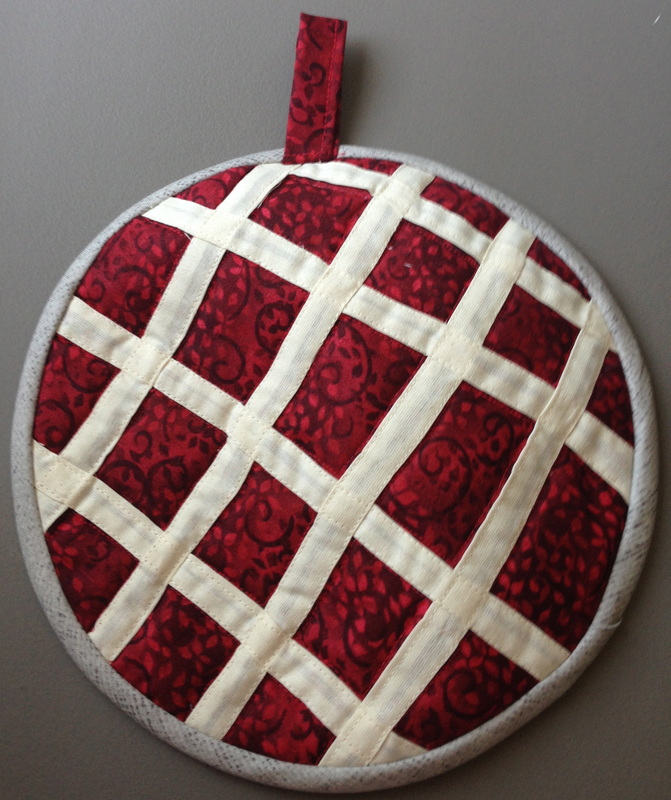
It's that time of the year, a time for fruit to ripen, markets to be open and plentiful sources of fruits and vegetables available. This very cute pot holder is inspired by the fruits of summer, picnics, potlucks and family get togethers. It's raspberry pie time! mmmm my favourite was the pie at Stone Crock in St Jacobs! What you will need make this "Raspberry Pie":
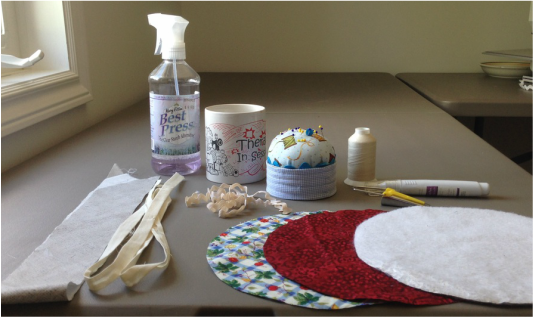
How to make it:
3. Audition your lattice by cutting 8- 10" lengths and weaving them on your pie fabric. Weave them under and over each other. Glue them in place with a dab of fabric glue.
I know it doesn't look great yet!
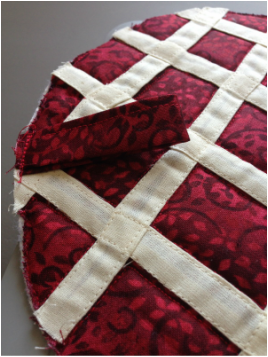
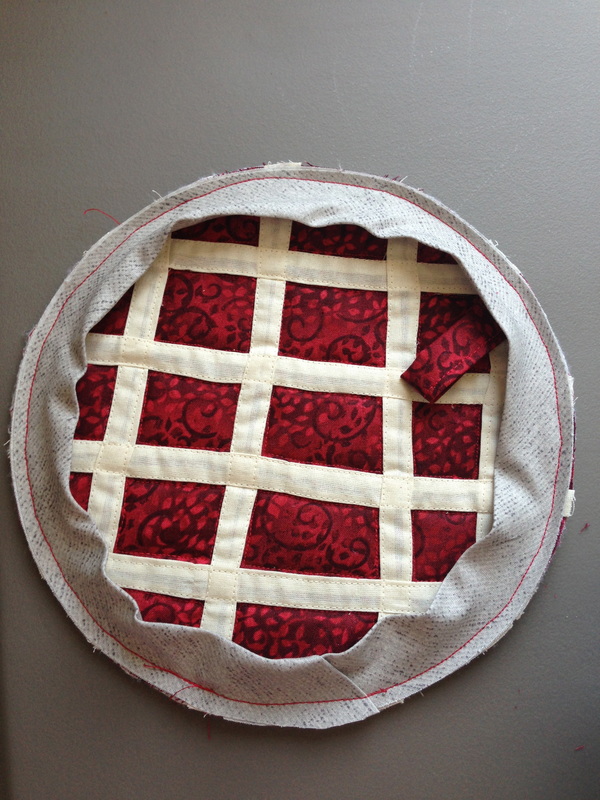
4. Lay all 3 layers of fabric, the top, Insul-Bright and Backing together as if its a quilt and pin to baste and hold together.
5. Top stitch about 1/8" in on all sides of the lattice with cream coloured threads through all layers. Trim around the edge of your pie. 6. Make a hanging tab by pressing your 5" x 2" piece of fabric in 1/4" on the long sides and then fold it in half encasing the raw edges. Top stitch this to close the finished edge.
7. Press the hanging tab in half and place the raw edges against the edge of the front of your pie where you think it looks best, sew it 1/8" from the edge to secure through all layers. leave the loop laying against the pie top
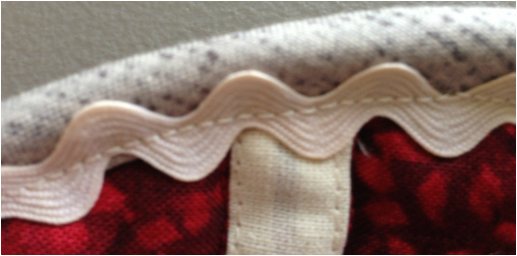
8. Press your grey binding/pie plate edge fabric in 1/2 to make binding as you would a quilt and sew it slowly to the front edge of your pie. Finger press to the back of your pie and hand stitch in place.
9. Sew on your rick rack by placing the valley of the rick rack just against the inside edge of the binding on the pie fabric and stitching down the centre. You will also need to tuck in the rick rack ends carefully so they look neat.
It's done! Almost good enough to eat and way less calories.
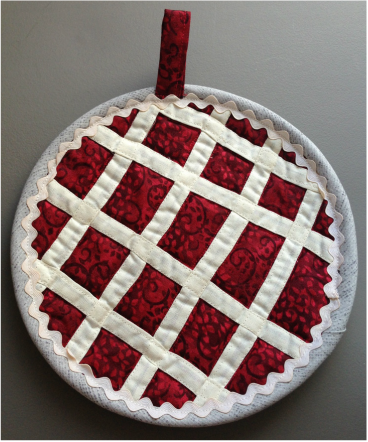
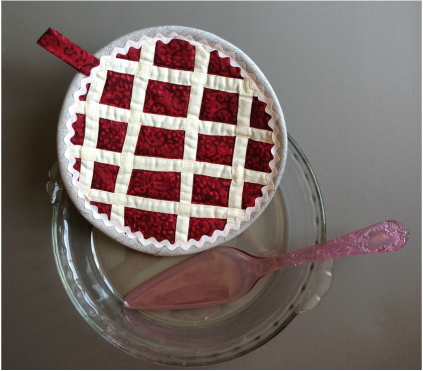
I hope you enjoyed this little project and that you make many "pies" this summer!
Please send us your photos so that we can share all of your productive efforts. Happy Tuesday! ❤️ 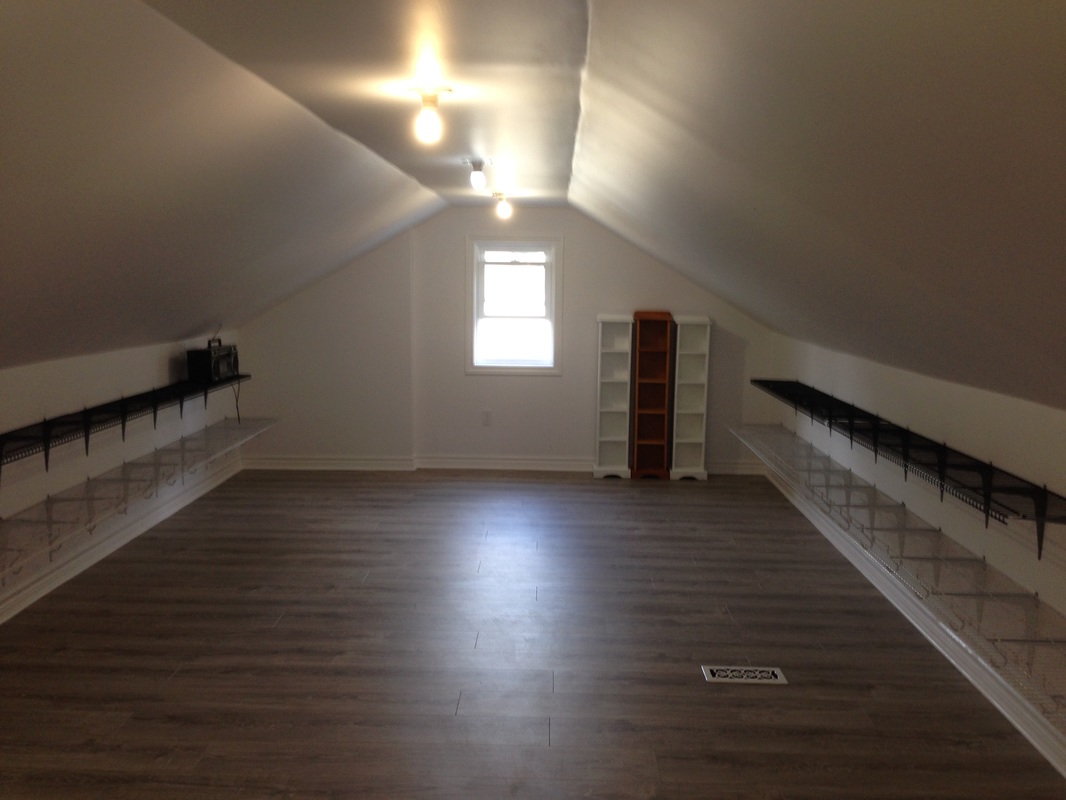 My studio (mostly complete) The above is a picture of the long arm home area of my studio, all complete except lighting. It has been 9 long months in the making. My husband has only had time in the evening and weekends to convert our cold/hot attic into a liveable studio for my passion and business. I am so grateful it is done at last. It is great to have a handy partner in life. The above is also the "calm before the storm" of the move in process. I have too much stuff! LOL 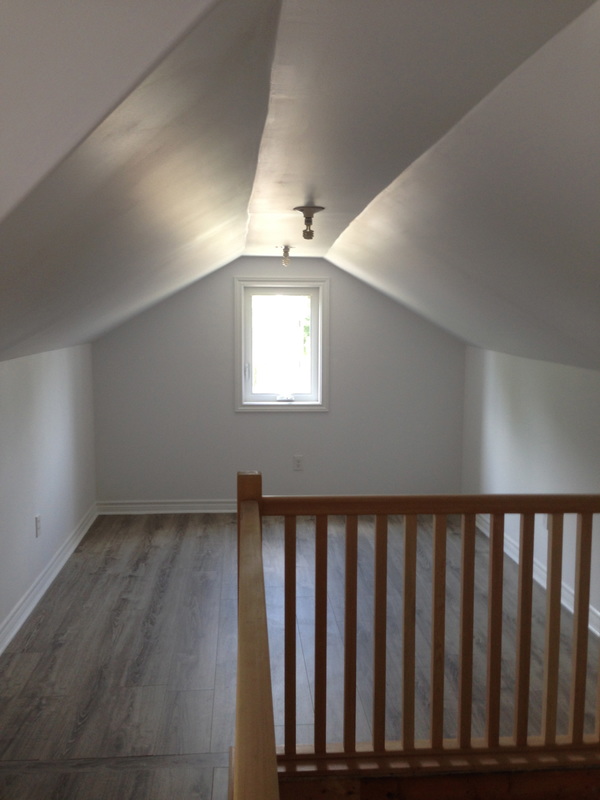 My domestic sewing area all completed except lighting and staining on the railing 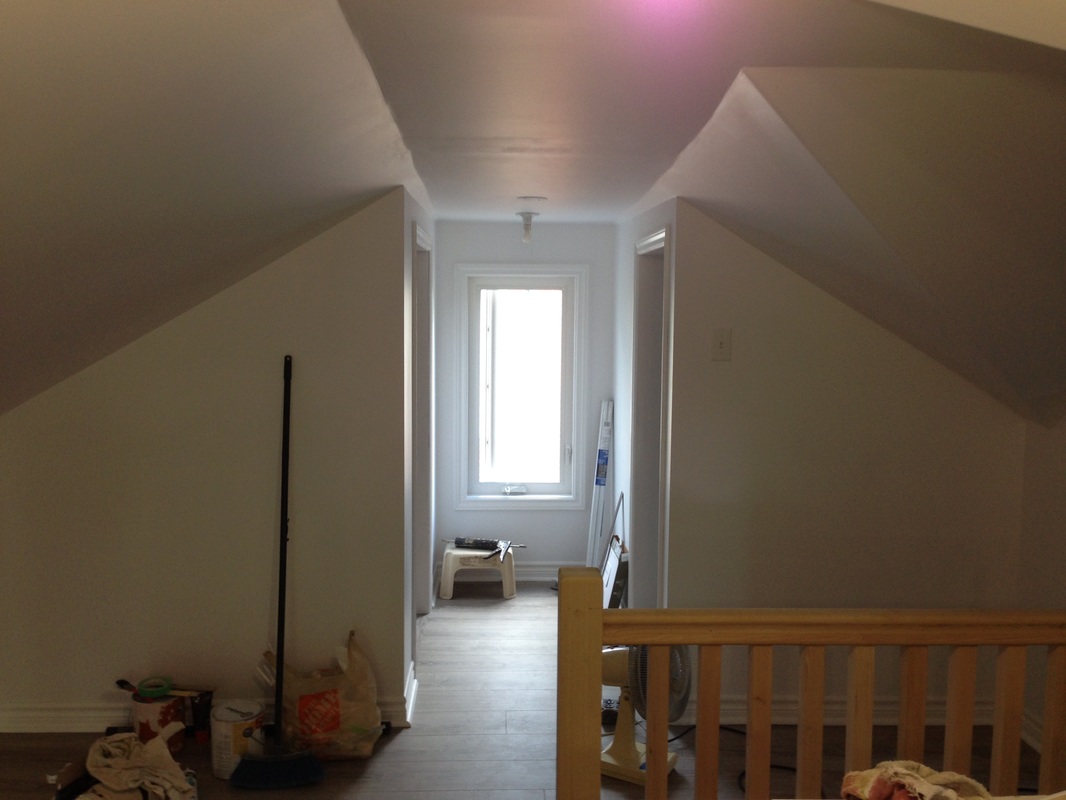 2 closets built on the driveway side. The tiling is in progress on the floor. I will post some after pictures once all my sewing paraphernalia is moved up into my new studio.
Yesterday, when I was given the green light to move in, it was an extremely happy day as all of you sewing/quilting enthusiasts can imagine! I no longer need a fitness gym (at least until I am moved in) as I have 2 flights of stairs to climb while moving my sewing room. I am going to try and be positive about this!! Have a great week everyone and Happy Monday!☀️ 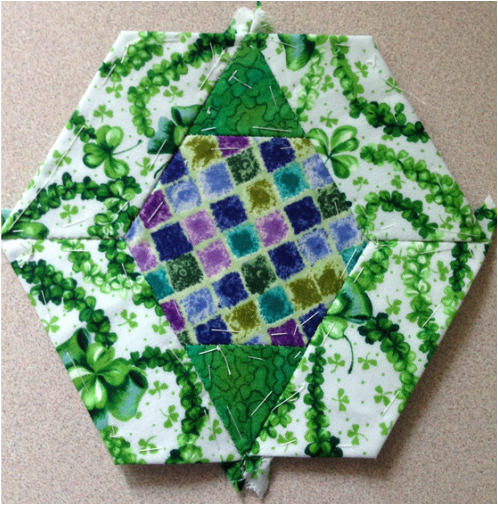 #28 Mary Ellen I think we were given a break on this one, last weeks block #27 had 12 small pieces and this one only had 7! Yeah, with all activities of summer, this was a nice break. I added lots of green because we have had a dry spell. Come on rain! If you would like to purchase this book from where this block is derived, click on the book link below.  Have a great Wednesday!☀️☔️
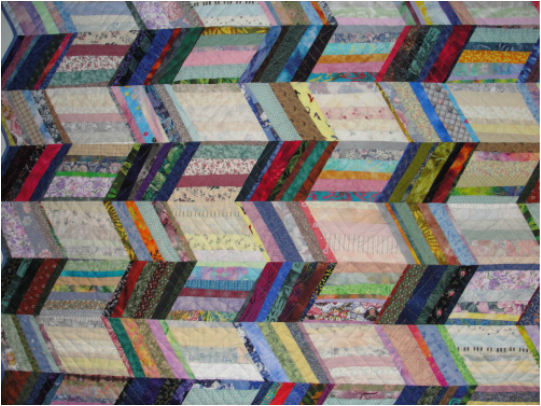 Scrappy quilt with effective use of colour value Value and Hue. Value is defined as the relative lightness or darkness of a color. It is an important tool for the designer/artist, in the way that it defines form and creates spatial illusions.
The quilt above looks like it is waving or creased and it's not. It creates a spacial illusion. When I first looked at this quilt I thought oh..... it just has an arrangement of light and dark strips. It's not that simple! It's an arrangement of 4 fabric values including: dark, medium, light and lightest light strips. The fabric is also placed horizontally and vertically creating the form or the creased look. What an effective use of scraps! Personally, I love scrappy quilts but the Type A part of me, wants them organized and the quilt above fulfils that requirement. Doing a scrap quilt like the one above takes the anxiety out of figuring out how to arrange your fabric. Lay your scraps in 4 piles :1. Lightest light, 2. Light 3. medium and 4. Dark. Cut strips from similar widths of fabric, sew them together to form aproximately 5" widths. and sub cut them into 5 x 7" rectangles. Medium and dark-5" width with strips going vertically & light and lightest light with strips horizontally. Sew the rectangles together as shown above. Light and dark together (alternating vertically and horizontal) and lightest light and medium together (alternating vertically and horizontally). Share with us your colour hue project be emailing it to us by using our contact us hover over "more" on the menu above to find "contact us" Also check out this great article on Craftsy.com Choosing a Color Palette for Quilting Projects here Happy Tuesday everyone, I hope you are having a great week.☀️ What's on your summer wishlist? Make projects you can't wait to share! Gain new skills with 50% off top classes.  Craftsy is having a class sale this weekend! Starting Friday, you'll see their top classes with discounts at 50% off. Check them out Here
Not just quilting classes! Knitting, Baking, Cooking, Paper Crafts, Sock Making, Woodworking, Jewelry Making, Bread Baking, Cheesecakes, Decorative Cakes, Sewing, Quilting and so much more! Have a Great Friday TGIF!💐 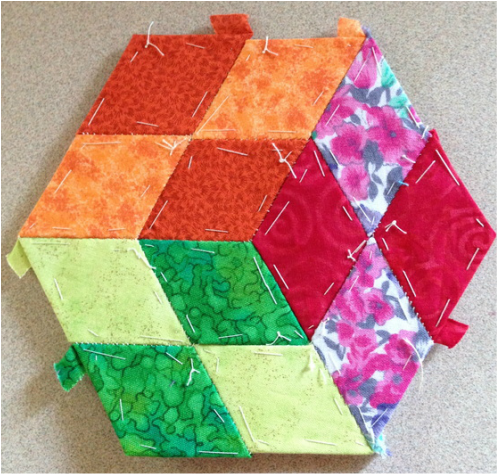 #27 "Victoria" While on vacation I was able to complete 6 of the hexagon quilt along blocks. It turned out to be a great take along project. I also used my small vinyl travel tote (from my Sew N'Travel Totes Pattern) to hold my scissors, thread, needles and blocks. These blocks fit perfectly! See Below: 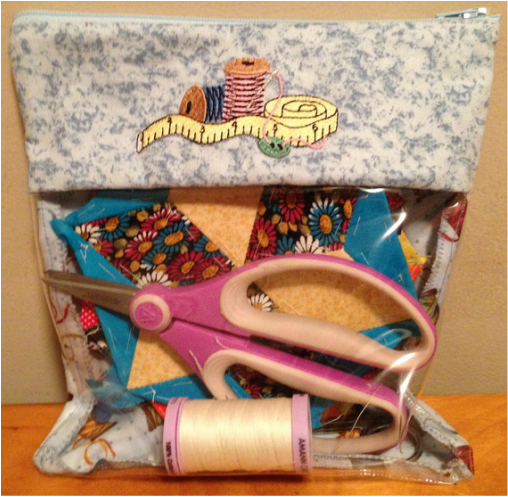 If you would like to purchase the book we are using to make these blocks, please click on this wonderful book below it will take you to the site where you can purchase it and English piece along with us!  Be sure to send in your photos of your hexagon blocks!
Happy Wednesday Everyone ❤️ |
Follow Me:
Welcome!Hi I'm Robin and I am a professional long arm quilter, pattern designer and teacher. I am passionate about all things quilty!  
  Categories
All

Sponsors
This blog contains affiliate links. This means that we endorse products.
We do receive rewards for these endorsements and this helps to keep this site alive and well. We support products which we believe are the best quality and to inspire your creativity! |


 RSS Feed