 Come back and visit us tomorrow to see how!
0 Comments
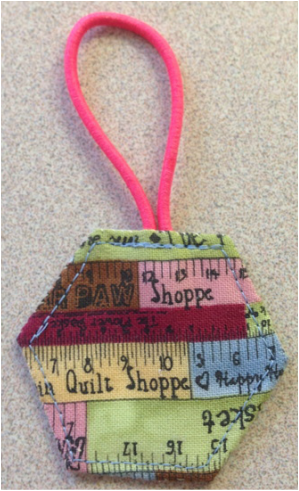
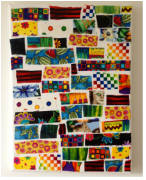 I experienced a weekend of fun with Mother's Day (family BBQ) and my daughters Graduate Exhibition at the Ontario College of Art and Design University in Toronto. ( I will be posting more about this in June when she graduates) So today's "Tuesday Tool or Technique", is inspired by fun and "artful" experiences. The little item above is a Art Collage made with some of my quilting cottons, specifically from my "brights" stash. This is also a very simple craft/art that you could do with your children or grandchildren or a great rainy day activity! Depending on your theme/fabric/colours/shapes and number/size of canvasses, you could make this collage project into great art for any room in your house as well. I have to say I did enjoy doing it. But then I think I am a child at heart! Life is too short to do stuff you don't enjoy doing right? Go ahead and try it and channel your inner artist/child and have fun! What you will need:
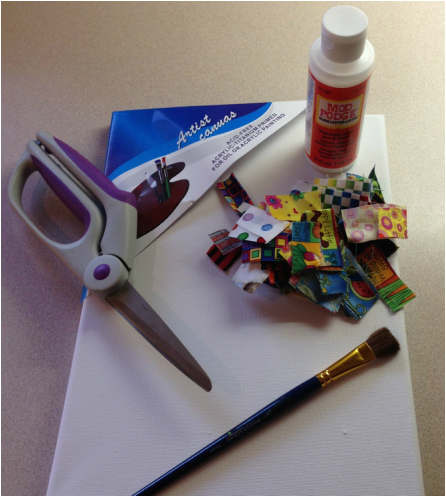 How to Make it: 1. Cut out some fabric shapes. 2.Spread a layer of mod podge on your canvas as you go. 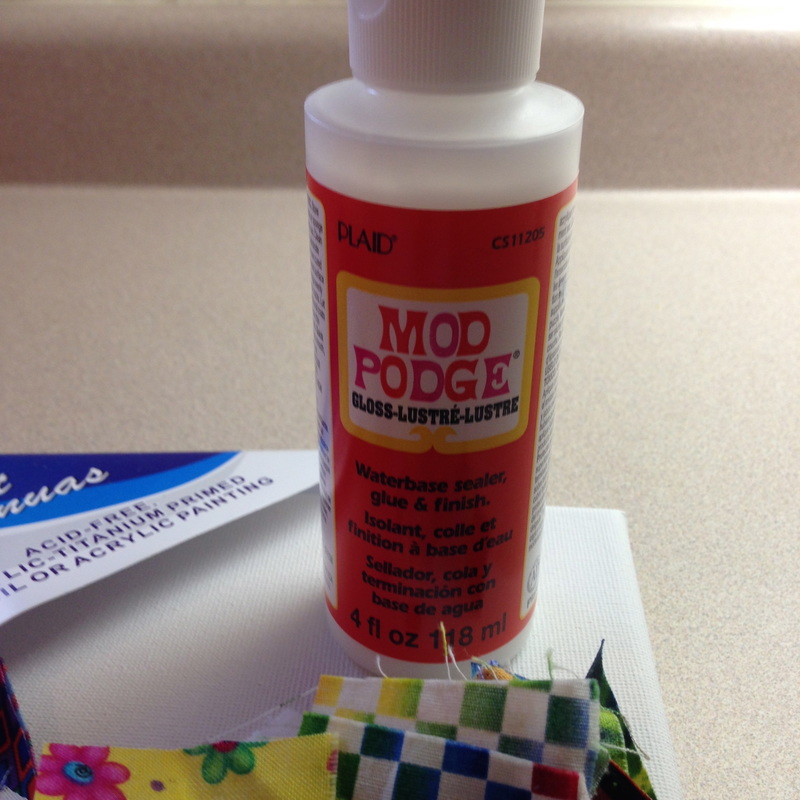 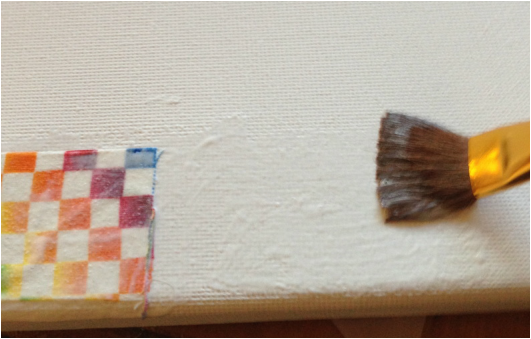 3. Randomly place fabric shapes on the canvas and brush more mod podge over them, leaving a little canvas gap between them until you have the canvas filled.  4. After the first layer of mod podge dries, you can coat it with another full coat to seal it and make sure all fabric is glued down. 5. Admire your efforts, you now have some inexpensive modern art to adorn your home! 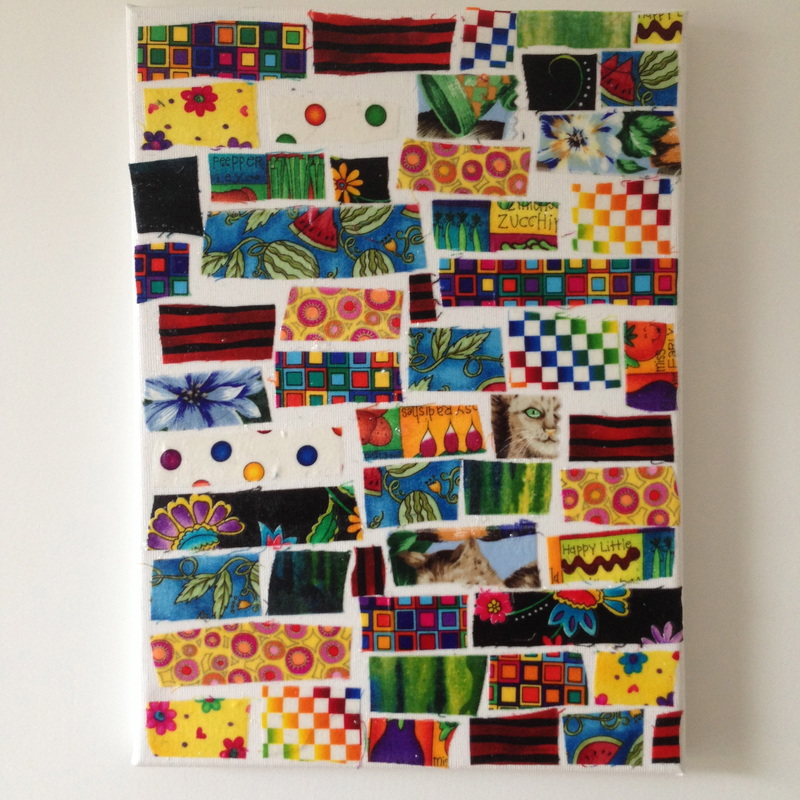 Have a great Tuesday!😊
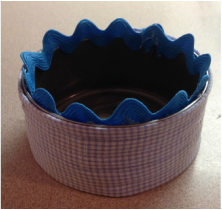
 Hold aloft to us the lowly Tuna Can! Todays Tuesdy Technique is kind of crafty! You can make a pretty & practical pin cushion from a tuna can - Who knew? 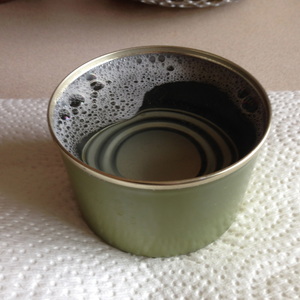 Wash out your tuna can thoroughly! You will need:
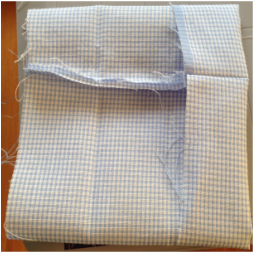
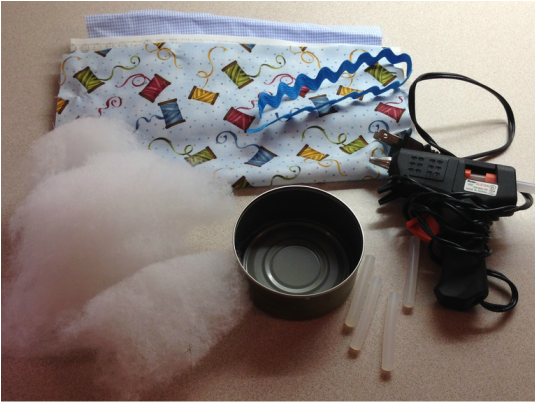 How to make it: ( Looks like a lot of steps but really it's a 1/2 hour project tops!) 1. Fold your sleeve fabric in 1/2 on the long side & press it. 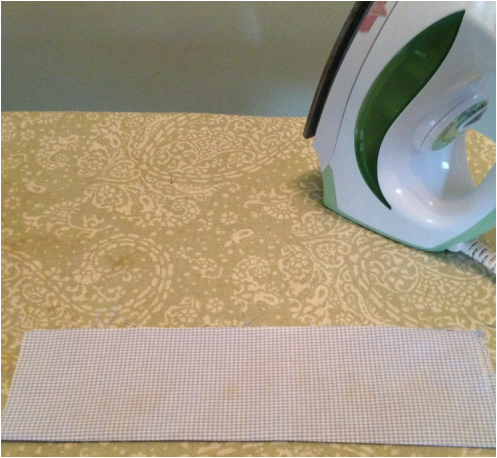 2. Fold each side toward the centre fold you just made as if you were making the straps for a purse.  3. Unfold it. 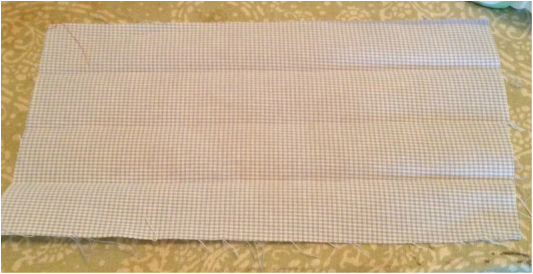 4. Bring the short sides together right sides together and sew a 1/4" seam to make a tube. 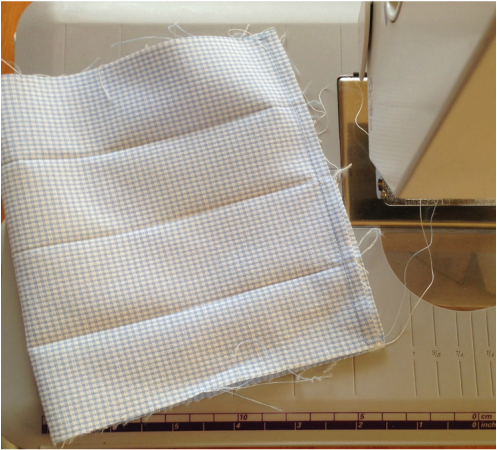 5. Finger press the seam open and fold one side down on the fold and then the other side.
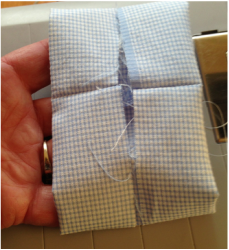
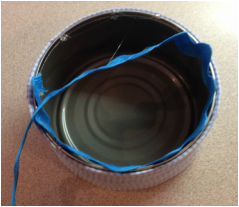
6. Fold it once more from the centre enclosing the raw edges. 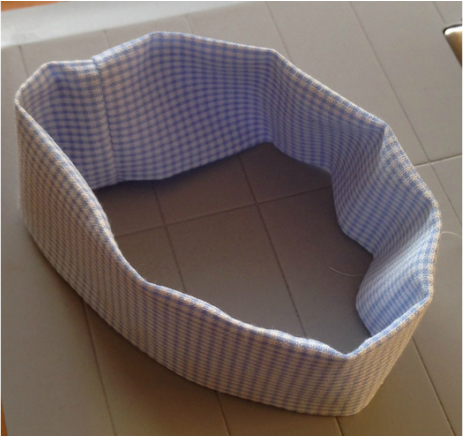 7. Audition it on your tuna can, it should fit snuggly. 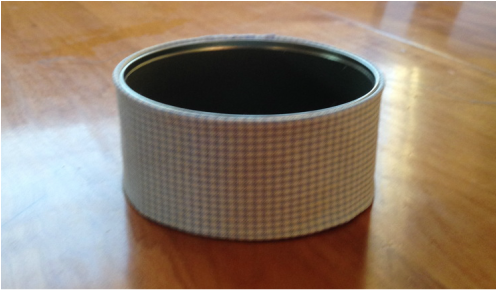 8. Top stitch it! 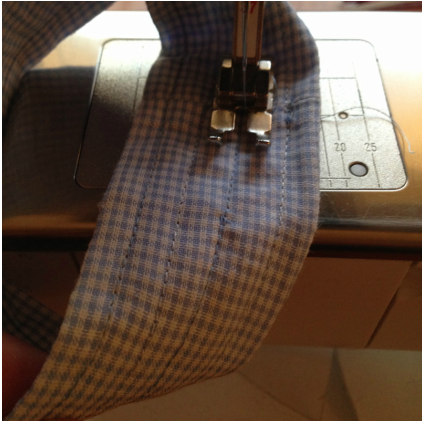 9. Place it back on the tuna can and dab a little glue under it to secure it in place. 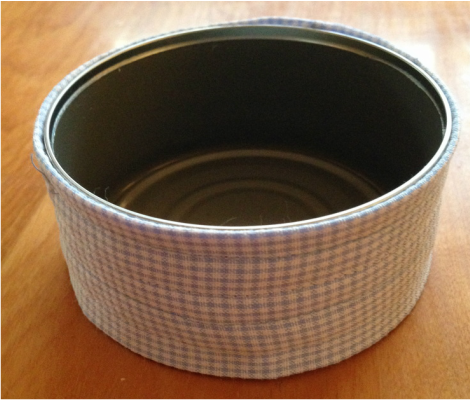 10. Glue rick rack on the under side of the top of the tuna can.
11. Place your stuffing on the wrong side in the middle of your pin cushion fabric and gather it tightly with your hand. 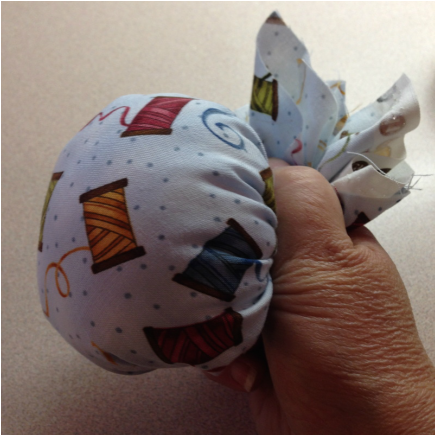 12. Sew it to gather it tight. 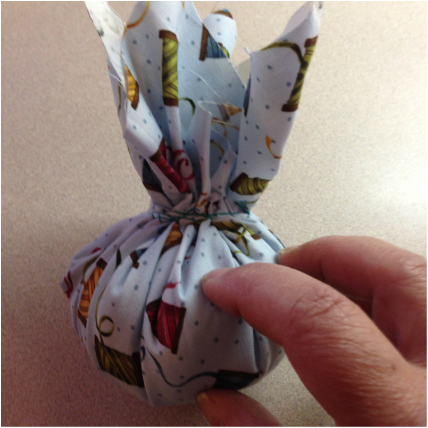 13. Put some glue in the bottom of the can & then stuff your gathered fabric into the tuna can base. 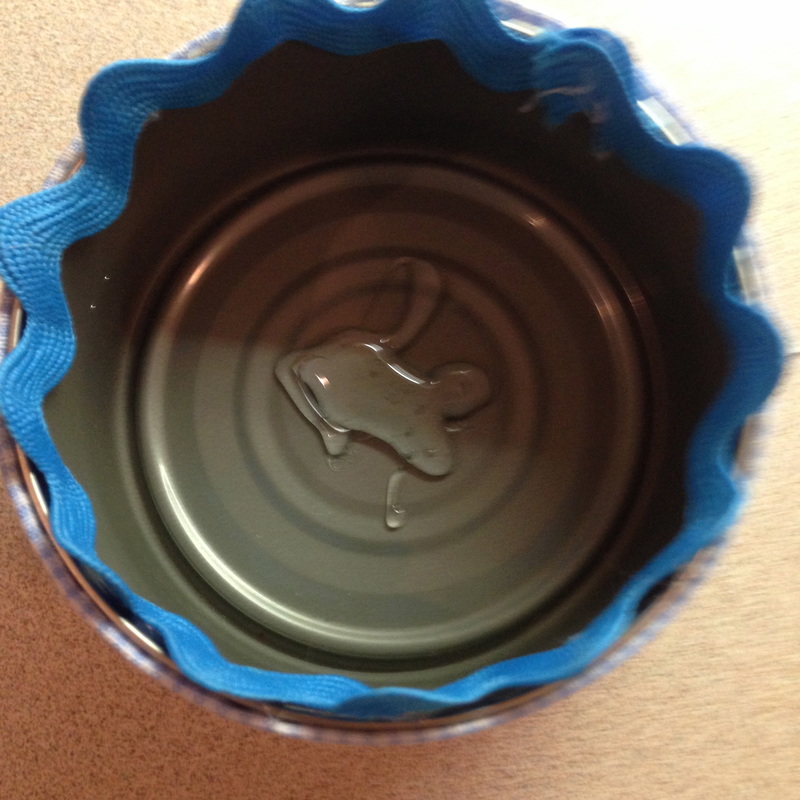 ... And there you have it, a very sturdy, large and practical pin cushion made from a recycled, reused and repurposed tuna can. I can't wait to make more! 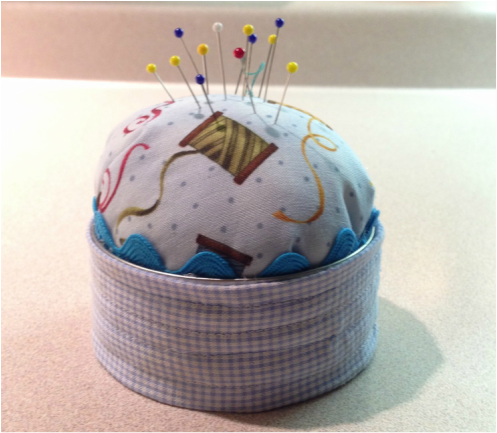 Happy Tuesday, I hope you enjoyed this tutorial and will make use of your tuna cans in the future! 😊😛
I decided after one of my recent posts about appliquéing and the birdie pillow, I wanted to spruce up my guest room with more pillows. I did not want the pillow to be elaborate or difficult to construct so I got to thinking...... What if?.... I used my rectangular doily I recently purchased? (I love linens and lace, they are textiles/fabric after all, lol) You could also use antique doilies or embroidered linens in the same manner and make this easy pillow. I decided to appliqué it loosley on top of some really nice Tula Pink gold/yellow fabric to bring out the yellow in my duvet cover. Before you think why duvet and not "quilt", I know I will eventually make a quilt for that room! 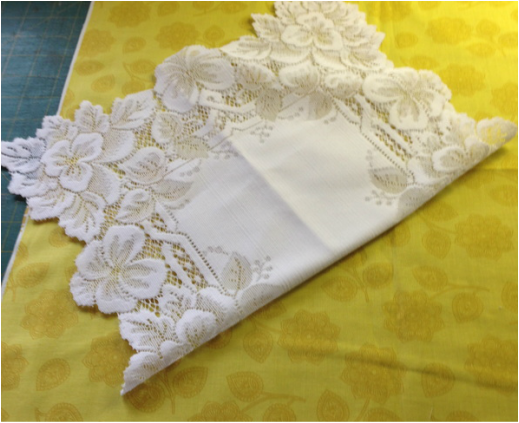 Tula Pink Fabric "Eden Henna Mustard" & my lovely rectangular doily I measured the fabric 2" bigger on all sides and cut it so that the doily would have space around it to show off the fabric. I centred and pinned the doily first and then appliquéd it by hand with a whip stitch discretely through the lace and pillow top fabric. 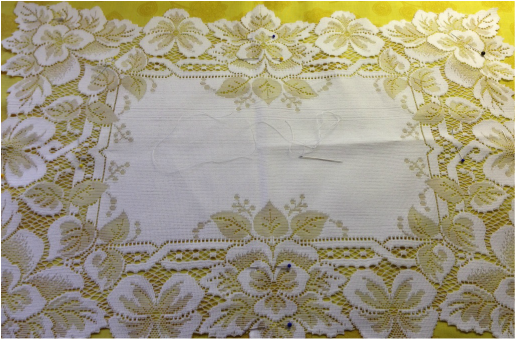 I then pinned the back of the pillow to the pillow top with right sides together. 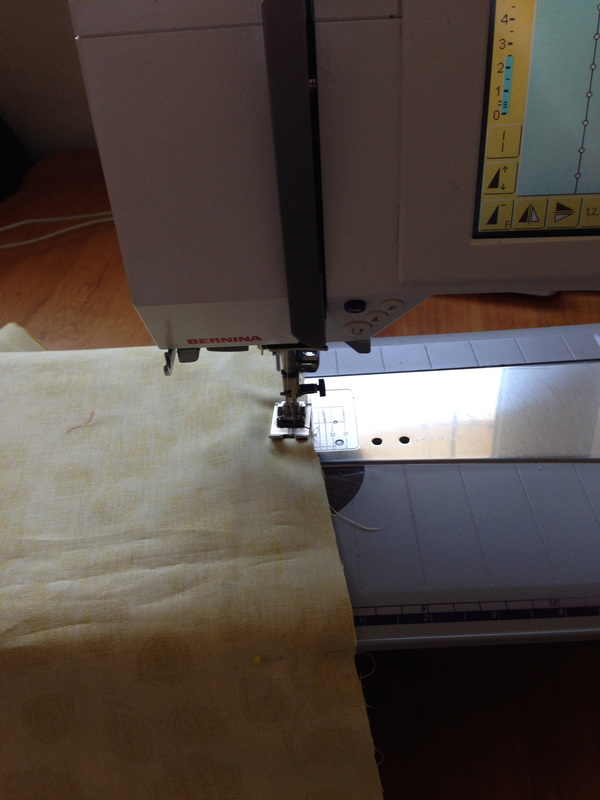 I sewed it all around the edge with a 1/4" seam allowance, leaving a 4" gap on the short side for turning and stuffing. It was then turned to the right side stuffed and the opening was slip stitched closed. 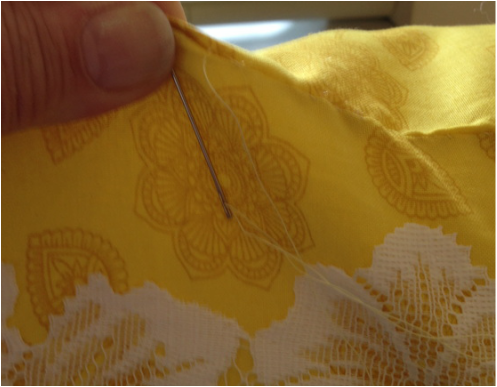 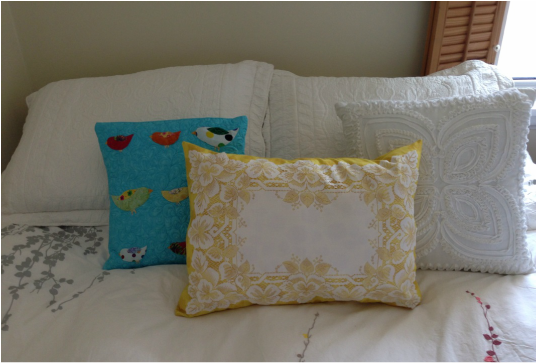 ....and there you have it, another pretty little pillow for my feminine, cottage style guest room.
Happy Tuesday! ☀️🏠 Skinny borders are so small that it’s challenging to come up with effective, continuous and/or creative ways to quilt them. I personally also find it a challenge to think of something that does not need marking (on all sized borders). So today I am sharing with you designs I often use for skinny borders. They are listed below from the easiest designs to the most challenging (even though they are all basically easy!) 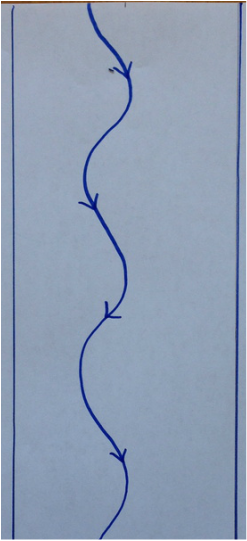 #1 The Curve 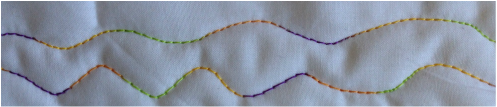 looks great with variegated thread 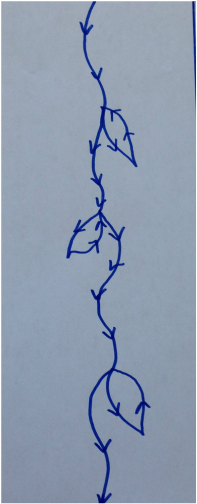 #2 The Curved Vine 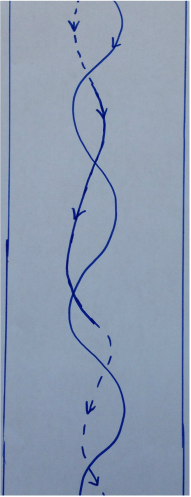 #3 The Ribbon (needs 2 lines of continuous quilting) 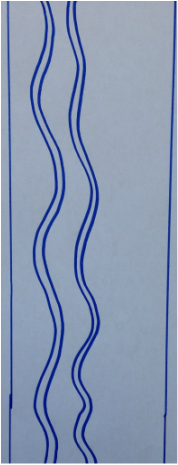 #4 The Double Echoed Curve (needs 4 lines of continuous quilting) 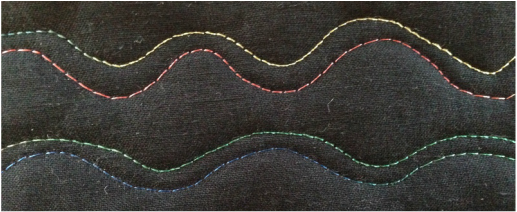 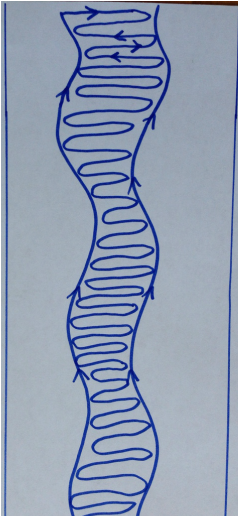 #5 Double Filled Curve (3 lines of continuous quilting needed) 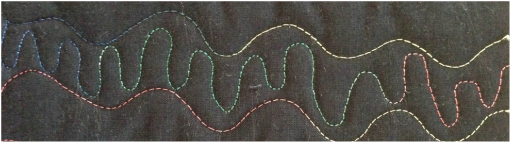 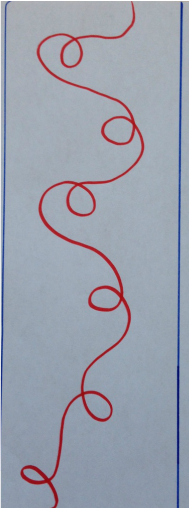 #6 Ee's and O's 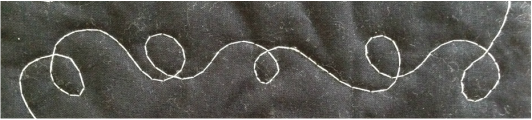 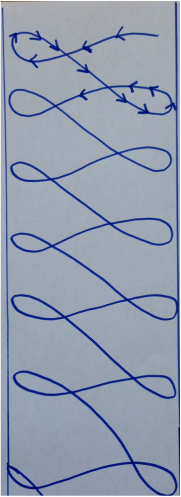 #7 Crazy Eights 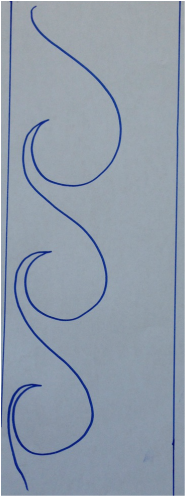 #8 The Wave 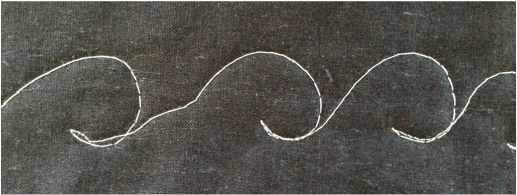 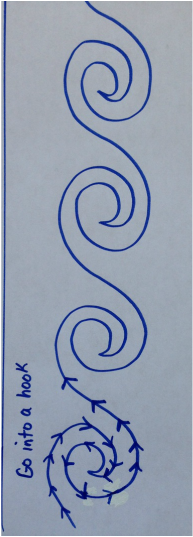 #9 The Wave Spiral (from right to left) 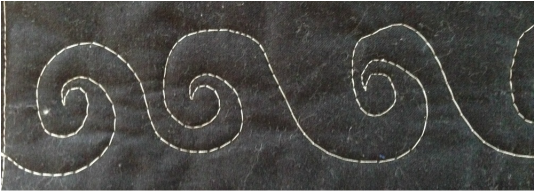 The wave spiral from left to right 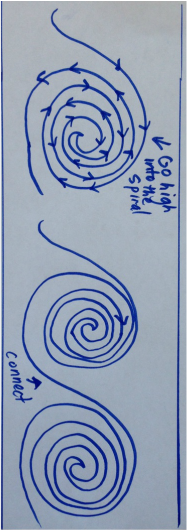 #10 The Tight Spiral Wave 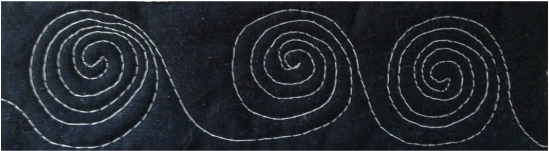 *Please note: I would recommend stabilizing your small borders by stitching them in the ditch before quilting them so that they continue to look as straight as when you cut & sewed them to your quilt*
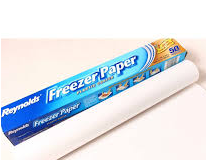
I know there are many, many more free motion design options but I just wanted to share with you a few of my "go to designs" and I hope I have inspired you for your small bordered quilts. Happy Tuesday! 😊🌷 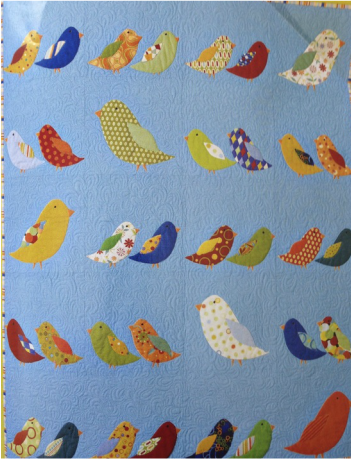 Kevin Kosbab Designer- Birds of a Feather from Feed Dog Designs I found this quilt in the magazine I purchased some time ago "Make It Modern" Better Homes and Garden Jan 2013. The designer is Kevin Kosbab of Feed Dog Designs. I have wanted to do something with it since I got the magazine because it's adorable, cheerful, springlike and colourful and there is lots of quilting space. I also wanted to share with you my method for appliqués to avoid my directional issues with reversing designs for fusible appliqué...... and I use freezer paper. I am making a personal project with the birds but you could use any appliqué design. Your main tools will be Reynolds white Freezer Paper, a sharpie marker, fabric, parchment paper, an iron and Fusible Web
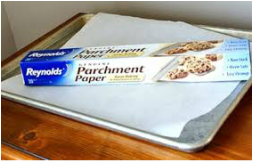
How Make Appliques with Freezer and Parchment Paper 1) Trace your appliqué design using a piece of freezer paper (on the dull/matte side) and a permanent marker, the way it is shown facing you. Cut it out roughly 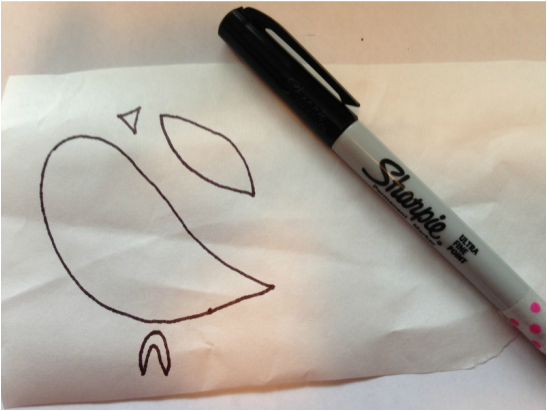 Draw the design on the matte side of freezer paper 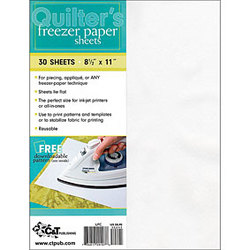 ***You could also print it out onto computer sized freezer paper, if you have a design from the computer and use freezer paper sheets available at Connecting Threads- How cool is that!- click on the image to the left to obtain these if needed/wanted!*** 3) Iron the freezer paper design to the right side of the fabric (wax side of Freezer Paper to the right side of fabric) - Believe me it will stick only temporarily and not leave a residue! 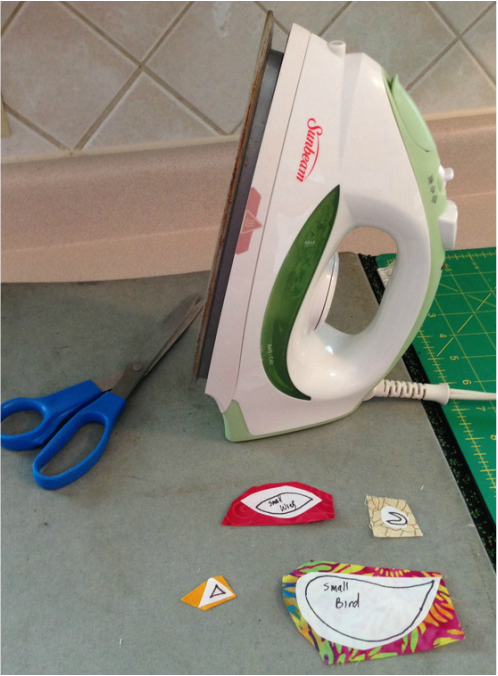 Freezer paper ironed wax side down to right side of fabric 4)Press the fusible web to the wrong side of the fabric 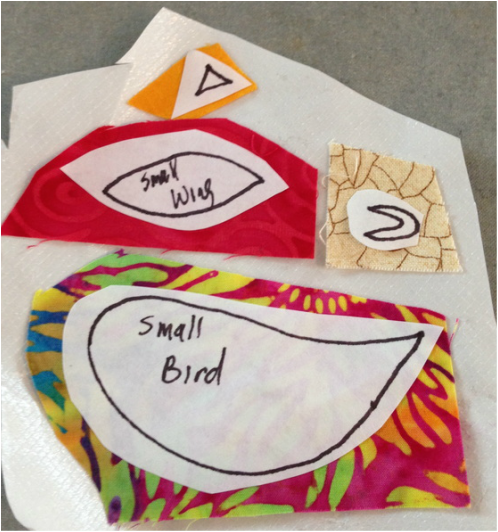 Appliques placed on fusible web wrong side down to the fusible web 5) Cut your appliqué out on the sharpie marker line, remove your freezer paper * You can use this same design over and over, just iron it to fabric with wax side to right side of new fabric, no need to draw your design over and over!* 6) Satin stitch, blanket stitch or appliqué stitch as desired to a background fabric. About Parchment Paper: -You may wish to lay a clean piece of parchment paper between your iron and your appliqué surface to protect your iron -You can build your appliqués on parchment paper -Parchment paper is a great tool in place of a silicone/lead pressing sheet (and it's a lot cheaper!) and fusible web will not stick to it and it will protect your iron as it has a non stick silicone treated finish... not just for cookies anymore! 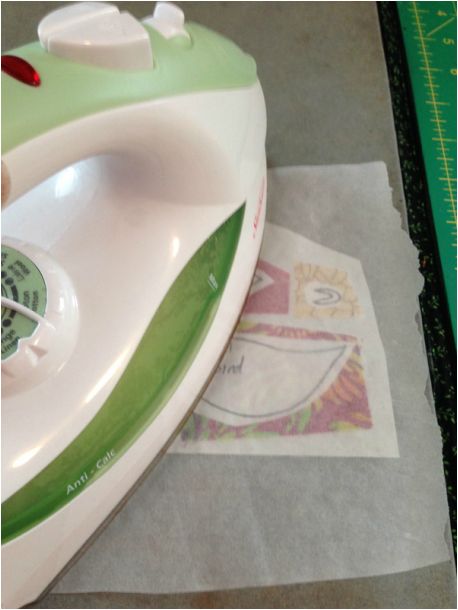 Place parchment paper over your appliqués while ironing to protect your iron from fusible web glue 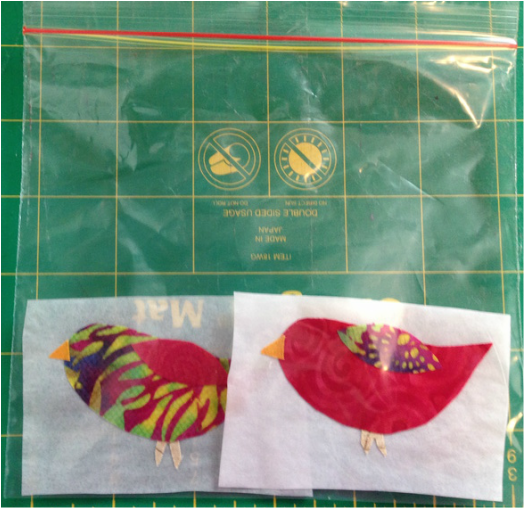 appliqués built on parchment paper and placed in a zip lock bag for future use 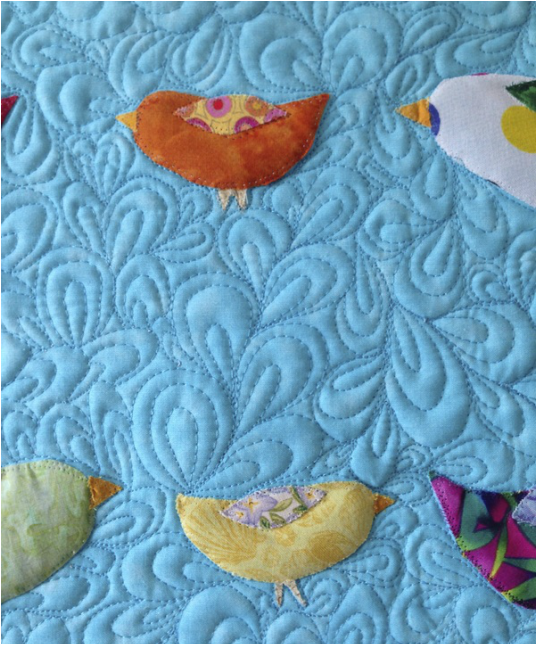 A close up of my appliqués and quilting 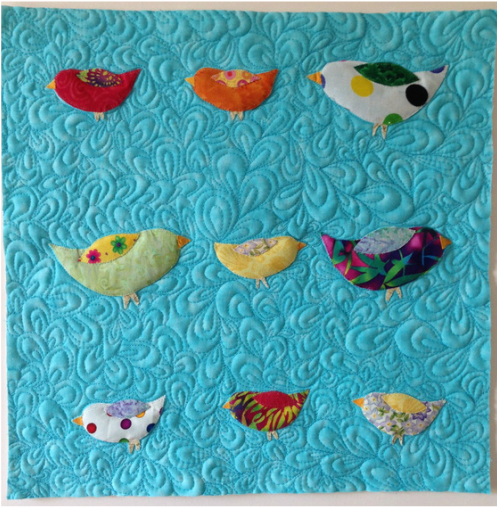 My little "quilt" 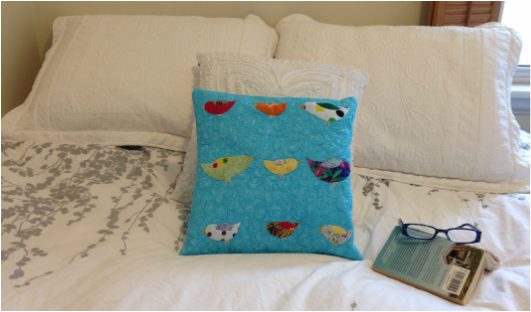 I actually made it into a pillow for my guest room! Happy Tuesday, I hope your week is going well! 🌷 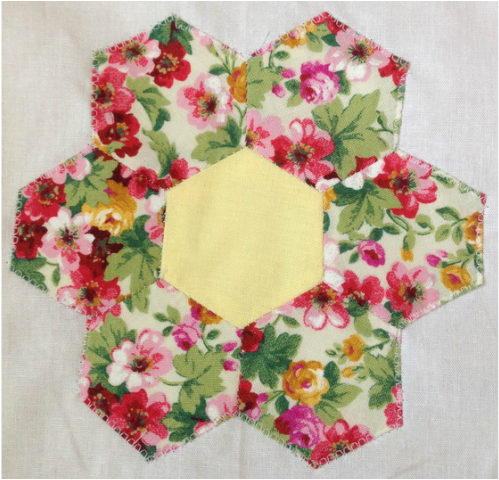
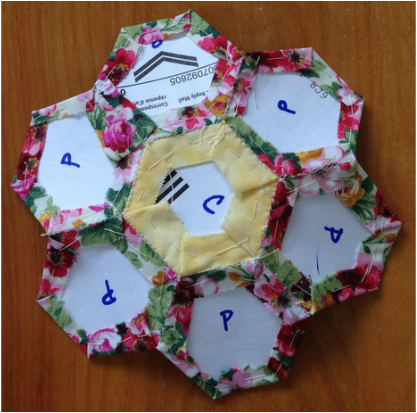
Classic "grandmothers flower" english paper pieced quilt block
As my blog followers know, I do a feature every wednesday on work with English Paper Piecing and I had someone ask me recently how to do it.
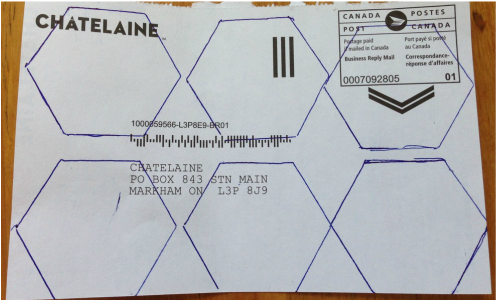
I assumed wrongly that everyone knows how to do it! So today I am sharing how to do EPP (english paper piecing) and sharing with you some resources that are very helpful to make these effectively. I hope if you try it, you become as addicted to making EPP pieces as much as I am!!! I know at least one person in my life who claims that I am the one at fault for their EPP addiction. Yeah! it's a good thing. It's a fantastic past time and it makes you feel productive while sitting for long car rides, watching TV, waiting at appointments, watching children's activities etc. My sister also claims that doing EPP stops her from thinking about snacking as well and I am sure we could all benefit from this "side effect". It's also a great small scrap buster! I am sure I have made hundreds of EPP pieces and I hope you will too❤️ How to start: 1) Assemble some card stock or the subscription cards out of magazines as shown below (they are the perfect weight for hexi papers): 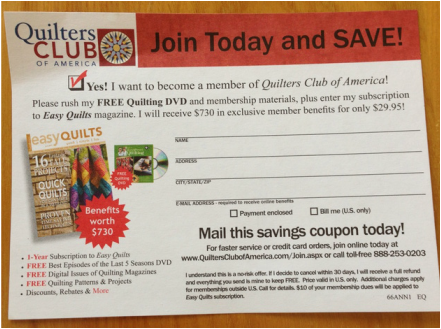
reuse and recycle these subscription cards
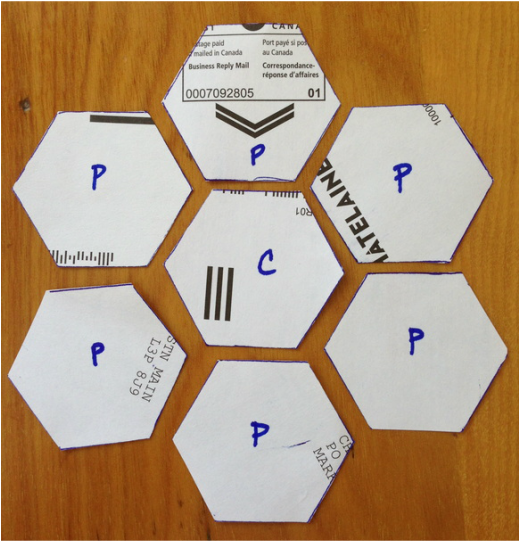
2) Print off hexi shapes from "images" in google of "free english paper piecing hexagon templates" or from free sites on the internet that provide EPP shapes or get them from a book. Trace the shape onto the back of your card stock (I cut out one shape to trace it). To make a "grandmothers flower" you will need 7 hexagons (any sized as long as all 7 are equal sized to make your flower, large or small). Draw them out accurately using a thin line pen or architectural pencil
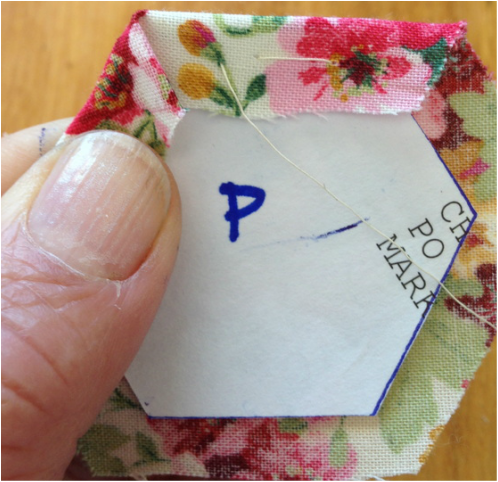
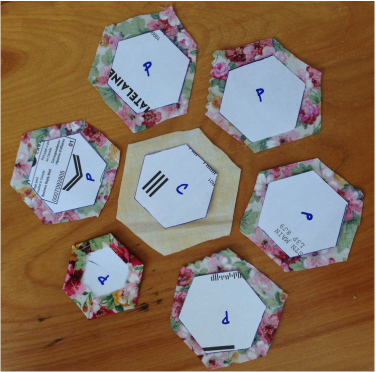
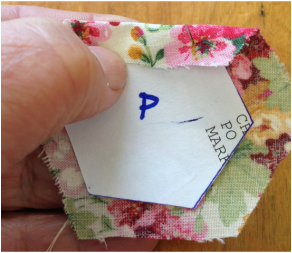
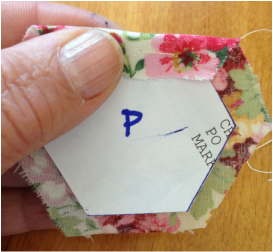
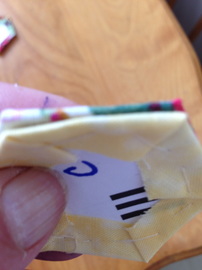
3) Cut out your hexi papers accurately, mark your centre with a "C" and your petal with a "P" especially if the centre and the petals are a different colour.
4) Cut out fabric 1/4" all the way around bigger than each hexi paper shape
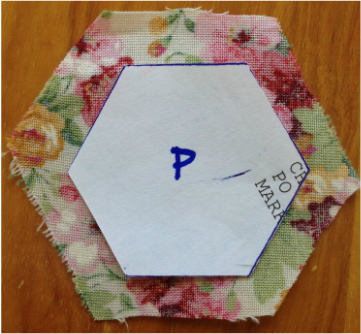
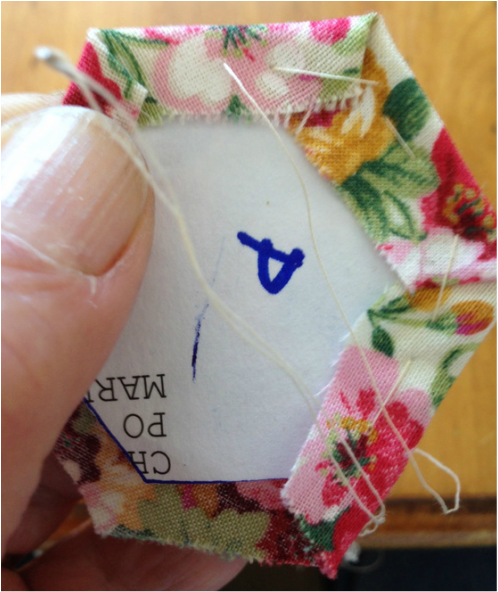
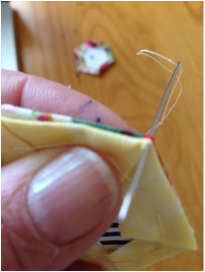
5) Wrong side facing you, use a household (basic sewing) needle & generic, neutral coloured sewing thread and fold the fabric tight against the edge and baste all edges. (be careful to keep 1/4" seam allowance all the way around as you fold and baste). Fold down at corners as you go, use a large basting stitch - these basting stitches will be removed later. Tie a knot and cut off the thread when you are finished. You are basically sculpting the fabric to fit the shape of the hexi fabric
fold the next edge and corner
Baste along the edge and over the corner fold, it helps to keep your corners snug and sharp
keep basting until it looks like this on the wrong side
and it looks like this on the right side
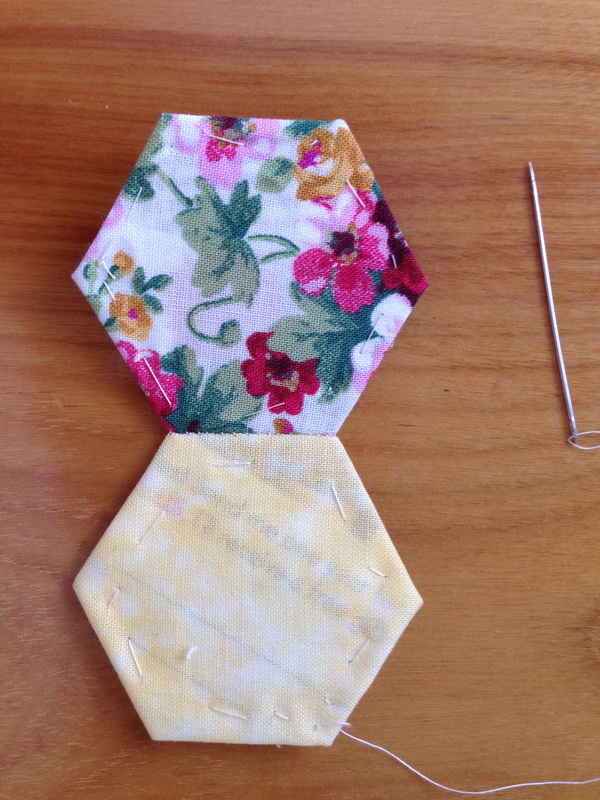
6) Make 5 more petals and one centre ( I like to see the centre a different colour)
paper and fabric all prepared for basting
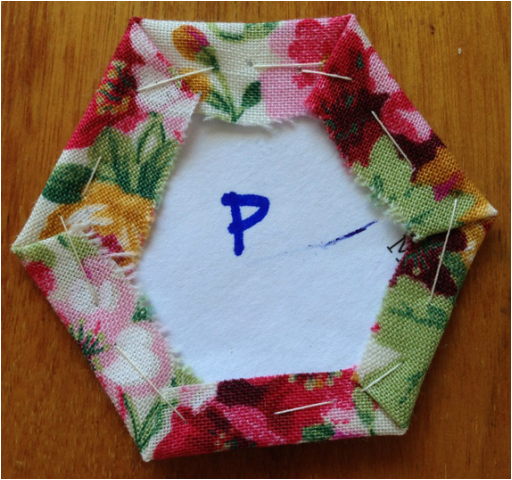
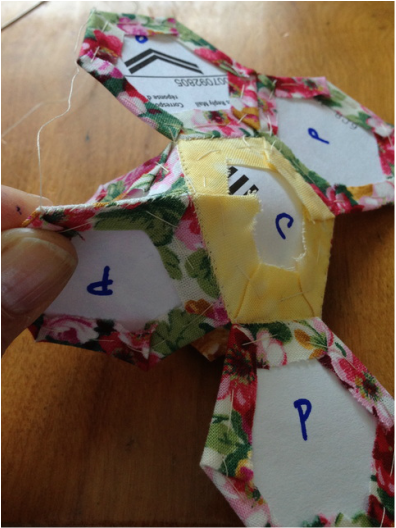
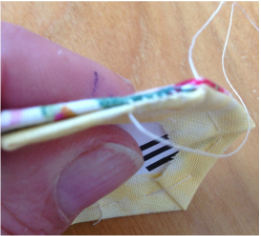
7) You will now be slip stitching your petals to your centre right sides together
8) slip stitch a petal to each side of the center right sides together until it looks like this:
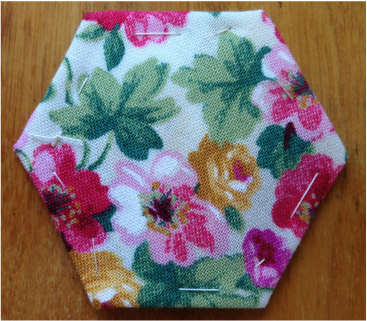
9) Hold sides of each petal right sides with the one next to it and slip stitch
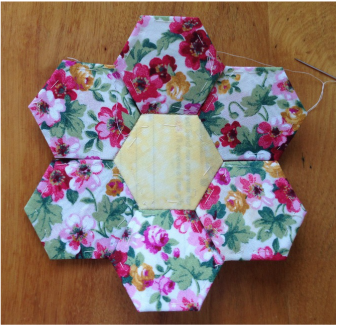
10) Once all petals are slip stitched, it will look like this:
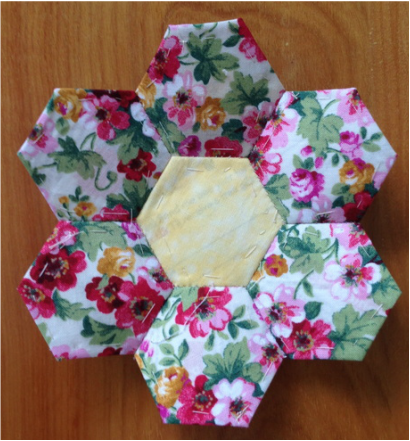
Front Side
Back side
11) Press your flower and decide if you are joining it with more EPP or appliquéing it onto a background
NOTE: a) If appliquéing it onto a background, press flat with a hot iron, remove basting stitches (NOT THE SLIP STITCHING) and pop out the papers and press again it is now ready to appliqué. b) If piecing with more EPP, do not remove basting stitches until all pieces are joined with another. Never remove slip stitching as this is what holds your piecing together. This tutorial is just to get you thinking about EPP. I recommend a wonderful book with all EPP shapes is "All Points Patchwork" by Dianne Gilleland, this I would personally consider a bible of EPP. It contains many shapes beyond hexagon with print outs available for 11 different geometric shapes, lots of small projects, wonderful modern ideas for EPP, how to piece together EPP shapes and fantastic illustrated instruction. If you want to get serious about EPP, I highly recommend this book. This is what is looks like: 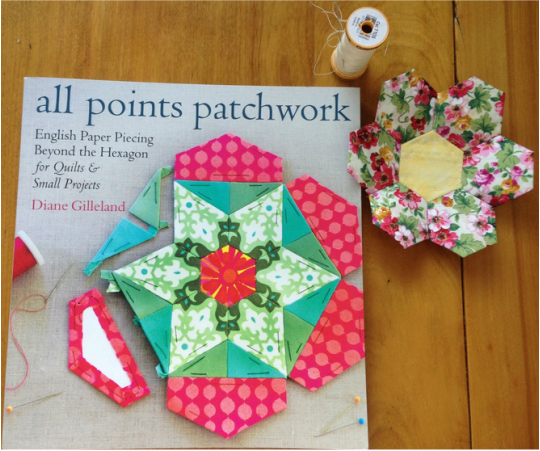
You can get it if you like by clicking here
or click on the amazon link below:
Happy Tuesday Everyone, I hope you enjoyed this tutorial and that you will attempt this technique. Please send us your pictures when you try it!
Facing a quilt means taking fabric from the front (or back) and turning it to the opposite side so that you don't have to bind it, but it looks finished. It is ideal for small or art quilt projects. Front to back facing gives you the neatest finished look, however back to front facing may also work for a quirkier/artsy quilt. Last week Tuesday, you may have seen my blog post about "Radiating Blossoms" using a fabric centre for inspiration and practising free motion quilting out onto the border area. This little quilt ended up being faced as I am going to use it as an art quilt to hang on my bathroom wall. How to Face a Quilt: 1) When you finish a quilt add 1.5" width all the way around on the length wise and width wise borders 2) Press the outside edge under 1/4" towards the wrong side of your quilt all the way around the perimeter. 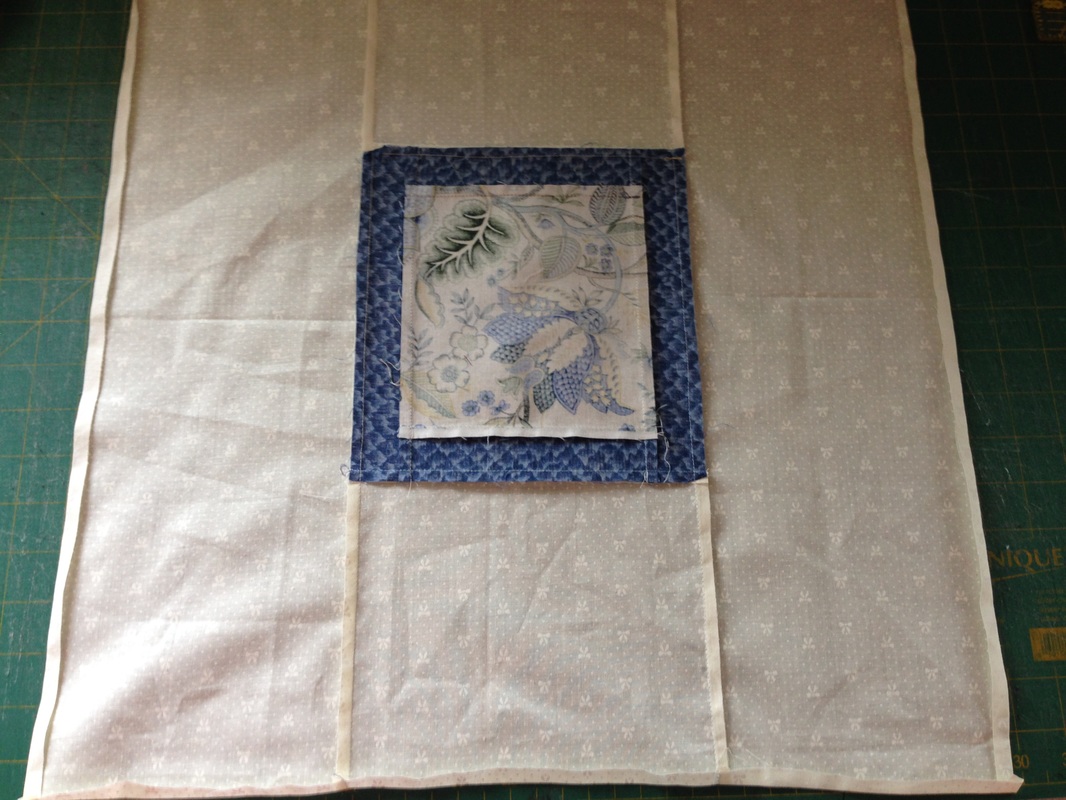 Edges are pressed under 1/4" 3) Draw a line with your Frixion pen on both horizontals and verticals 1.25" in from the edge all the way around. 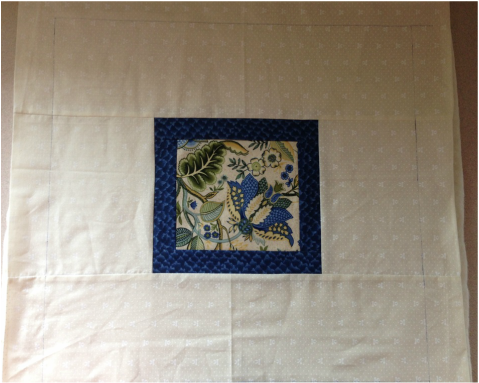 The 1.25" line drawn around the quilt top 4) Allow your batting to be a little bit bigger than your finished quilt top to allow for sprawl of the batting as you quilt and the same for the backing (you can trim this after the quilting). Sandwich and baste your quilt. 5) Quilt your quilt but do not go beyond the frixion markings 6) Sew on the Frixion marking 7) Trim both your backing and batting fabric very close to the line you just stitched but do not cut into the top fabric of your quilt 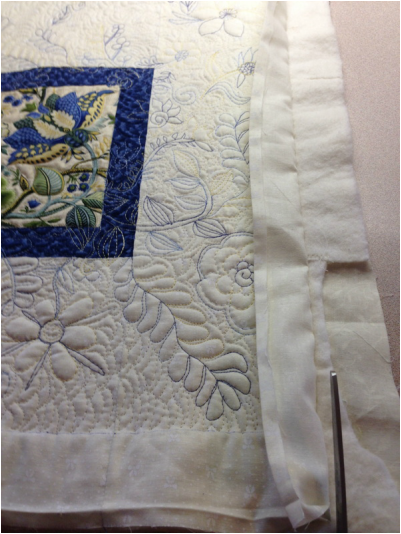 Cutting away the batting and backing close to the Frixion/stitch line 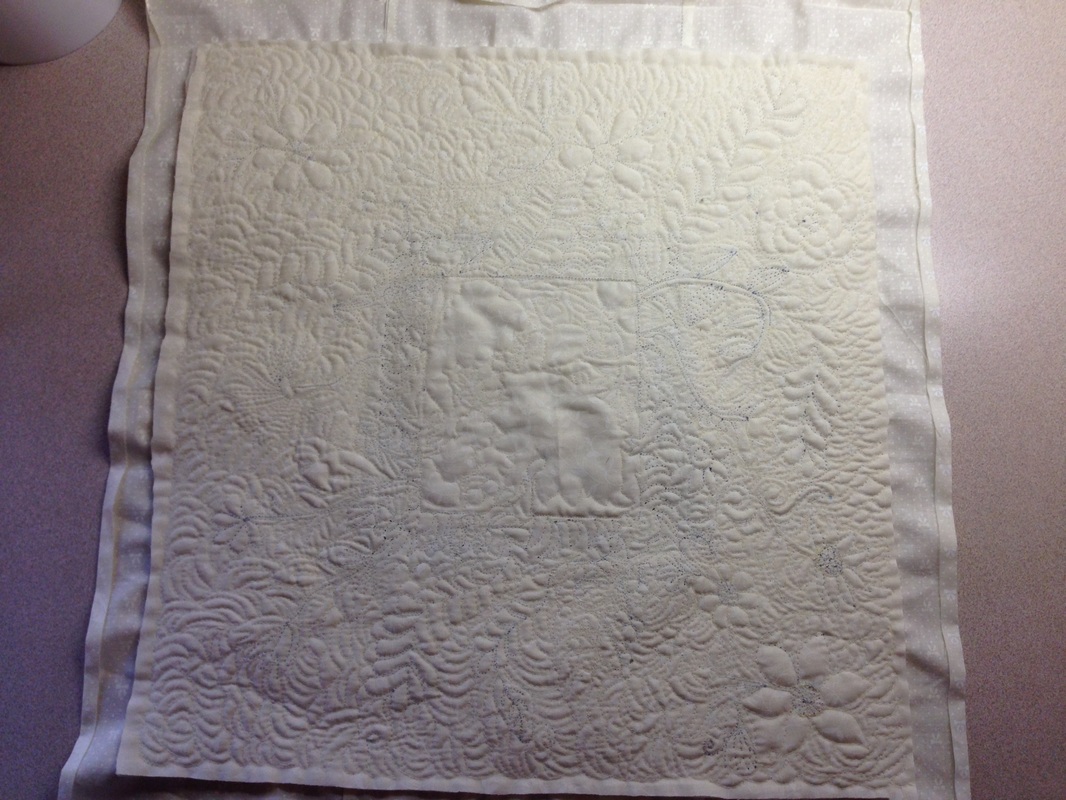 8. Once all edges are trimmed, turn your quilt over, press your facing and pin the edges towards the back.  9. Slip stitch your facing to the back of your quilt, overlap your corners neatly or fold and mitre them, remove your pins, press from the right side and you are done! 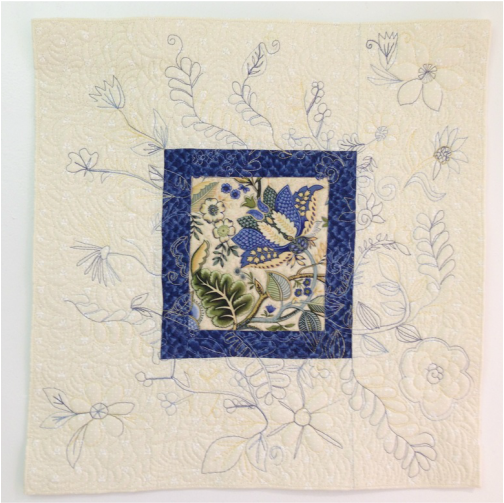 Have a great Tuesday everyone, I hope that this tutorial is helpful!🐣
A Great Free Motion Practise Project- "Radiating Blossoms", It's Tool and Technique Tuesday!3/15/2016 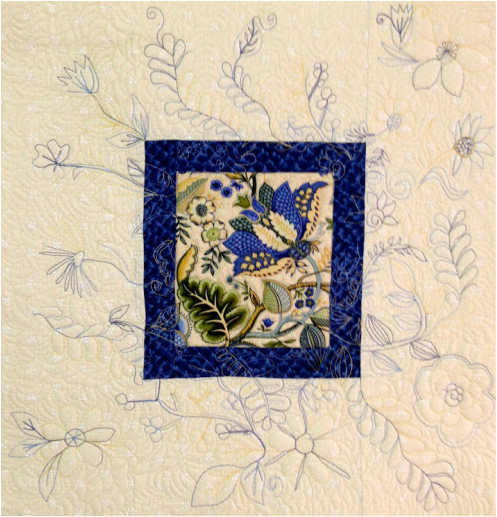 Make this "Radiating Blossoms" quilt to practise your free motion quilting! Quite a few people lately at the Waterloo County Quilters Guild have been taking classes in free motion quilting. I have also been teaching classes on this subject in Barrie. The reason I want to talk about this project is in the hopes that it will give people an idea of what to do to practise their free motion quilting skills. In my opinion practise is vital to improving your free motion skills. If you take piano lessons you have to practise to get better and the same is true of free motion quilting! This little project is kind of the reverse of a quilt, the background is on the outside of the feature fabric to give you space to quilt and the feature fabric is the inspiration to get you thinking creatively. You will want to radiate the design out onto the border and spill it onto the background fabric. It is recommended that you choose a fabric with defined edges and one that you love. Don't be afraid to cut into it! Some other suggestions for feature fabrics:  Practise Leaves, feathers, ferns, curly tendrils etc with the above fabric  Practise fill stitches, circles, elongated leaves, foliage, butterflies, curly tendrils etc with this  Practise leaves with fills, paisley designs circles and more with this I have given you only a few suggestions, there is so much gorgeous fabric out there, I encourage you to look at your stash, you will probably have some perfect fabric. What you will need to do this project: 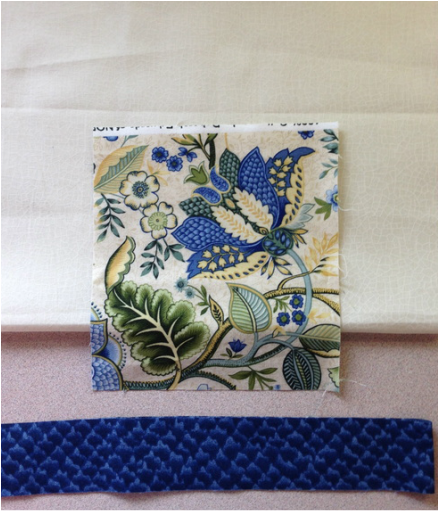 Background fabric (you decide on the size), feature fabric ( mine is 5.5 x 5" and a border strip ( mine is 1.5"). You will also need batting and backing fabric (the size of your top when pieced together) You will also need: 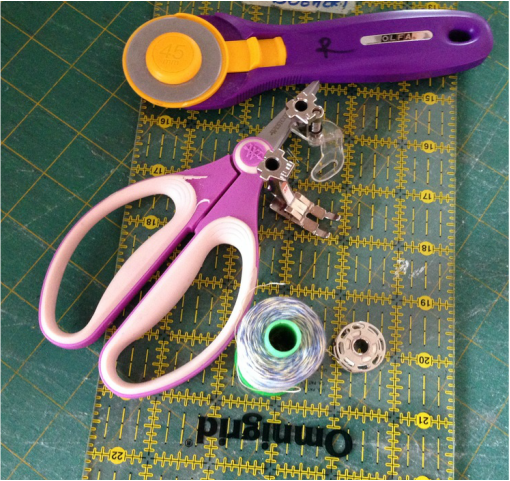 A rotary cutter, scissors, free motion foot, 1/4" foot, cutting mat, ruler, decorative thread ( I used variegated blue and yellow) and bobbin thread to match your backing fabric How to make this project: 1) Cut out all of your fabric 2) Piece your border strip to your feature fabric 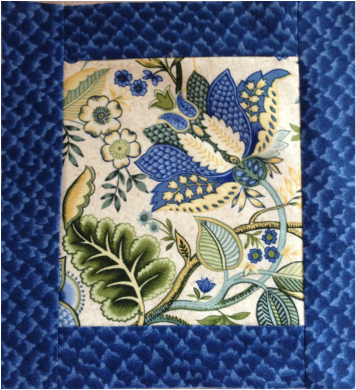 3) Add your background 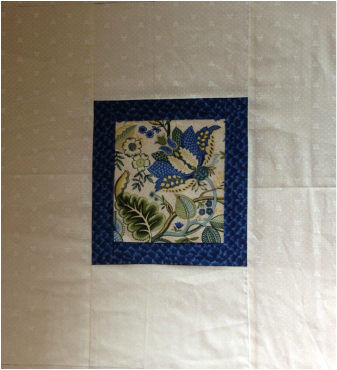 4) Sandwich your quilt with your backing and batting ( I used 505 Quilt Basting Spray) 5) Quilt around the motifs in the centre first and fill in the background spaces if you like, use a meander (stipple stitch) or stacked bananas (your choice of fill) 6) Look at your centre fabric and decide where you can extend a design, i.e. a leaf, stem, flower, feather etc and extend these out onto the border and into your background. Use a disappearing ink pen if it helps you to draw it out first. 7) Leave room for fill stitches, they provide a place for your eye to rest and see the flowers or leaves etc. you have free motion quilted. 8) Use a thread that you can see to make your feature motifs- i.e. flowers or leaves in a brighter colour and use a thread that matches the background for fill stitches. 8) Remember to bring up your threads from the bobbin to avoid nesting and cut threads when you stop on the back 9) Breath! and stop! when feel the design/motif looks the way you want it to, cut threads and move to another area 10) Fill in the background areas with a fill stitch at the end Refer to the pictures below to see what I mean. 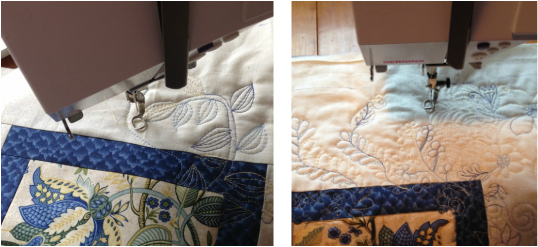  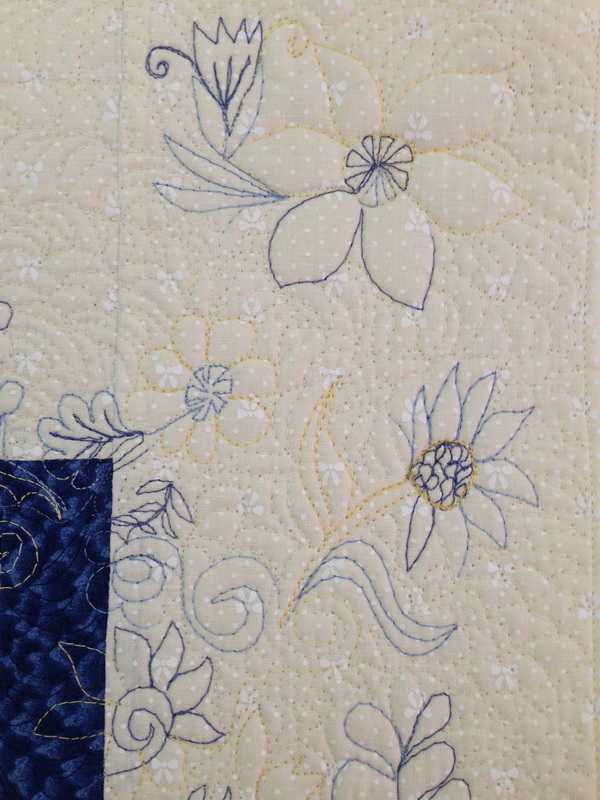 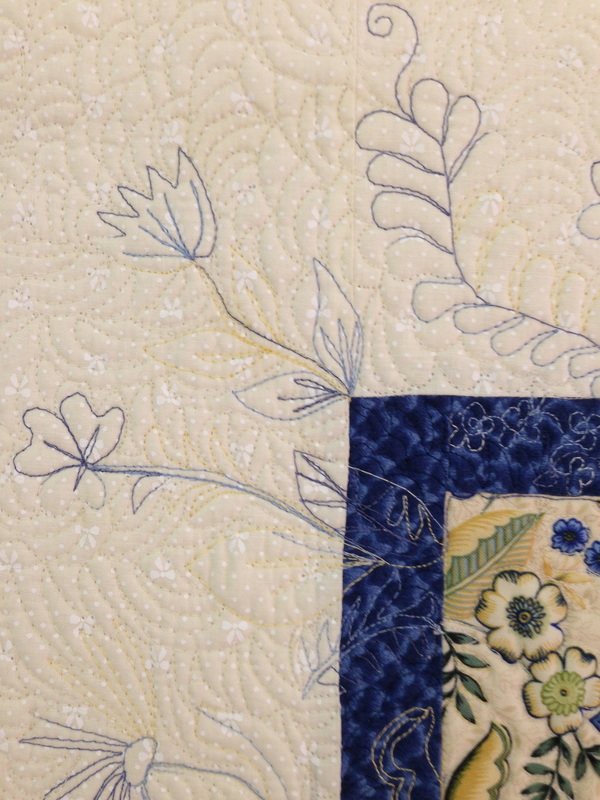 See the designs go onto the border and into the background 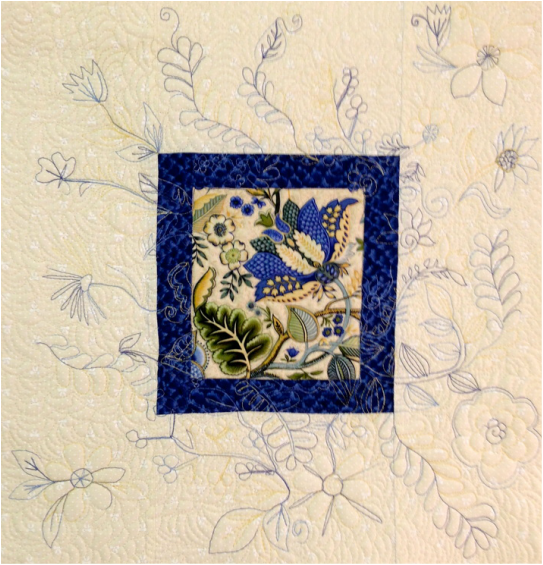 Admire your efforts and keep on practising! You could make many potholders, cushion covers, wall hangings, tote bags etc with these practise pieces.
Happy Tuesday! I hope I have inspired you today! 😊 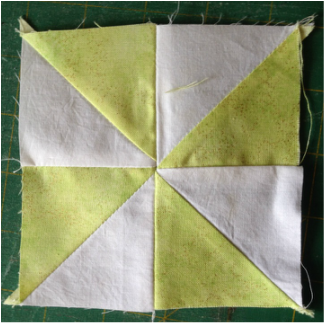 A pinwheel/windmill block- make 2 blocks all at once with this technique! This free tutorial will show you how to make many-(8 )-1/2 square triangle units like the ones above all at once. You can use these to make pinwheel/windmill blocks or any block involving a 1/2 square triangle Step 1: To make a Magic 8, first determine what size finished half-square triangles are desired. For example:
Determine your 2 fabrics, mine are lime green and white 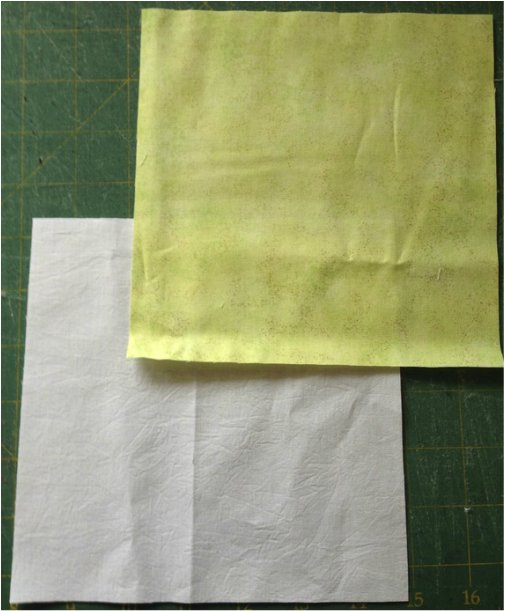 Step 3: With right sides together, draw two diagonal lines corner to corner. 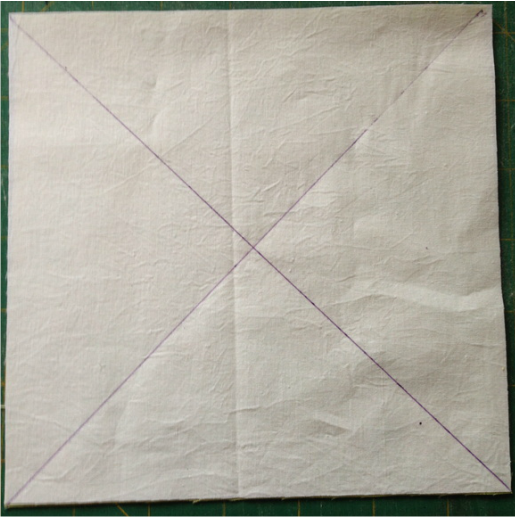 Step 4: Stitch a quarter inch of either side of both drawn lines. 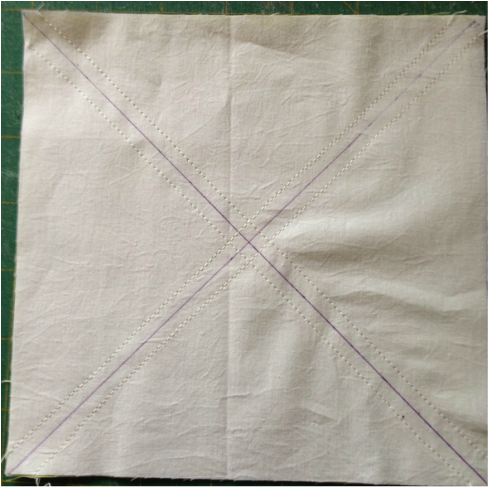 Step 5: Carefully cut apart with out shifting the stitched fabric square. There will be four cuts: Cut down the centre vertically, horizontally and then diagonally on each line you drew earlier Use a rotary cutter and ruler to make sure you are accurate 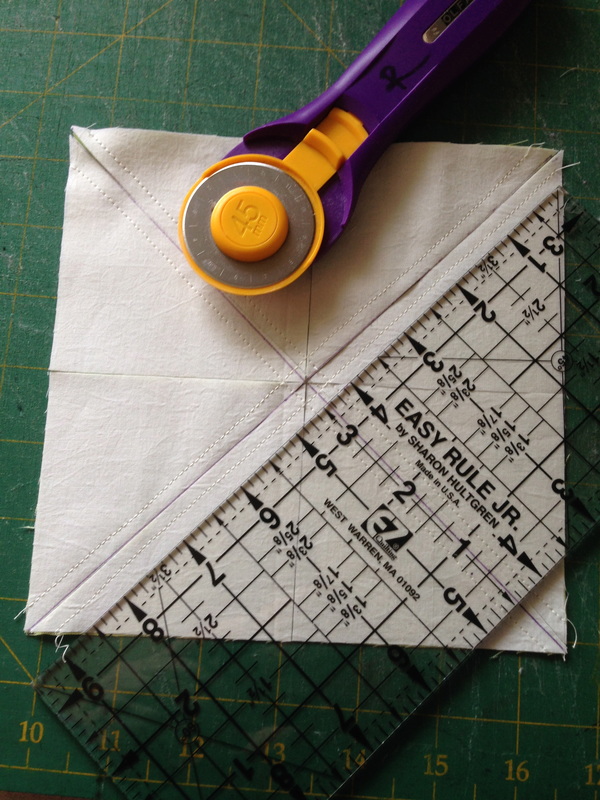 Step 6: Separate all 8 units and you will see you have 8- 1/2 square triangle units made like magic! 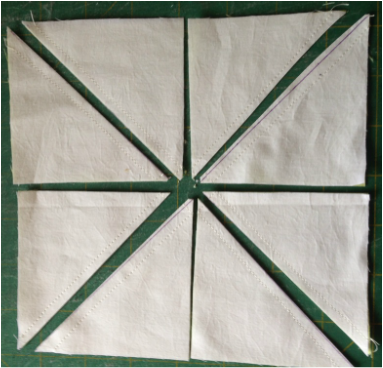 Step 7: Press towards the dark fabric and sew together like the below graphic and use pins to match points (recommended) 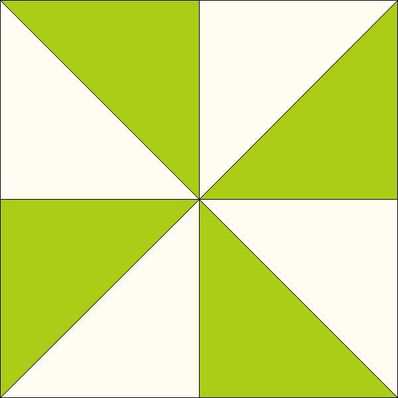 Step 8: Press connecting seams open to avoid bulking up the centre seam (recommended) 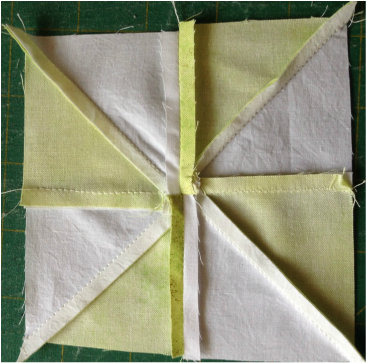 Step 8: Admire your efforts- I think this is the easiest way to make 1/2 square triangles! 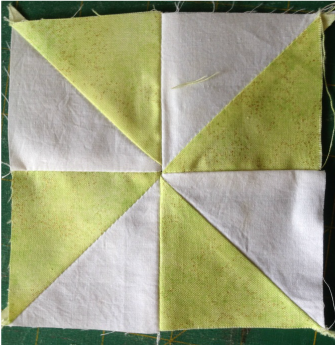 Now get busy and make a quilt entirely from the method above with pinwheels/windmill blocks LOL.
It would make a great summer quilt, don't you think? Send us pictures to share if you do! Happy Tuesday!😊 |
Follow Me:
Welcome!Hi I'm Robin and I am a professional long arm quilter, pattern designer and teacher. I am passionate about all things quilty!  
  Categories
All

Sponsors
This blog contains affiliate links. This means that we endorse products.
We do receive rewards for these endorsements and this helps to keep this site alive and well. We support products which we believe are the best quality and to inspire your creativity! |
 RSS Feed