QUILTINGINTHELOFT
  • Blog
  • About
  • Quilting
  • Shop
  • Teaching
  • Gallery
  • Contact
  • Crochet
  • Sponsorships
  • Blog
  • About
  • Quilting
  • Shop
  • Teaching
  • Gallery
  • Contact
  • Crochet
  • Sponsorships
Search

Welcome To Quiltingintheloft.com

Picture
Brought to you by quiltingintheloft.com

A Great Ric Rac Project for Gift Giving! Double Ended Oven Mitts

11/15/2016

2 Comments

 
PictureDouble ended oven mitts trimmed with ric rac!


Over the next few weeks I will be sharing with you projects which are oriented to gift giving, getting ready for the holiday season and utilizing ric rac as a trim.

You are probably thinking, ric rac is a bit  too retro?
 
I think it's fun to incorporate this trim on projects!  That's my story and I am sticking to it!!  It is a trim that can appear modern and fun or vintage... you choose.


The story of ric rac (also spelled rickrack & ricrac) goes back to the 1800's.
Ric rac has been described as a flat narrow zig zag shaped braided trim used for clothing and curtains. Before the popularity and availability of sewing machines and sergers it was used to conveniently finish the edges of fabric.  

This trim became popular and peaked in use in the 1970's, at the time of "Little House in the Prairie" and likely as I surmise, along with the increased use of the  home sewing machine.

Any way I cut it, ha ha pardon the pun!  I like it for the following reasons:
  1. It is colourful
  2. It has a non conforming shape- it's not straight!
  3. It's cheerful and is a great embellishment on kids clothing and much more....
  4. It is available in many colours and sizes
  5. It is a readily available trim at most sewing (and some quilt) stores
  6. It is relatively inexpensive when compared to other trims
  7. It is easy to sew on
  8. It's classic, it has stood the test of time and timeless (depending on how you decide to use it)
  9. On the other hand, it is simple, fun, retro and even a bit kitchy if that's the way you want it to look.
  10. It is versatile as a trim with home decor, wearables and quilting.

Picture
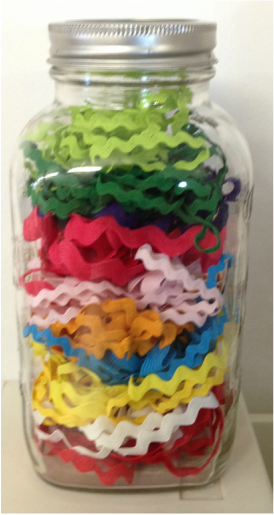
My jar of ric rac, a great way to store it

​Now on to the project at hand......

Double Ended Oven Mitts, so handy to hang conveniently on your oven. No need to hide these beauties away! 

​A great gift for the chef/baker in your family or keep to use for your kitchen!

​ I am keeping mine, I need it for upcoming Christmas decor and baking.
Picture
Project #1 with Ric Rac, Double Ended Oven Mitts
What you will need:
  1.  2- 28 x 7" pieces of cotton fabric for the front and back of the mitten back. (owl fabric above)
  2. 1- 28 x 7" piece of Insul- Bright- see below
  3. 1- 28 x 7" piece of quality quilt batting ( I used Hobbs Heirloom 80/20)
  4. 2- 3 x 7" pieces of cotton trim fabric for the mitten front (green above)
  5. 4 - 7 x 7" squares of fabric- mitten front (red solid)
  6. 2 - 7 x 8 1/4" pieces of batting - mitten front
  7. 2- 3/8" x 7" pieces of ric rac in a colour to contrast with your fabric
  8. Approximately 65" x 2 1/2" of bias double fold binding
  9. Fusible web (optional)
  10. Thread to match for appliqués or invisible thread (optional)
  11. Thread to match for quilting and piecing
  12. Scissors
  13. Iron
  14. Sewing machine
  15. Quilting foot for sewing machine
  16. Free pattern download Double Ended Oven Mitts Pattern  to trace for rounded ends of mitten back and fronts, get it here and print it out.
Picture
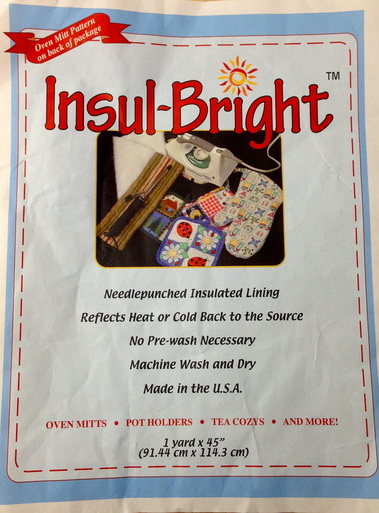
This is what I used with a layer of batting

How to make your double ended oven mitts:
  1. Sandwich your rectangle: front and back of mitten (back) (owl fabric) together with a layer of insul-bright and batting as described in 1, 2 & 3 above. Make sure the right side of your fabric faces outward. Pin to hold for quilting.
  2. Quilt the quilt sandwich using a pattern of your choice (mine was a simple wave down the length). See photo above.
  3.  Using the free PDF pattern for the ends of the mitten back, trace at each end (with a disappearing ink pen) and cut out according to the pattern, through all layers.
     4.  Use the pattern for the mitten front pieces to trace and cut out the 
​          mitten front rounded areas.
    5.  Baste at the edge of 2 of the mitten fronts, the 2 pieces of ric rac to the
​         straight edge of the mitten. See below:
Picture
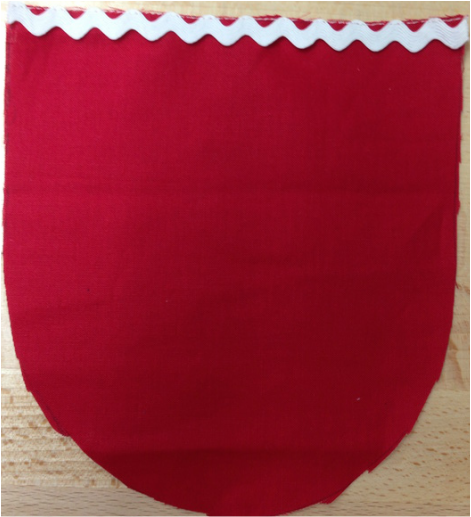
     6.  Attach the trim piece (3 x7") right side down to the ric rac and sew
​          with a 1/8" seam allowance
Picture
    7.  Repeat for the other pocket as in 6 above.
    8. Sew the back of the front pocket to the other side of the trim (green) as
​        shown below (right sides together). Make 2 of these
Picture
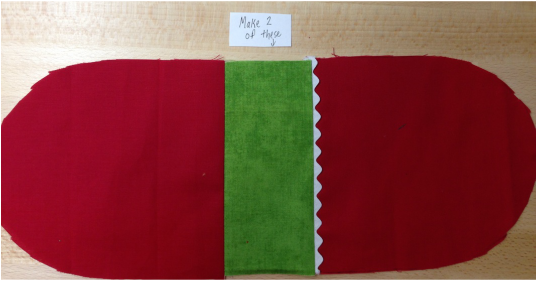
     9.  Applique or embellish if you wish now on the ric rac side of the front
        pocket. See below:
​        I  cut out some owls, fused them with fusible web
​        and used invisible thread to appliqué them.
Picture
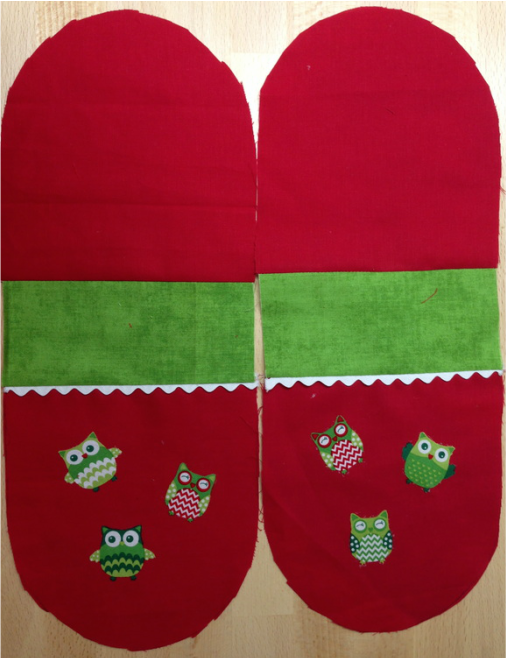
     10.  Fold your mitten fronts over the 7 x 8 1/4" pieces of batting. (Batting
            sandwiched on the inside of the mitten) Trim if necessary.
           Stitch in the seam ditch between the trim and the ric rac and sew all
           around the outside edge of the pocket to hold together- 1/8" in from
           the edge. Repeat for the second pocket.
Picture
     
Picture
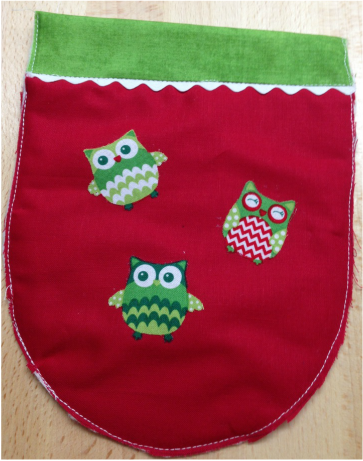
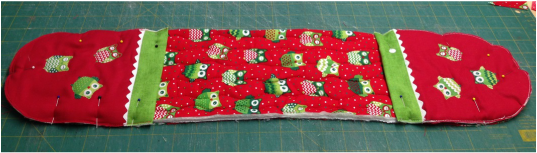
Pin all around pocket edge
Picture
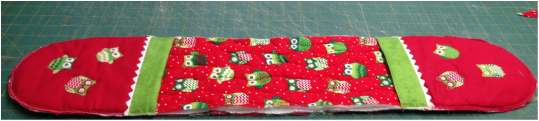
Sew with a 1/4" seam allowance all around pocket edge
     12.  Bind with pre-prepared bias, 2 1/2 double fold binding using a 1/4" seam allowance. Bind as you would a quilt! See below:
Picture
Picture
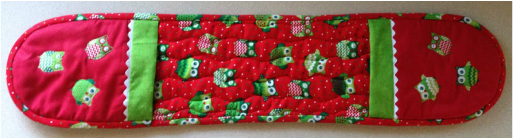
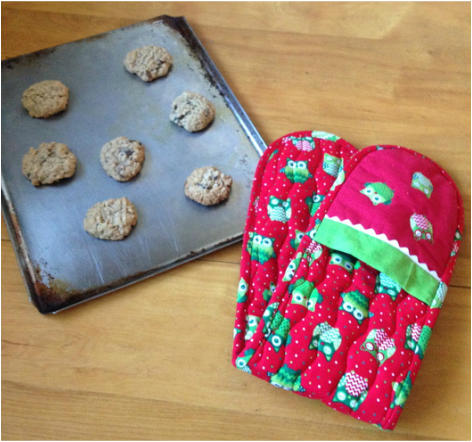
You are now ready to put your double sided oven mitts to great use or save them for someone special this Christmas.

​Doesn't that ric rac look adorable!!

​ Happy Baking and Happy Tuesday!
2 Comments
Verda
1/15/2022 02:58:41 pm

Wonderful instructions! Thanks!

Reply
Bonnie Gause link
10/31/2022 09:35:48 am

Thank you very much I have been wanting one of these

Reply


Leave a Reply.

    Follow Me:

    RSS Feed

      Subscribe to receive updates and exclusive content!

    Subscribe to Newsletter
    Picture

    Welcome!

    ​​Hi I'm Robin and I am a professional long arm quilter, pattern designer and teacher.  I am passionate about all thin​gs quilty!

    Picture
    KeepsakeQuilting

         Categories

    All
    About Us
    Baby Gift Ideas
    Baking
    Be Inspired!
    BERNINA
    Classes
    Crochet
    DIY
    Environment Friendly Projects
    Fabric
    Fantastic BOOKS
    Free Patterns
    Give Aways
    Happy-monday
    Hexagon-quilt-along
    Holidays
    Local-events
    Long Arm Quilting
    Monthly-minis
    Organizing
    Patterns
    Publications
    QUILTsocial.com
    Recipes
    Rulerwork
    Ruler Work
    Sale-items
    Scan-n-cut
    Stash-busting
    Teaching
    TGIF Fridays
    The Best Notions
    Tool & Technique Tuesday
    Tutorials
    Wedding DIY
    Wednesday Wonder Blocks
    You Tube

    Picture
    HummingBird Sewing Centre
    Waterloo County Quilters' 
    Elmira Needle Sisters
    Katjas Quilt Shoppe
    Xposures By Melony
    Quilt & Fibre Art Festival 
    hyggeligt.ca , St Marys
    Quilting By Design, New Hamburg
    Twill and Timber.com
    Wild North Kids
    ​​Leah  Day
    Den 'Ve Gems
          Sponsors
    This blog contains affiliate links. This means that we endorse products. 
    We do receive rewards for these endorsements and this helps to keep this site alive and well.
    We support products which we believe are the best quality and to inspire your creativity!
Proudly powered by Weebly
  • Blog
  • About
  • Quilting
  • Shop
  • Teaching
  • Gallery
  • Contact
  • Crochet
  • Sponsorships