|
Brought to you by quiltingintheloft.com
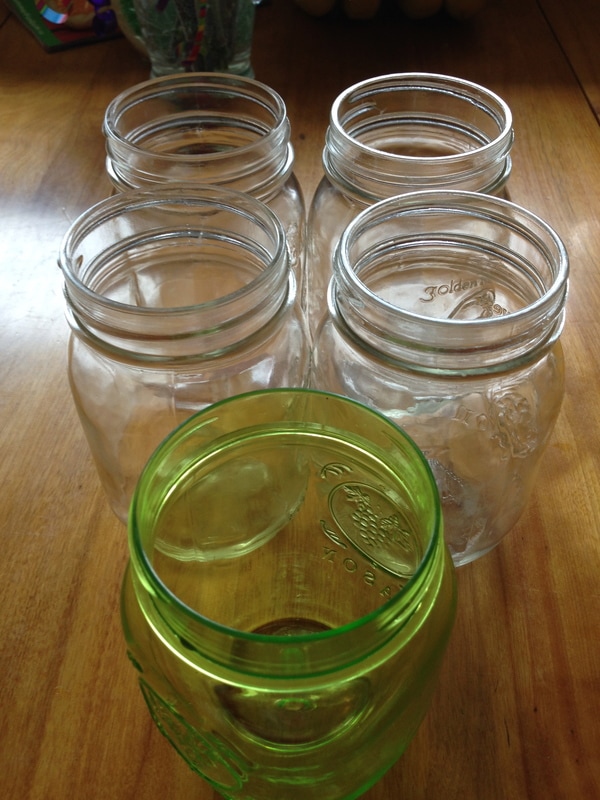
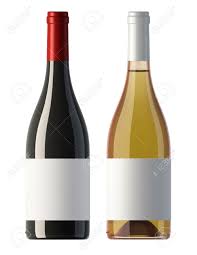
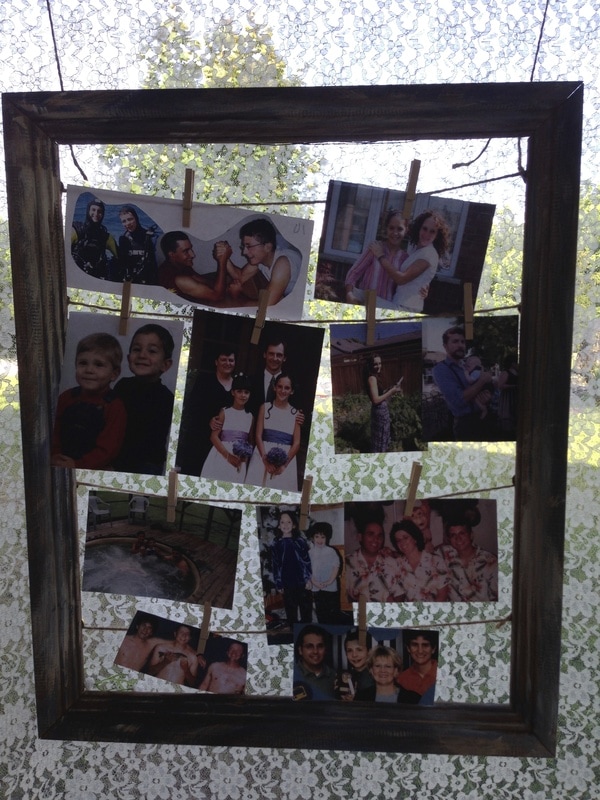
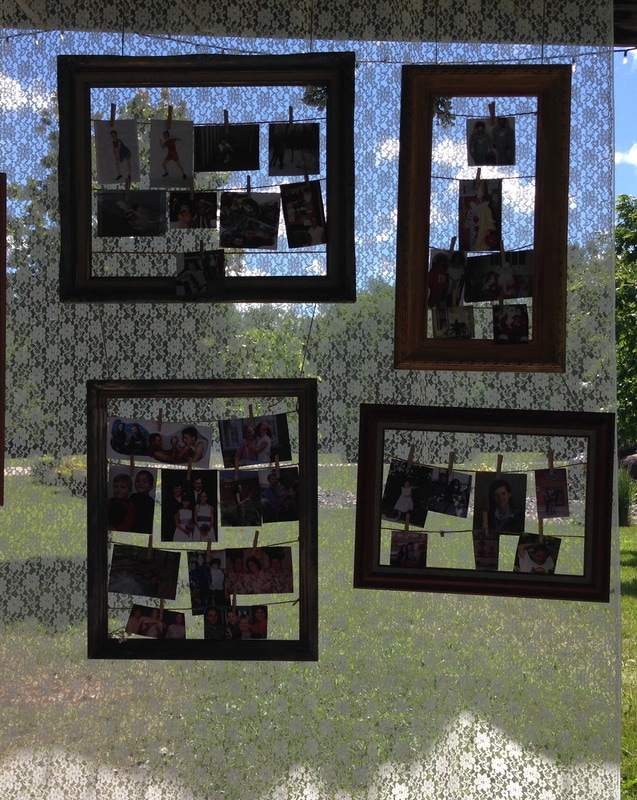
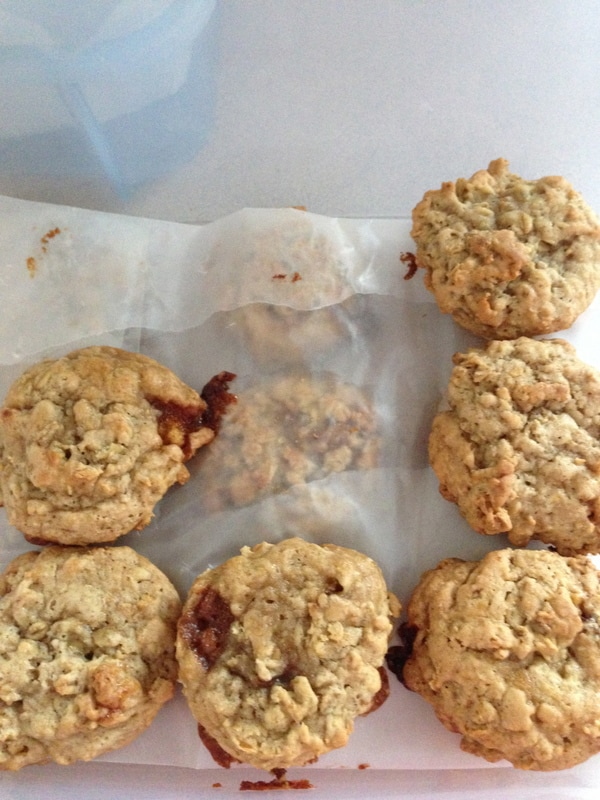
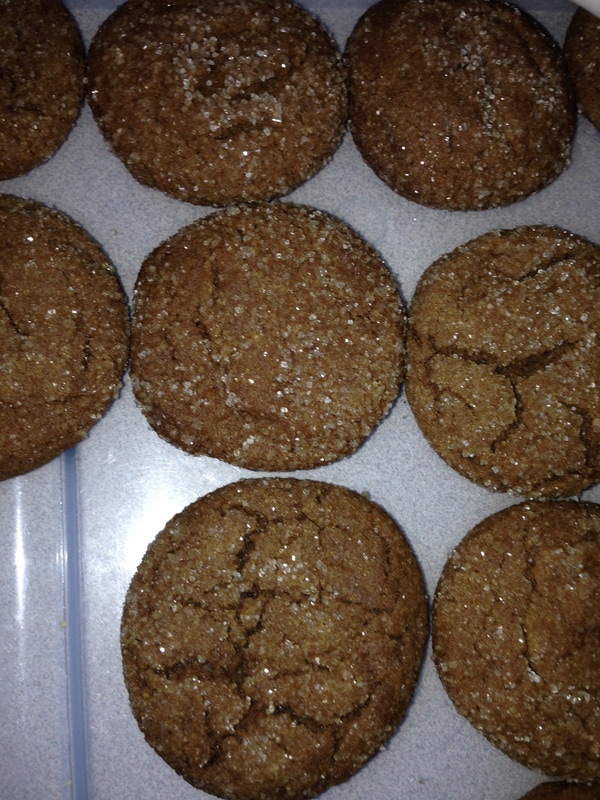
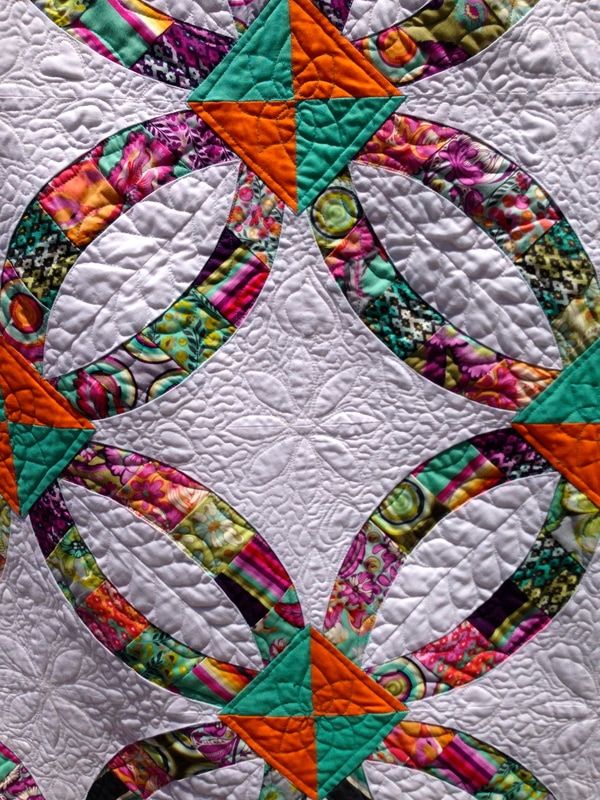
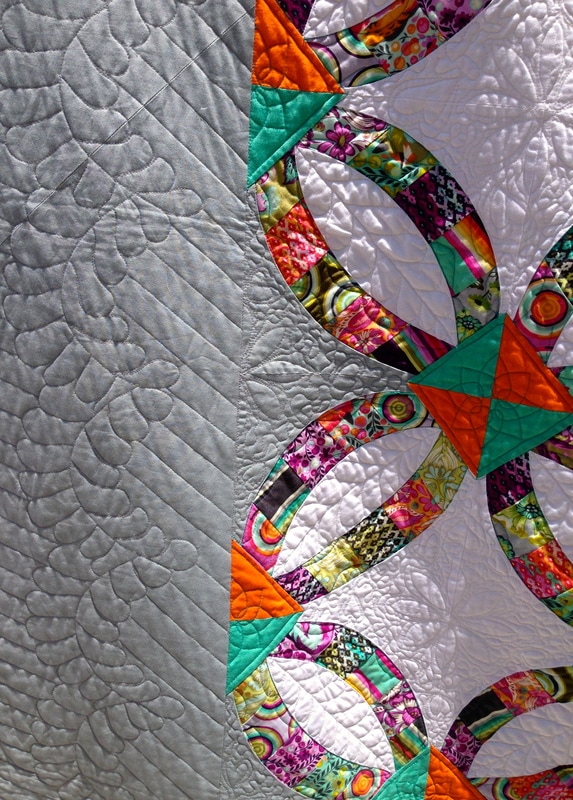
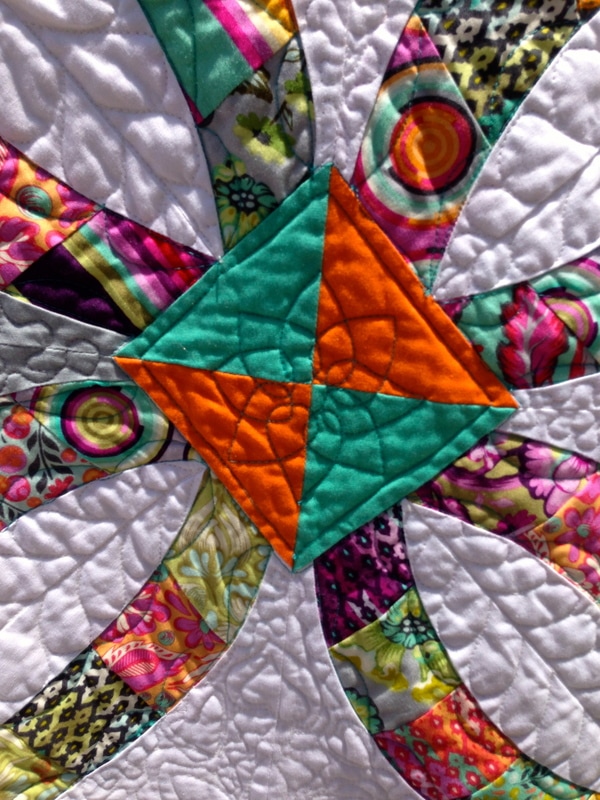
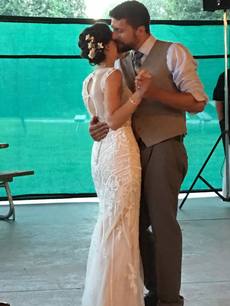 Hi everyone, we had an exciting event on the weekend. The wedding of my daughter Katie & brand new son-in-law Chad. I thought it would be helpful to share some DIY ideas for weddings with you. It's not all sewing but DIY and anyone who sews or quilts is probably a DIY'er. I wonder what the statistical probability is of that? Also, read to the end, you just may see some sewing!! First off, my mother made me a wreath for my front door to make a statement that says "this is the wedding month". It is made from grapevine wreath, lace, ivy, spray roses, a glue gun and other flowers. See the picture below: 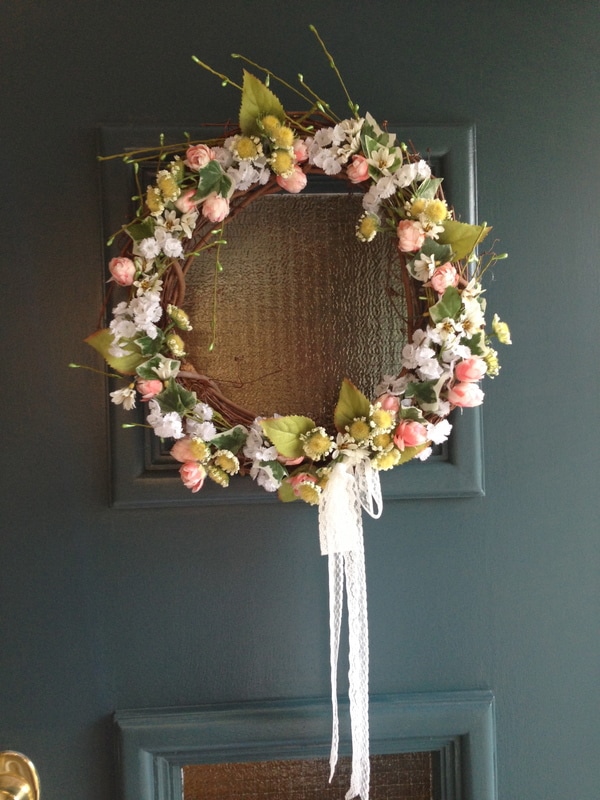 We started the wedding week with a bachelorette party. This party ended up with attendance issues because every lady invited to the bachelorette was also invited the following weekend to the wedding and just could not do 2 weekends in a row. So we improvised and started out the party with the 4 ladies and then invited the guys (on the way back from their camping/bachelor weekend) to join in our festivities. We planned a social paint night. I hired an artist to teach us to paint! Of course we had some great beverages and food as well and what a hoot it was with the guys! See pictures below: 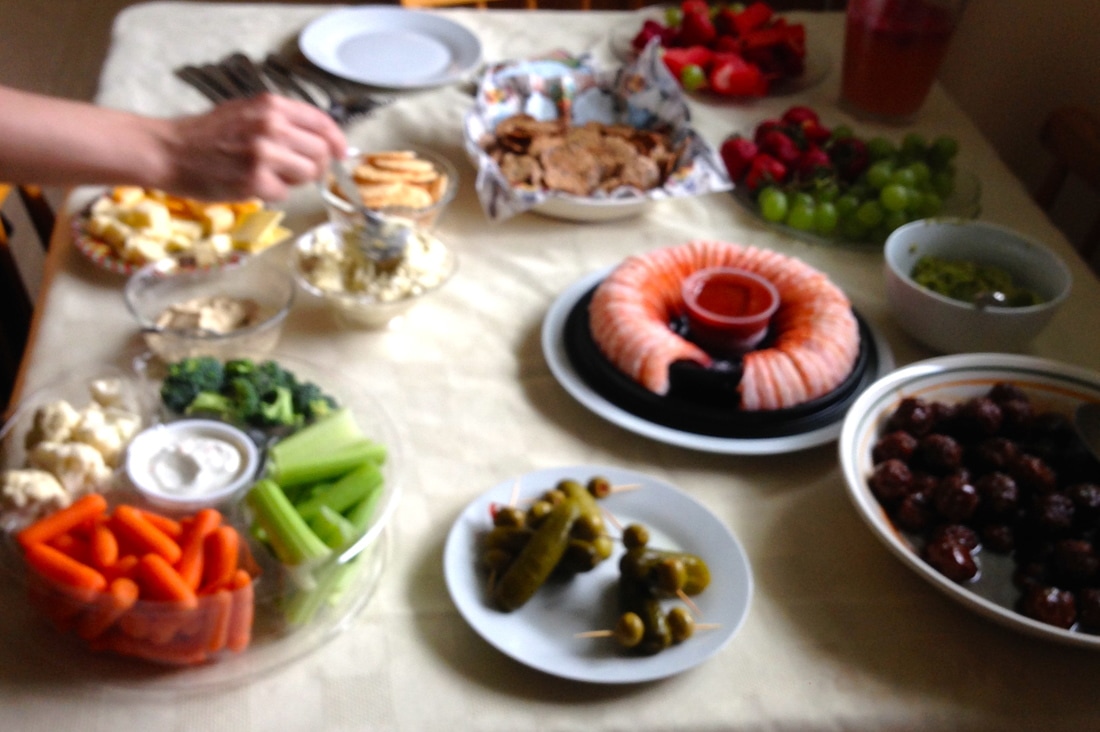 Food 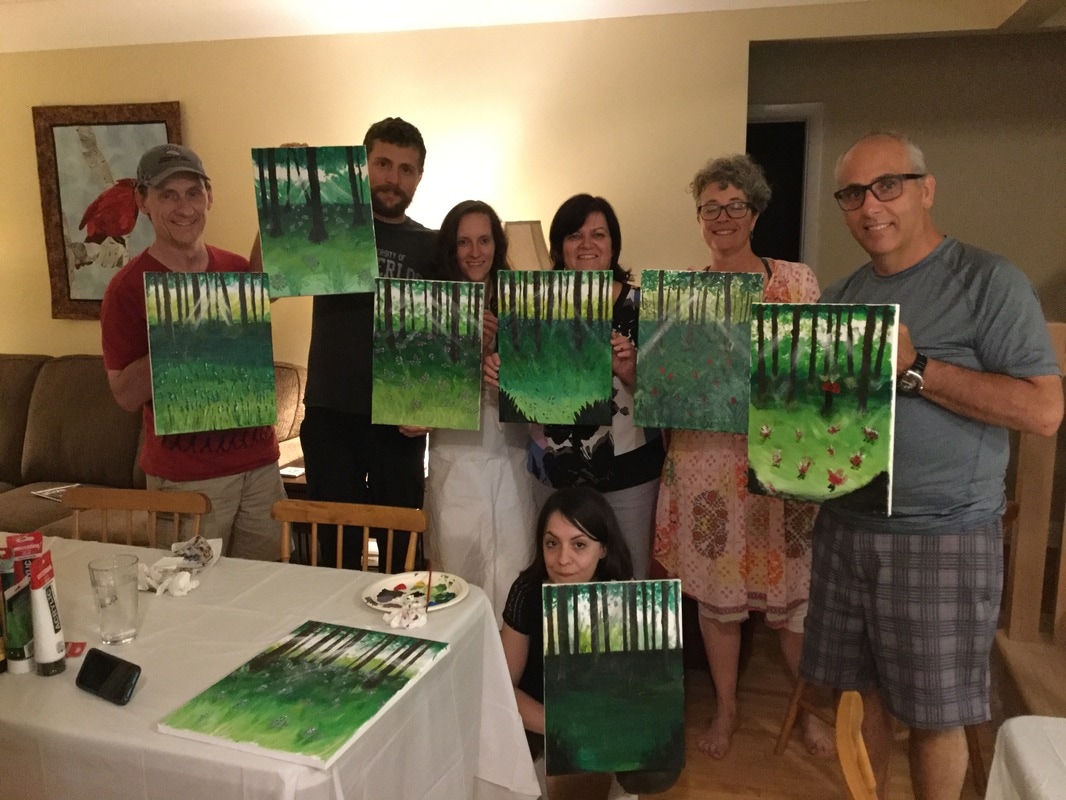 ... creative activity and good people to be with. What more could you ask for? Now on to the wedding..... 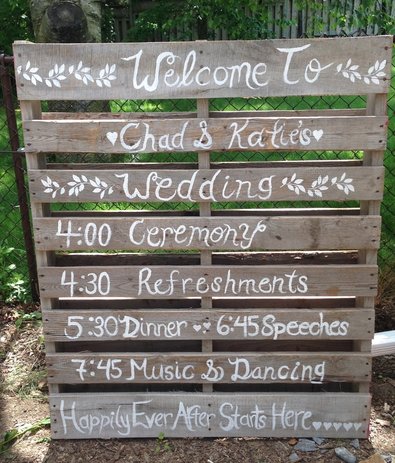 Guests arrived at the Parking lot to see this hand painted DIY Pallet Sign Flowers, Hair and Make-up: Hydrangeas, spray roses, english ivy (from our garden), greenery and limonium (latifolium sea lavender) for the bride. 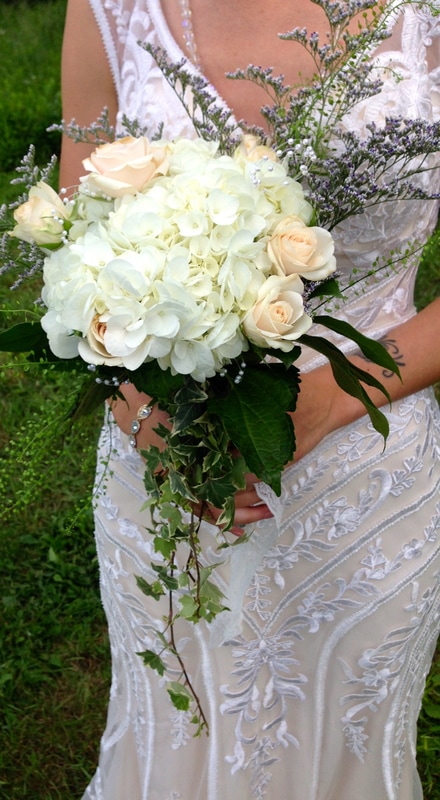 This beautiful fresh flower bouquet was designed and made by hand by my very talented mother. She is not a trained florist, but rather has the confidence to design and arrange flowers! 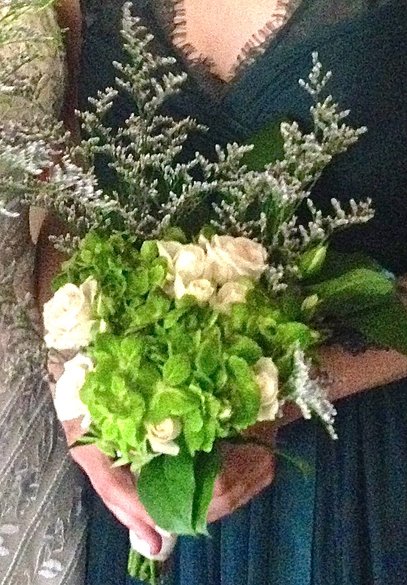 The maid of honour's bouquet 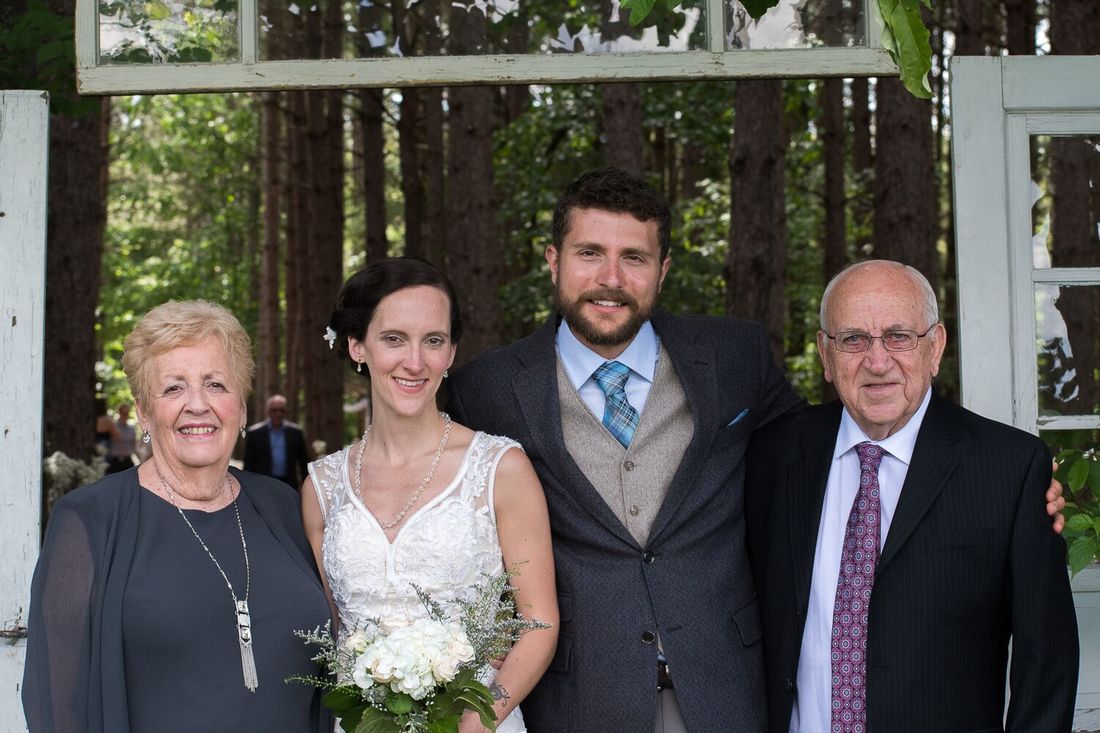 Bride and Groom and Grandma Linda on the left our "floral designer" and Grandpa Stan on the right our Pancake Chef & Vintage plate setting organizer 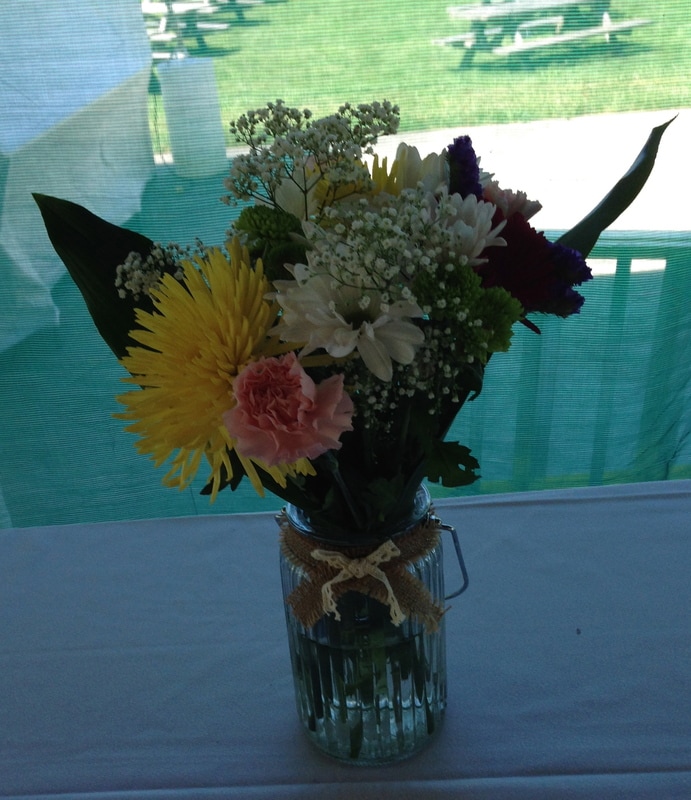 Other bouquets' added to the buffet table 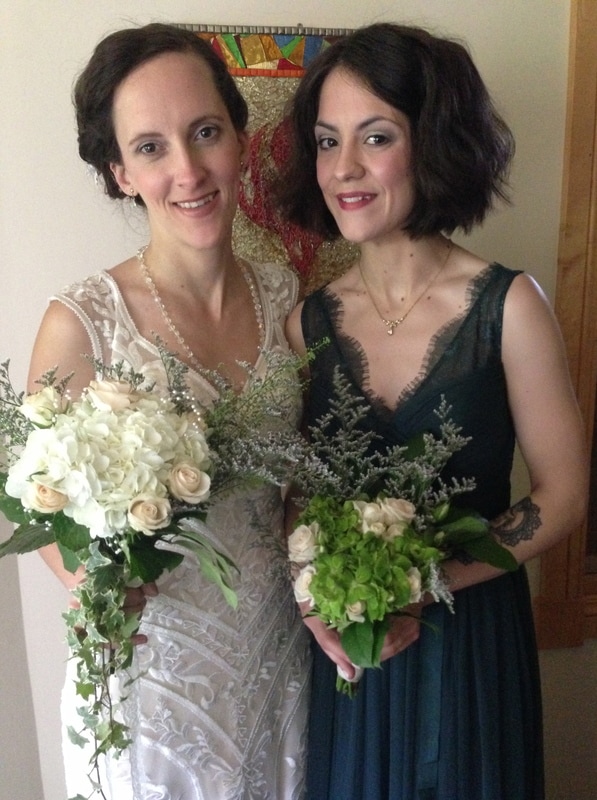 My beautiful daughters- Katie the Bride and Mallory Maid of Honour, they looked stunning (no bias there). Hair and make-up was done by my sister-in-law, Aileen (a trained hair stylist and aesthetician) and she helped the girls to look so lovely! We were at a retreat centre for a weekend, so very fortunate to have a stylist for the weekend. 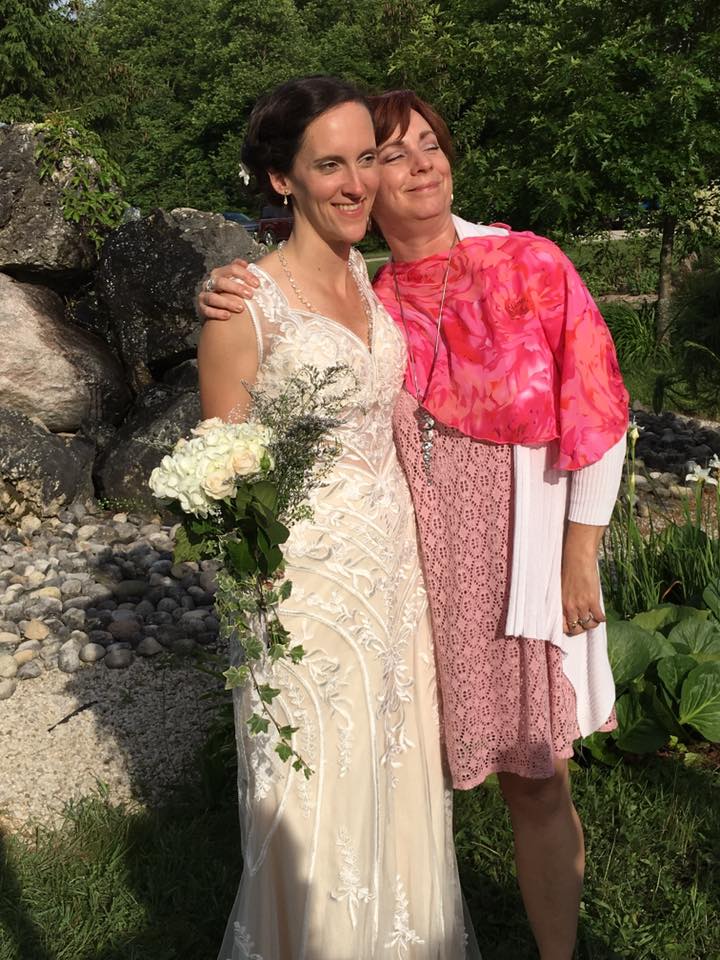 Our own beautiful stylist Aileen! 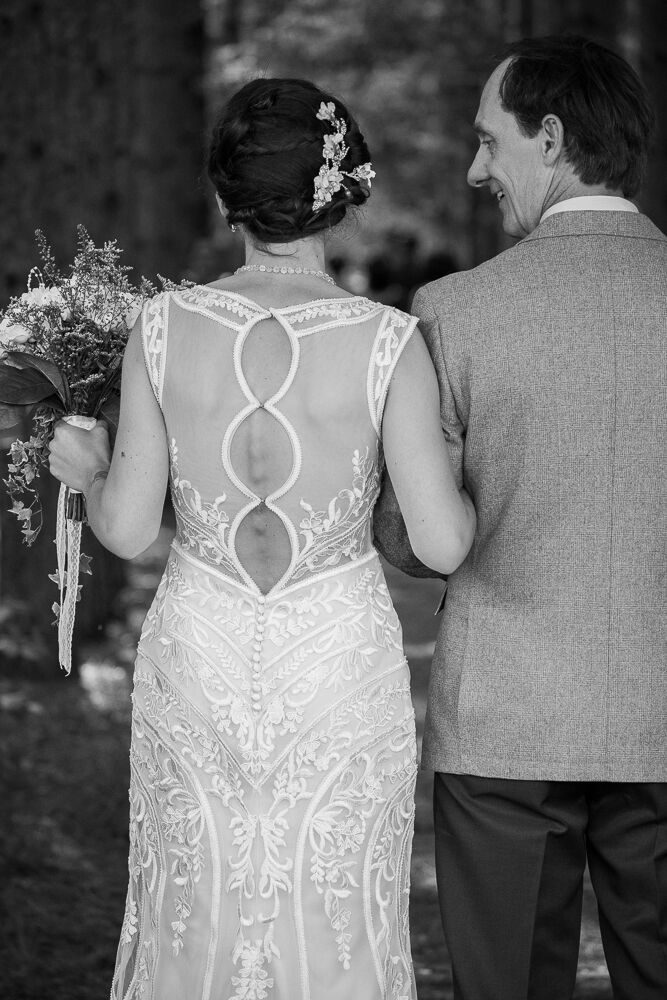 Check out the back of Katie's gorgeous dress and hair! The ceremony site: The ceremony was in a wooded area with an alee of trees making a natural aisle way. It needed some decor but we did not want to take away from it's natural beauty. The before picture (at the rehearsal) is below: 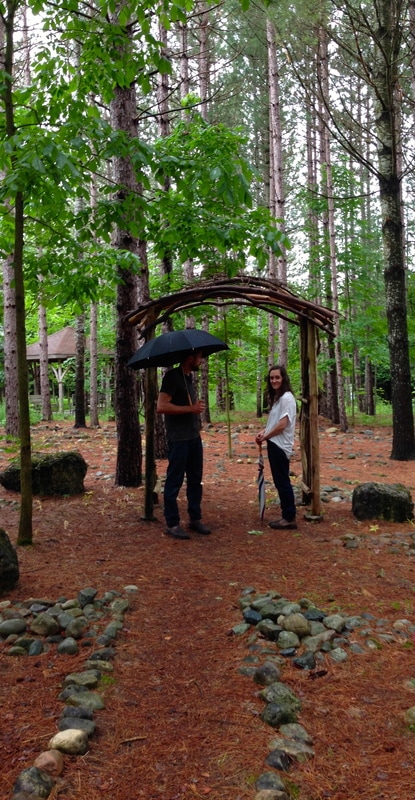 The labyrinth ceremony site before 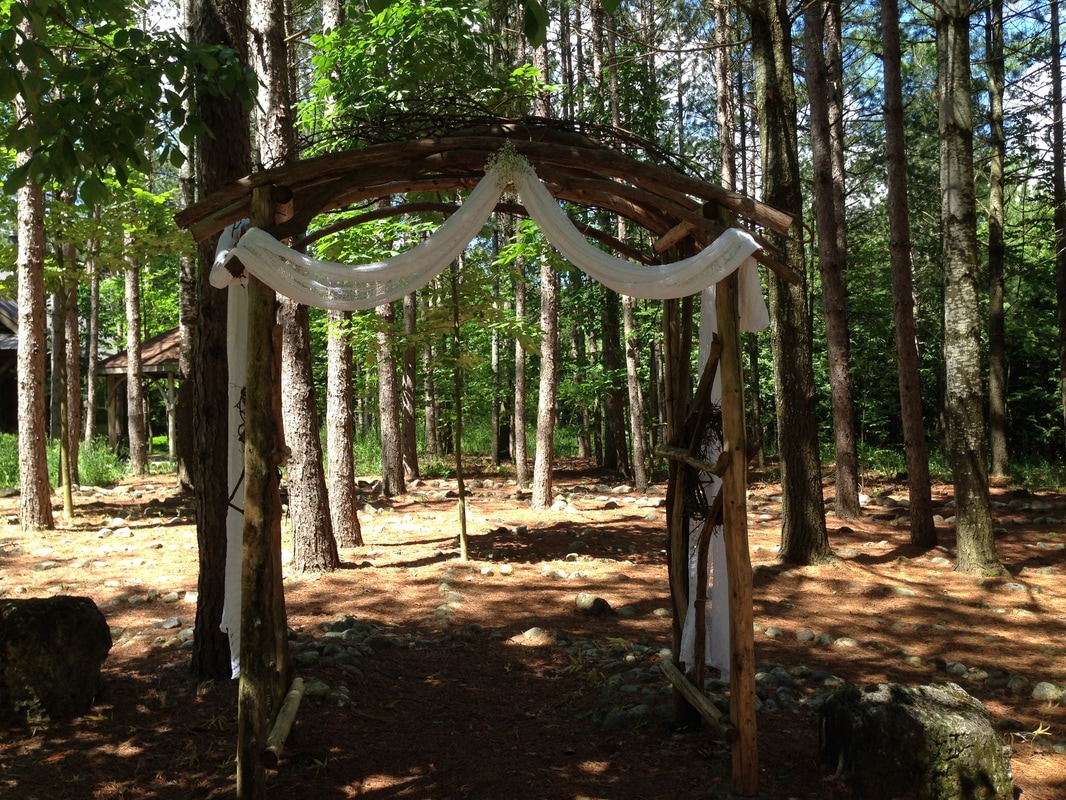 The ceremony canope area swagged with a length of lace purchased at value village and baby's breath added at the centre top On the aisle of trees we hung canning jars with wire and added baby's breath to them. Keeping it simple but pretty. See below: 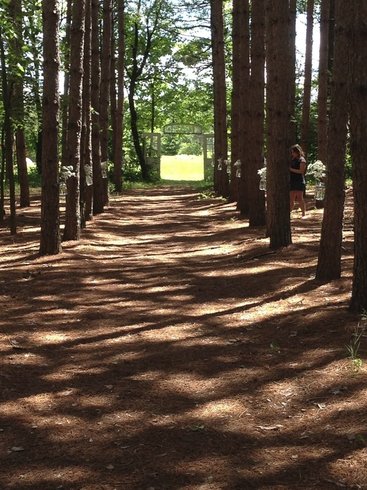 The aisle of trees where the bride walked to the ceremony 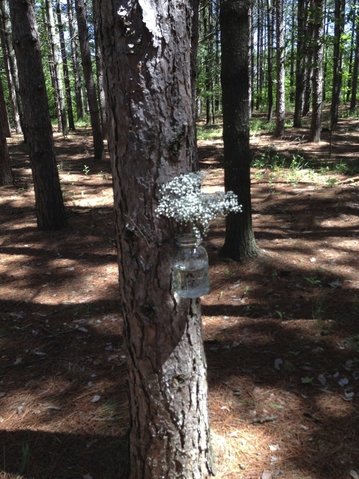 Close up of canning jars with baby's breath on random trees through the aisle of trees 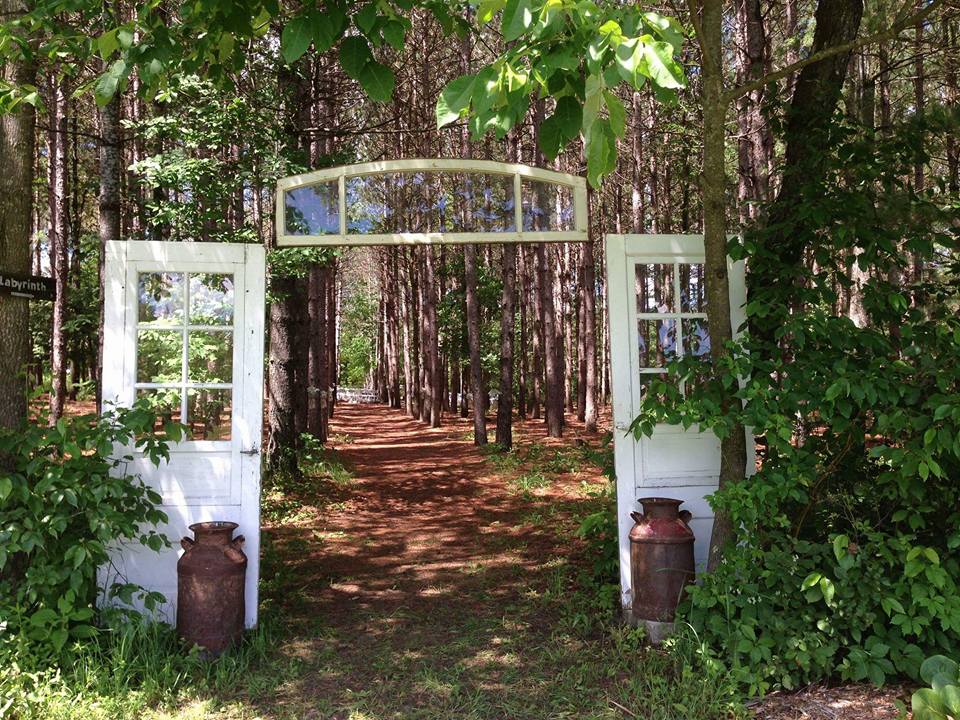 Entrance to the aisle of trees flanked by old doors, a window above and rusted milk jugs The reception site: The reception was held in an outdoor pavilion on the same property. Some challenges we were considering were night lighting, temperatures, candles and mosquitos (along with other flying critters). 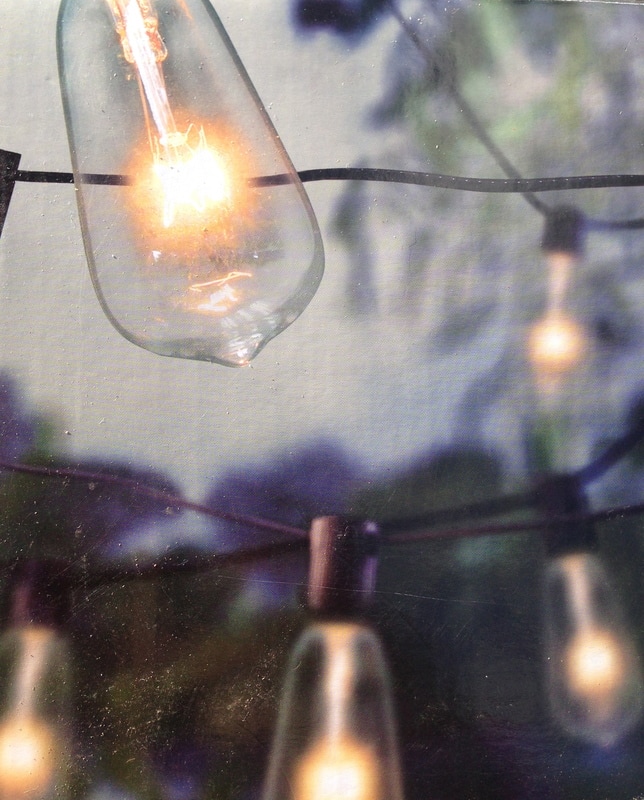 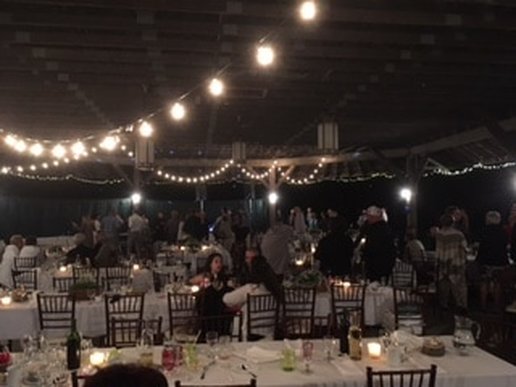 Candles were on each table and we added Edison string lights in keeping with my daughters theme of vintage, rustic. Twinkle lights were strung around the pavilion. Mosquitos/bugs were considered by adding discrete bug zappers on the pavilion pillars every 15 feet or so (guests did not see this) We also placed tiki torches on the property to direct guests to facilities at night and filled them with Citronella oil to repel bugs. We also had a "Comfort Station" complete with quilts to warm people, bug spray, first aid and sun screen available on picnic tables outside of the pavillion! Decor: My daughter had requested vintage dishes and dishes that are not the same. Quite a tall order! The going rate for vintage plates to rent these days is $6.95 per plate!!! Guess what? If you ask family and friends and troll through vintage and second hand stores for a year, you can collect 180 vintage plates for a lot less, some were borrowed as well! See picture below: 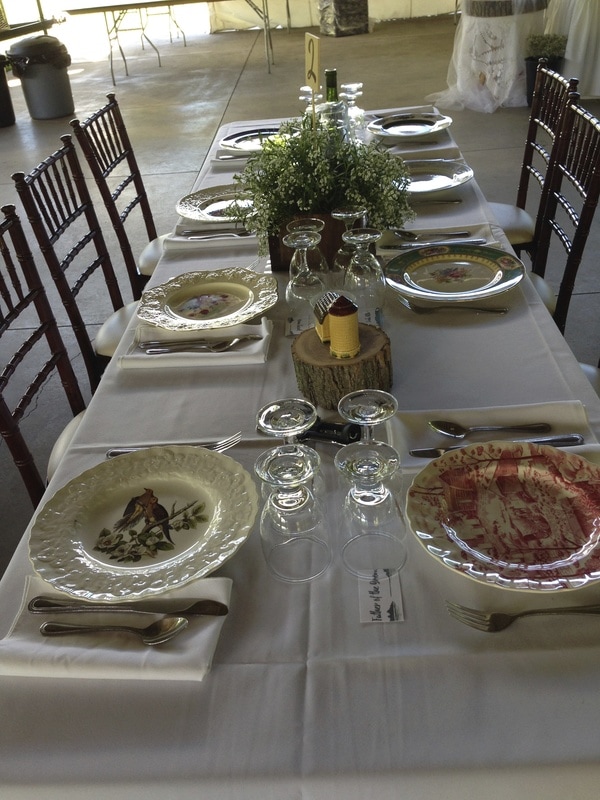 all dishes are vintage and uniquely set on the tables In addition to collecting plates, we collected about 22 sets of vintage salt and pepper shakers and set them on log end on each table (cut by the grooms step-father). Look closely above you will see a log end and a barn and silo salt and pepper shaker and below you will see apples on a log end. 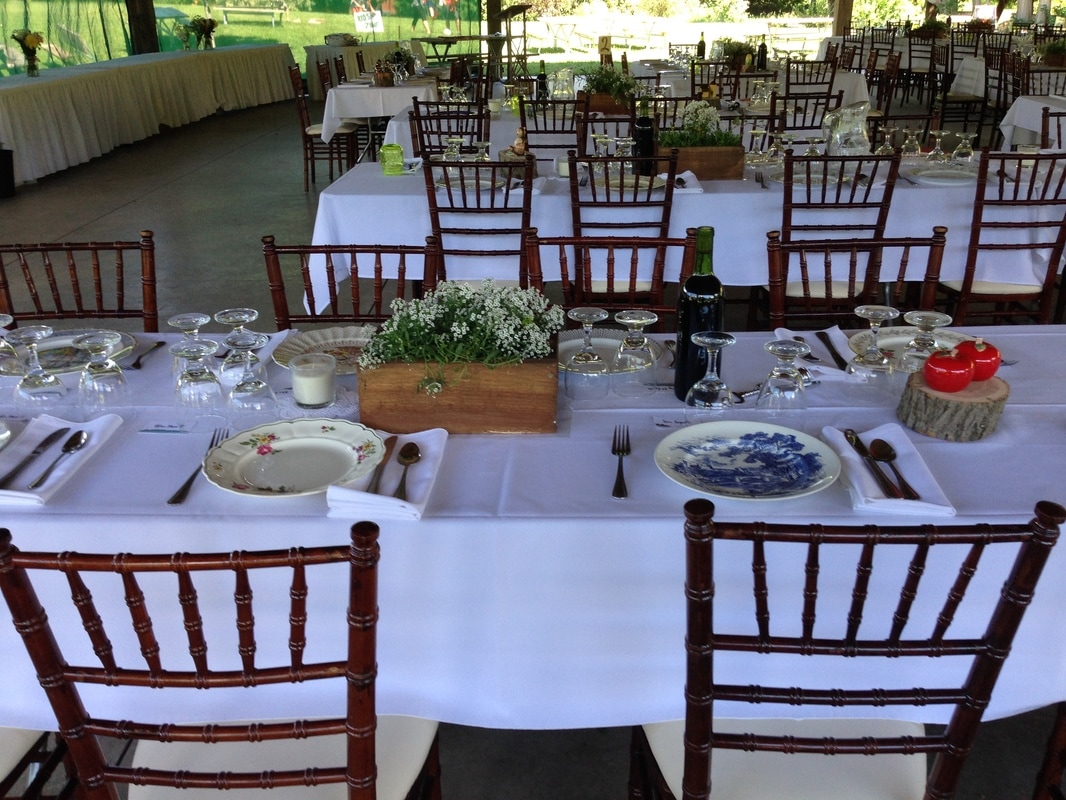 see the vintage plates, wood planter and log end and apple salt and pepper shakers above. Natural weathered planters and live plants were in the centre of each table and a great spot to place a table marker. The weathered planters were constructed by Katie's grandfather, Katie's sister's boyfriend Mike and Katie's Dad. Weathered with steel wool and vinegar by Mallory (Katie's sister) and yours truly and planted by Katie's dad and Mike. See a close up photo of the planter below: 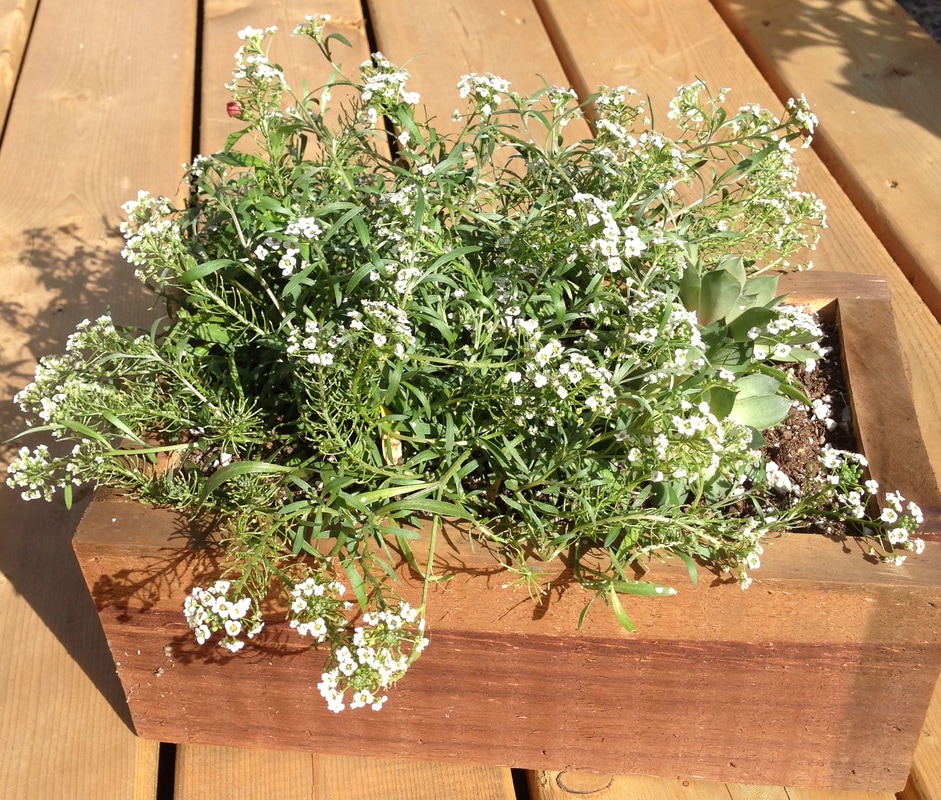 We used 2 simple ivory Ikea candles per 6 foot table for candle lighting because they would be very basic in style and would not conflict with the rest of the style. You can see these in the table setting above. We also added rented wine and water glasses and white linen table clothes, napkins and wooden chiavari chairs. The table numbers were wood burned on natural wood pieces cut out by the bride's dad and then wood burnt by the brides sister's boyfriend. Mike again ! He was such a great help!! 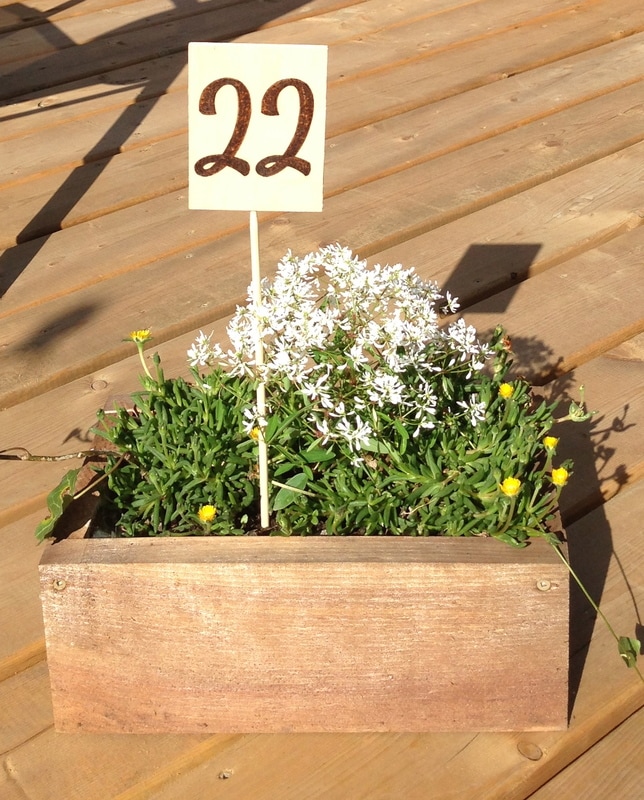 Mike also wood burned directional signs for around the grounds showing guests the way to the ceremony, reception and washroom facilities. See photo below: 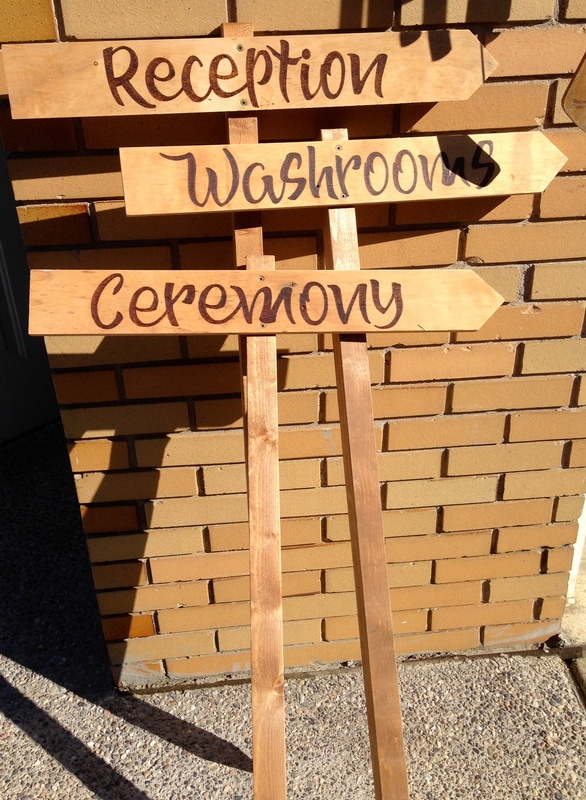 Wood burned directional signs made by our own Michael Casey- Wood Burner Extraordinaire! The font is done as per the invitations at the direction of the bride! 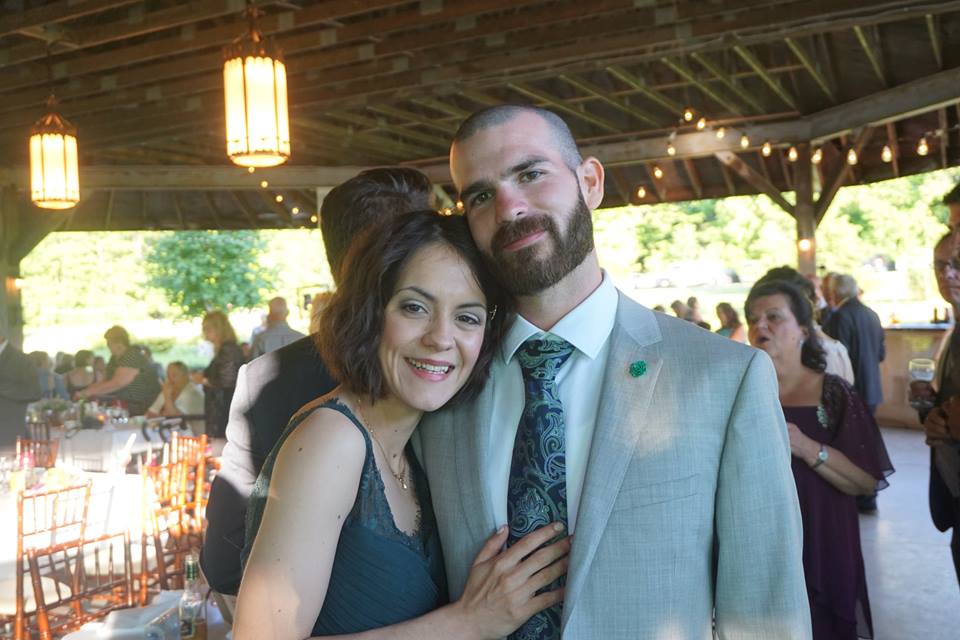 Mallory ( my DIY Cohort) and Michael (our wood burner extraordinaire) Speaking of wood burning, I also dabbled in it for the first time ever! I have new appreciation for how hard it is! IT IS A LOT MORE DIFFICULT THAN IT LOOKS! I worked on the Mr and Mrs signs (ovals purchased at the dollar store) wood burned them and added burlap and lace. See the pic below: 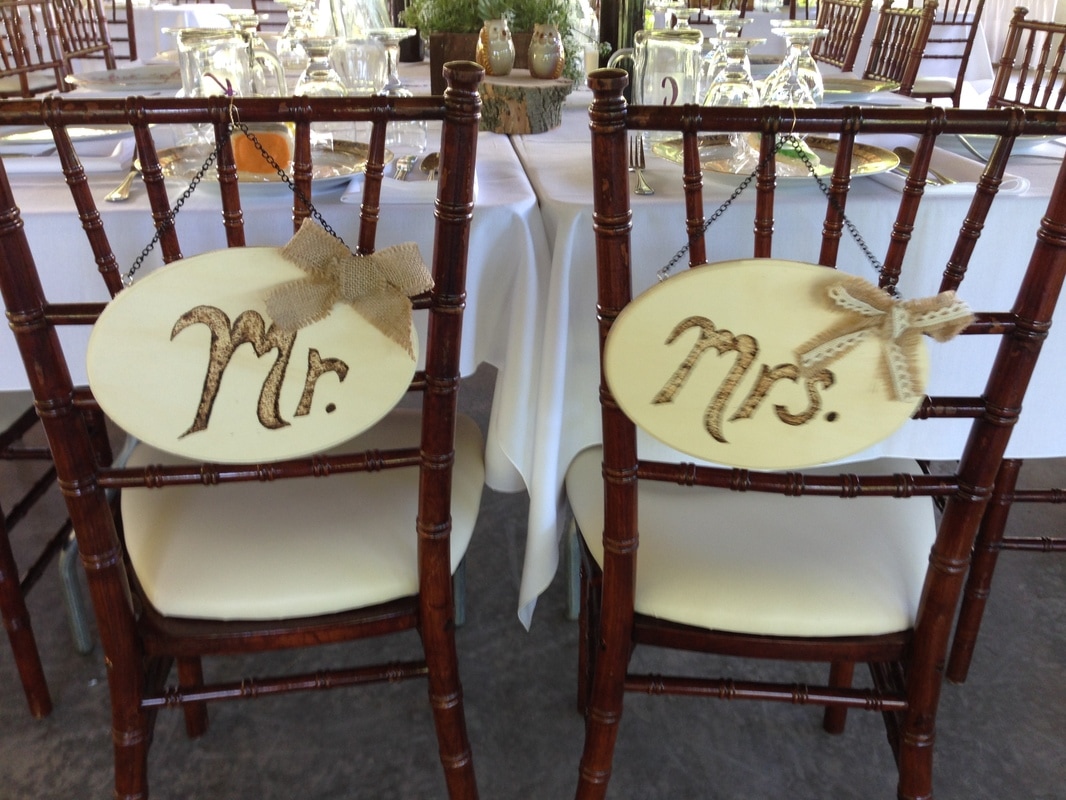 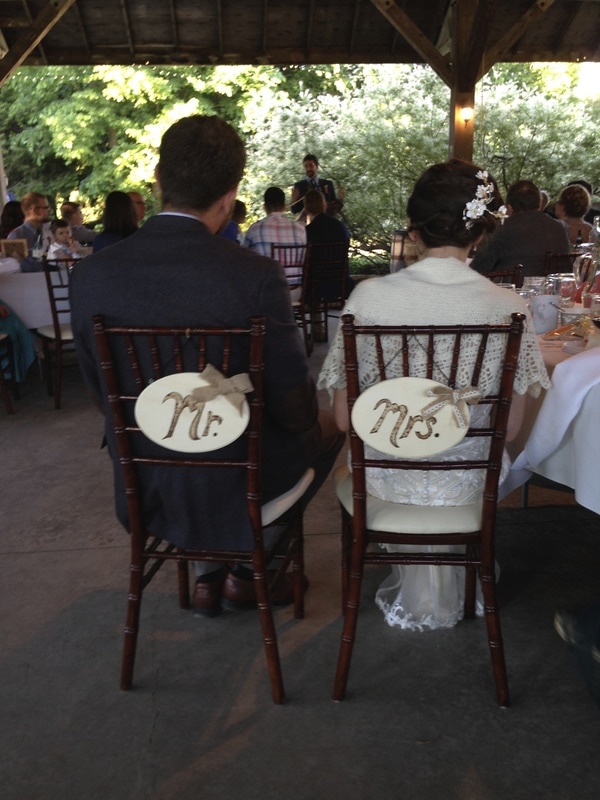 How cute is that! The Kissing Menu: At the last hour (and I'm not exaggerating) Some very good friends of the bride and groom (and our family!) The Sommerville's, decided to make a Kissing menu up and have them framed at each table. Apparently, this menu was also at their wedding in the fall, so now it's a tradition!! The menu had guests perform different activities in order to have the bride and groom kiss. None of the "tinkling of the glasses". My sister and I of course picked the serenade and sung Skinna Marinky Dinky Dink - from Sharon Lois and Bram at a Mic and at the Front of the Pavilion of course! No Shame there!! See the picture of the Kissing Menu below: 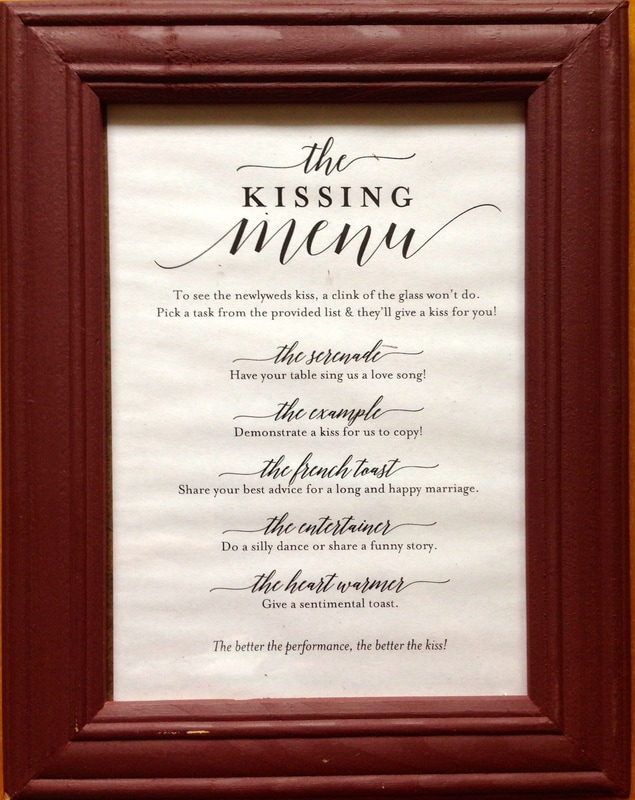 Highway and road signage: We painted up some rough made A frames (Made by the bride's dad) to direct traffic from the main highway and into the lane way to the wedding site. They are not perfect but they were fun to do as a family with white and black paint. See these below: 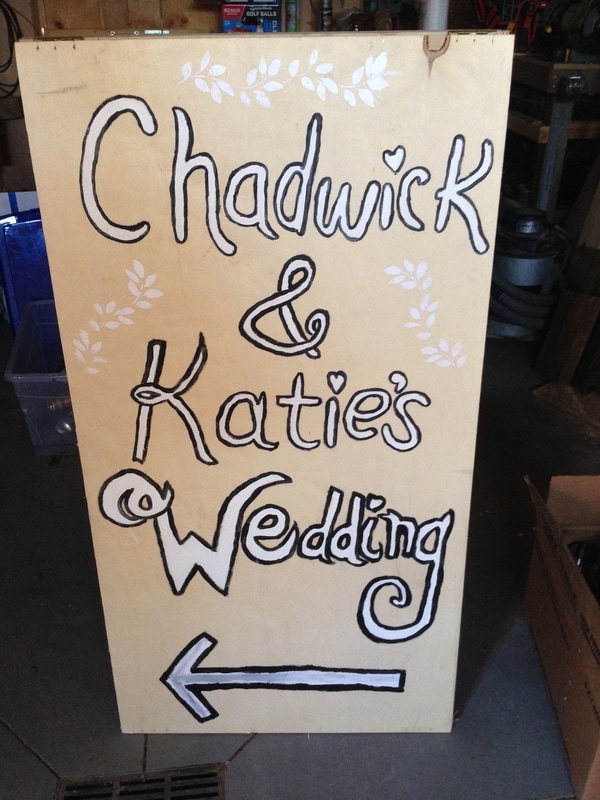 Bar Signage: We used a basic piece of MDF board and painted it with chalk board paint and chalked it up to make a simple bar sign. This was propped on an easel encased in burlap from the father of the bride's work. It was also secured to the easel in case of high winds (outdoor venue challenges!) See photo below: 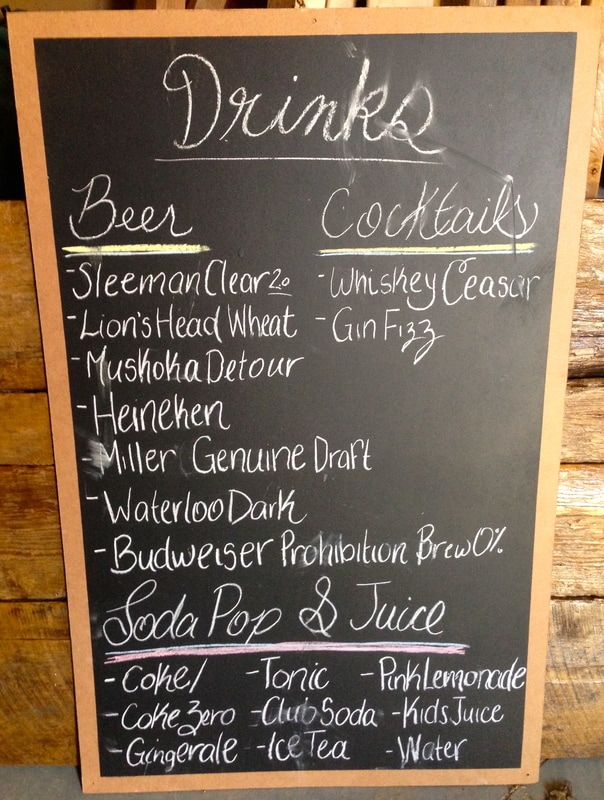 The bar was made with urethaned barn boards and saw horses and wrapped with burlap. DIY'd by my talented brothers and husband. Sorry no pictures of it. There were too many people lined up at the bar all night blocking photos I guess! Canning jars begged and borrowed from family members were the drinking glassed requested by the bride and groom as this is what they drink out of at home. We also had plastic green ones for the children, placed at their individual place settings. Wine was made by the groom's mom and step father, we had both white and red available in various ranges of dry and sweetness. See pic below: The Welcome Table: This receptacle for wedding cards was a challenge for us as the decorators as Katie and Chad specifically did not want "Bridal Like" decor and wanted more rustic charm to showcase who they are as a couple. Chad used to be a log home builder and still works in timber work. Hence, we came up with the idea of building them a "Hillier Homestead" out of twigs, glue sticks, wood shims, and sphagnum moss to "house" their cards. For my youngest daughter Mallory and I it was a 2 day project, but well worth the effort. Mallory used a box to make the walls for the house and the roof and literally sculpted the shape of a house. We then cut out windows and doors and added plastic for windows and fabric for curtains and stained glass to make this adorable homestead to securely hold the cards. The door was painted orange because it's the grooms favourite colour. There is an opening on the roof where the cards fit in perfectly. See the picture below: 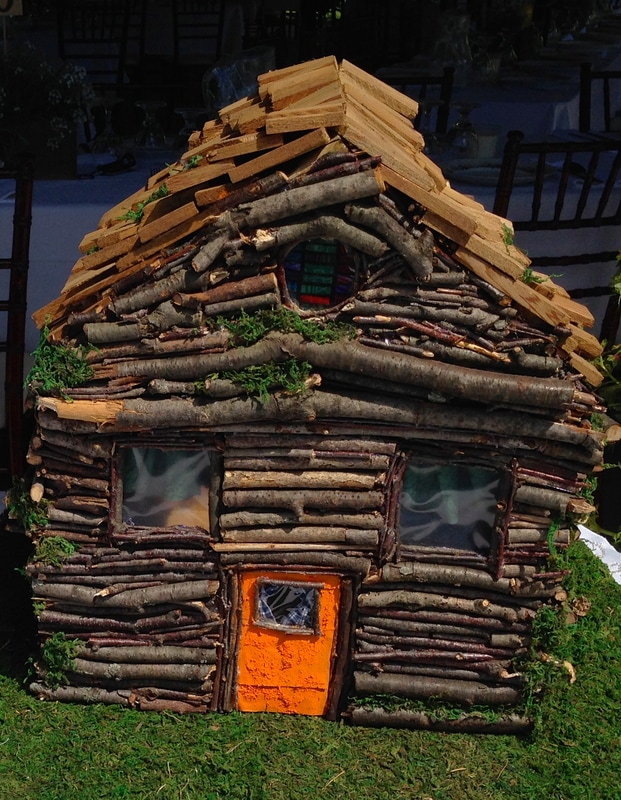 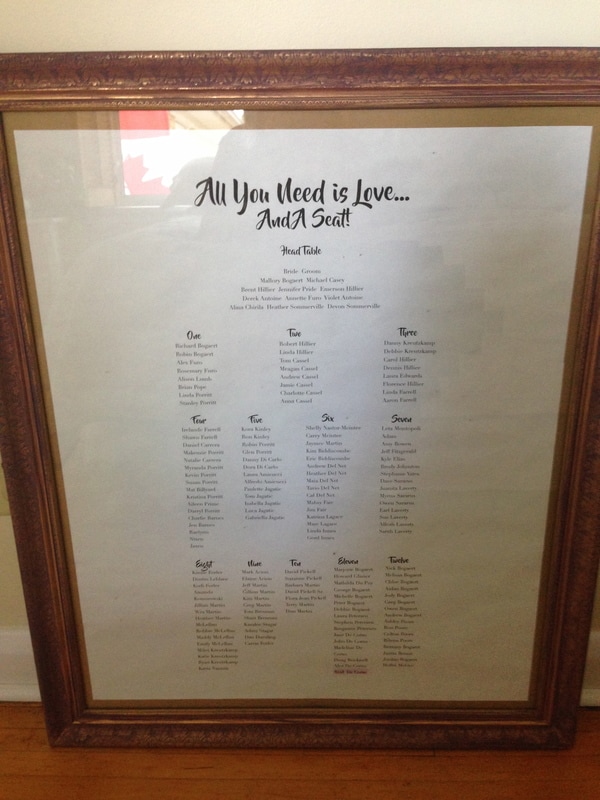 The seating plan (you can see it to the left on the photo below) was typed up by Mallory and placed in a frame on a rustic easel. Mallory weathered the frame with paint. All you need is love and a Seat! 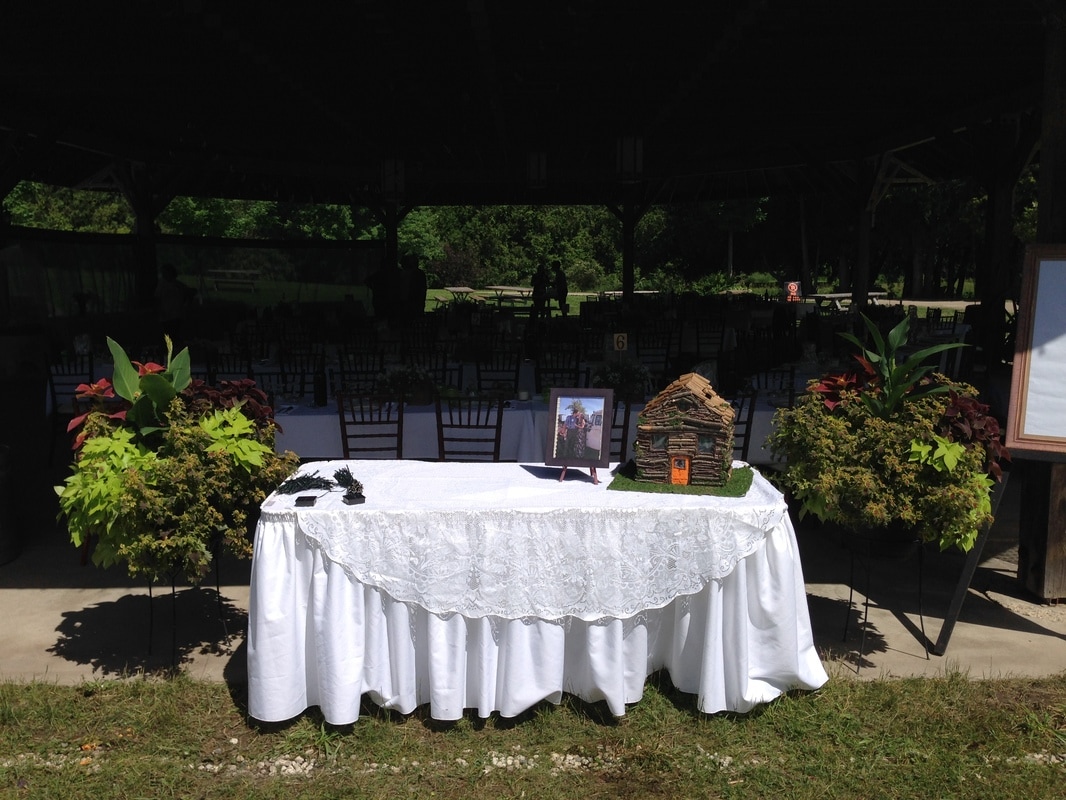 The welcome table, not quite complete! But the "Card box" and picture of the bride and groom is there A picture of the bride and groom just after they got engaged was added to the welcome table. See picture of this below: 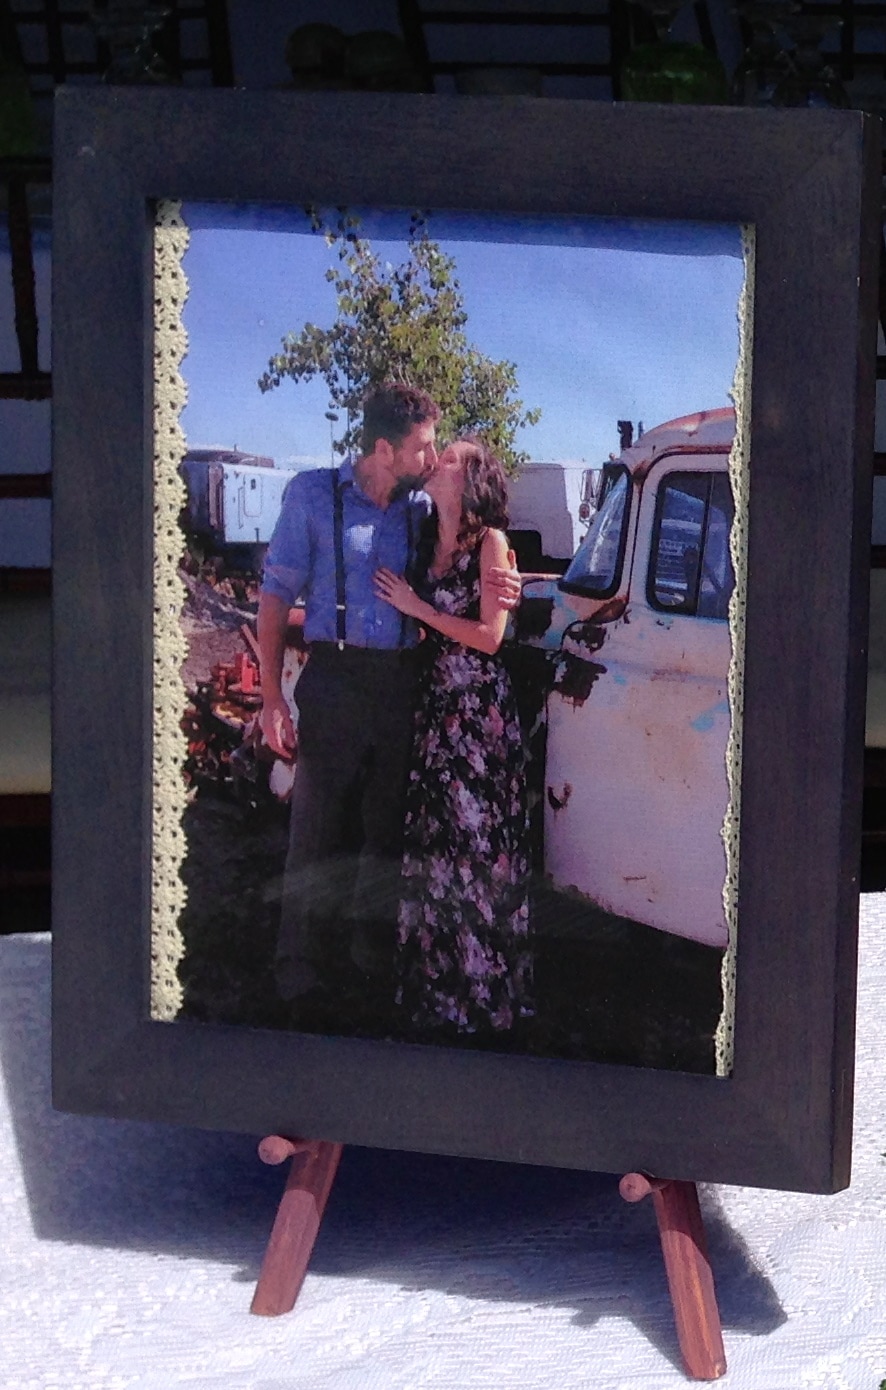 We also added guest gifts to the gift table. The bride and groom are huge DIY'ers and they brought home made soap all the way from BC wrapped in labels that went with their wedding invitations. They were placed in whicker baskets and added to the welcome table ready for guests to arrive. 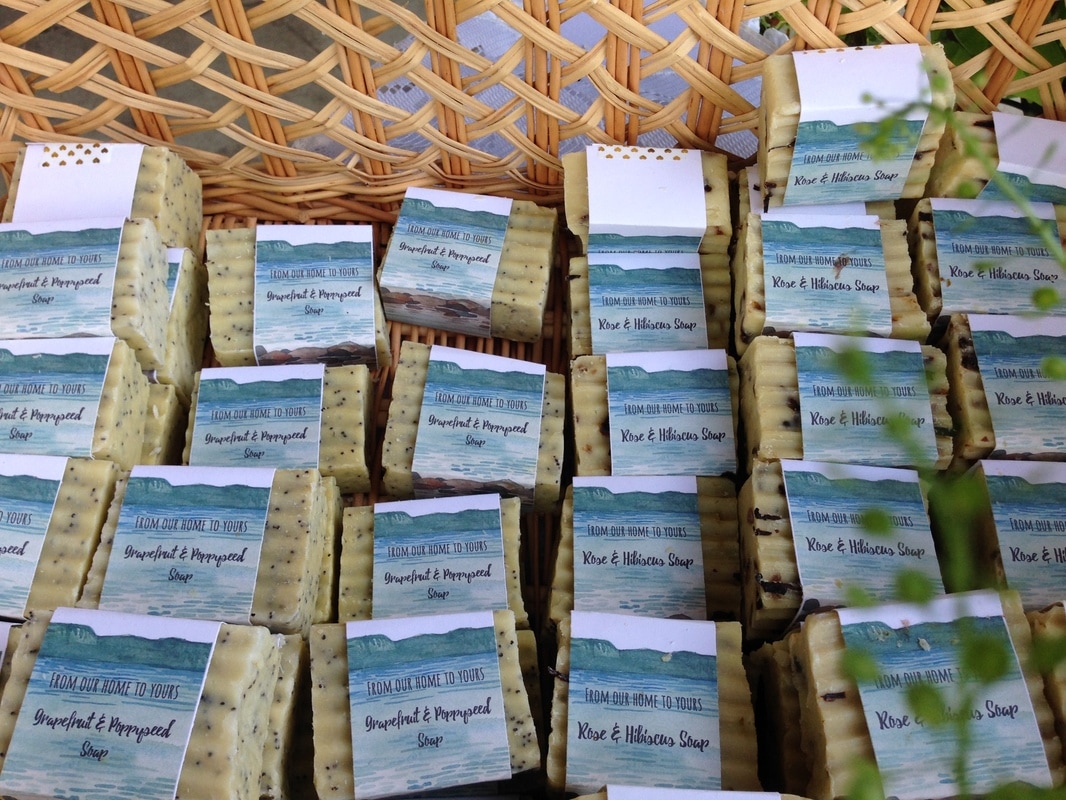 Live plants with coleus and potato vine flanked either side of the welcome table. Katie requested natural plants for decor and her Landscape Architect dad was happy to provide! See below: 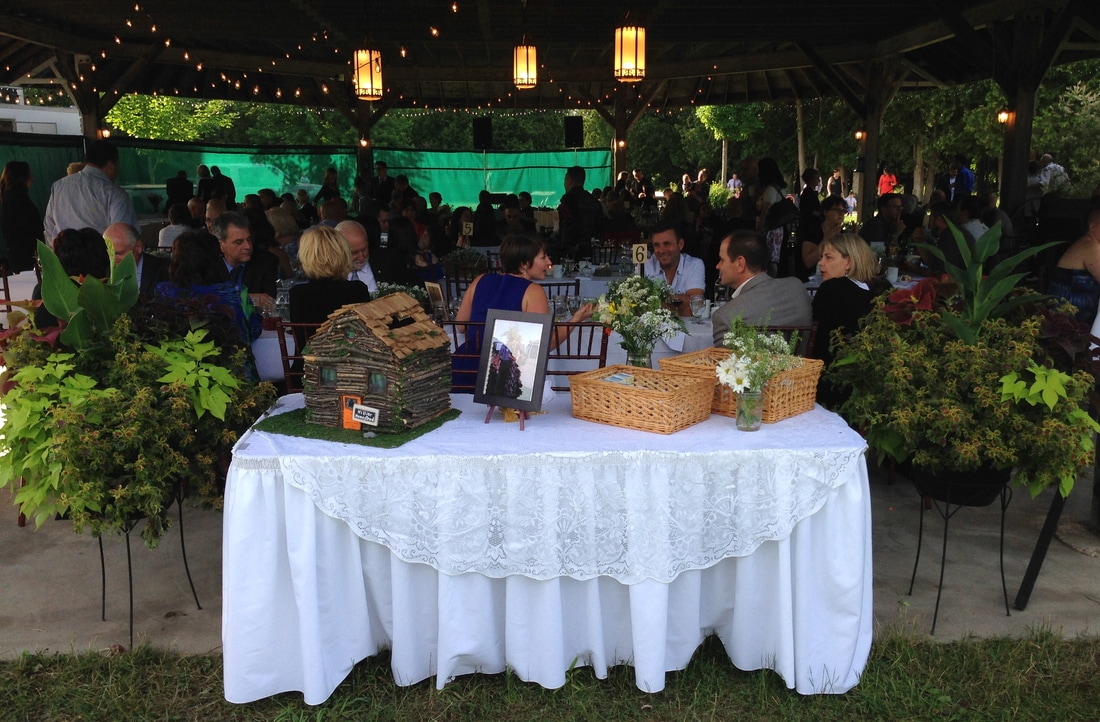 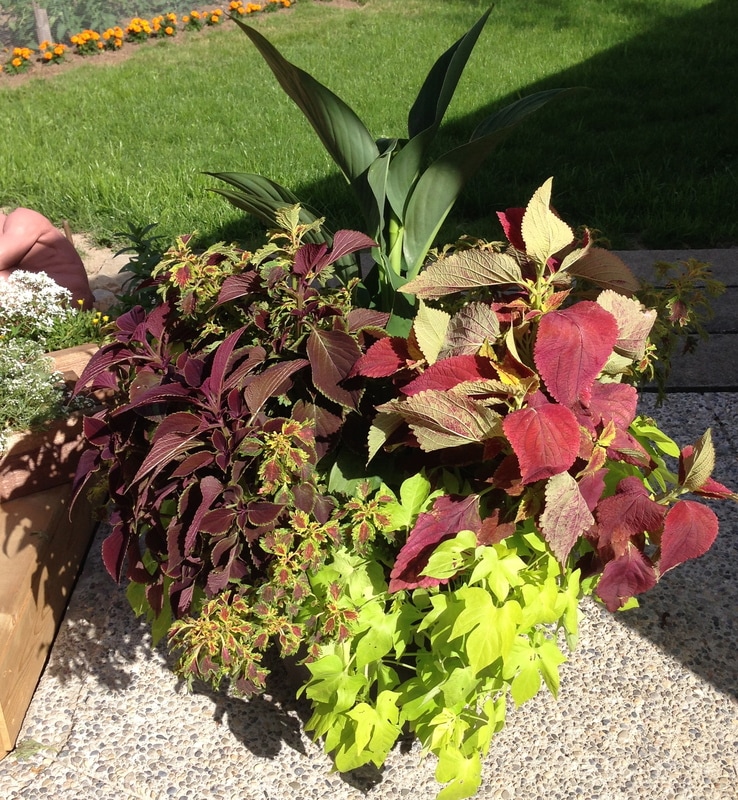 Plants to flank the welcome table Add some floral elements to the welcome table and it's completely DIY'ed. 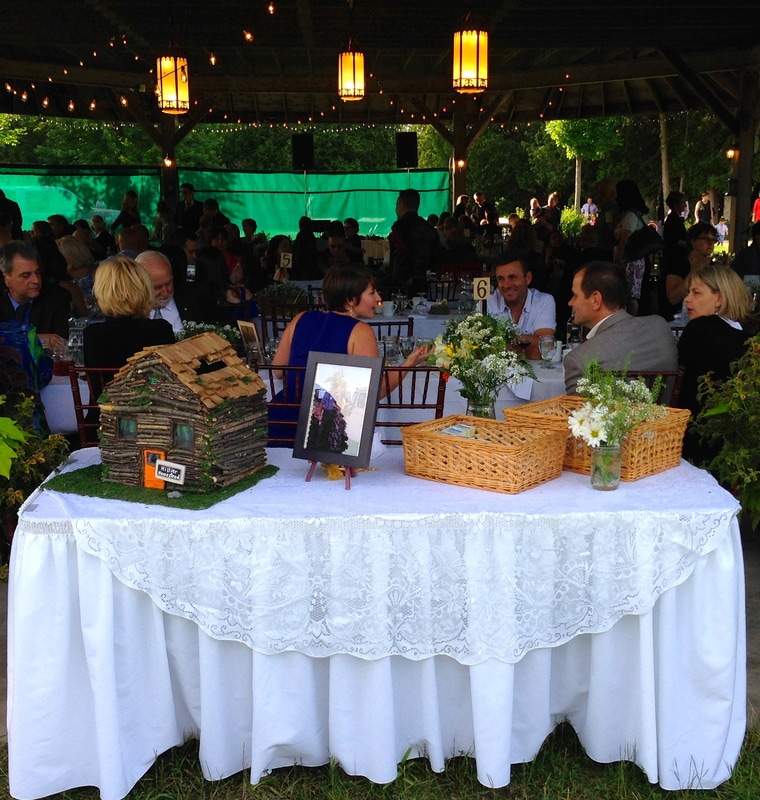 Who said welcome tables have to look totally bridal anyways?? 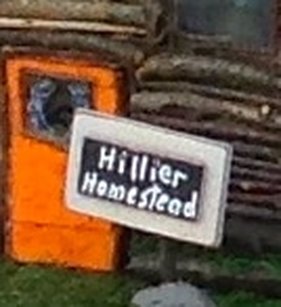 Check out the cute little sign Diy'ed in front of the card box The Memory Montage: A lot of weddings these days have photographic displays with video technology. We unfortunately could not do this because of the outdoor location. Therefore we DIY'ed a photo display with old picture frames, painted and distressed. We hung jute lines and used tiny clothes pegs to hang memory photos of the bride and groom and added a very long and wide piece of lace behind the display to protect it from the elements and create a vintage look. See the photos below: 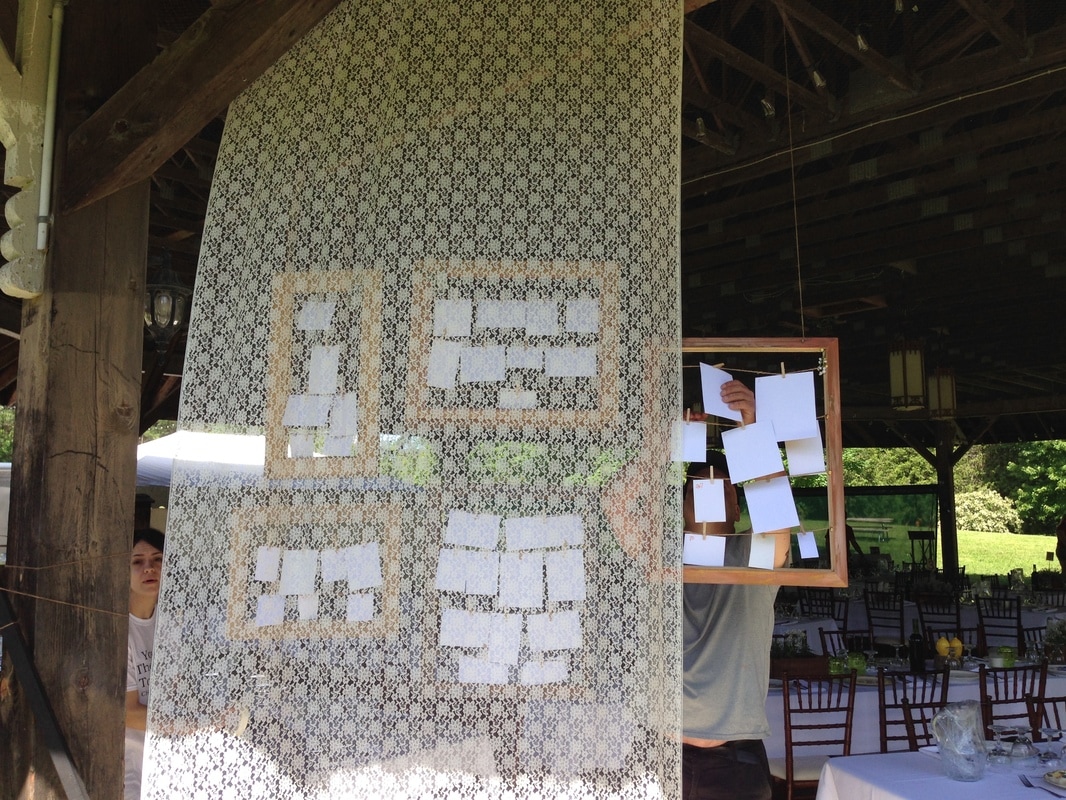 Kids Zone: A picnic table was taken over by the coordinator of the Kids Zone (the grooms step mom) along with some very helpful friends (The Delnet Family), it was covered with butcher paper. Crayon packs were available along with pipe cleaners and a "wedding activity" book complete with colouring pages, word searches, a maze, note area, decorate a cake and tic tac toe. The kids Zone also had a soft Frizbee for the kids to play with outside of the pavilion area, but near this picnic table!  The Cake: The cake was made in my home ( I am a Wilton Certified Cake Decorator). My daughter did not want a "decorator's cake" and I had to consider the weather. I made a messy iced triple tiered cake made of vanilla sponge filled with a fresh raspberry coulee and stabilized whipped cream icing. I had a custom wood topper made to repeat the words carved into her ring box by her husband (to the moon and back) and added baby's breath for decor to keep it looking natural. The groom cut me a beautiful log piece that completely encompassed the table it stood on. (I think I will DIY that later!) See the photo below: 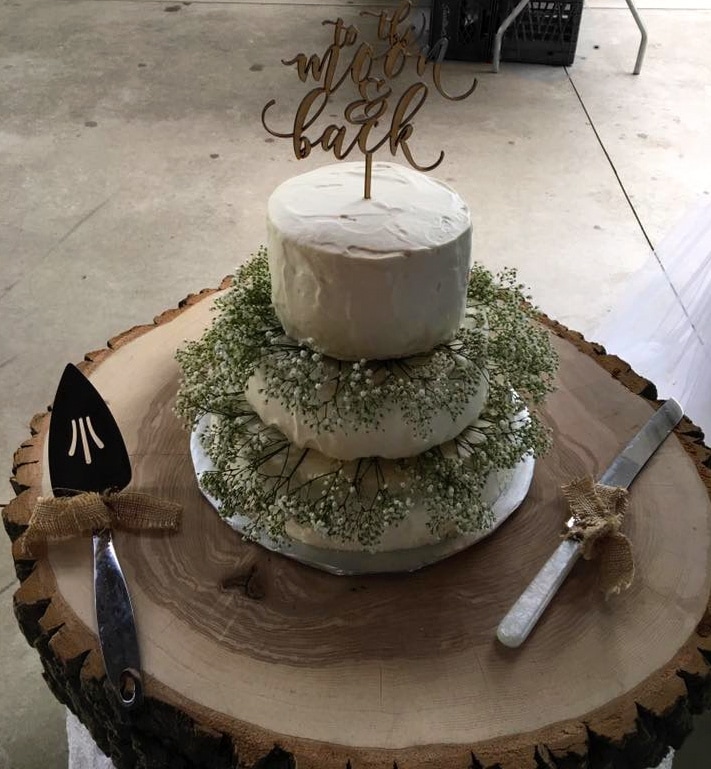 messy iced triple tiered cake made of vanilla sponge filled with a fresh raspberry coulee and stabilized whipped cream icing. Topped with a laser cut custom topper with the words "To the Moon and Back" 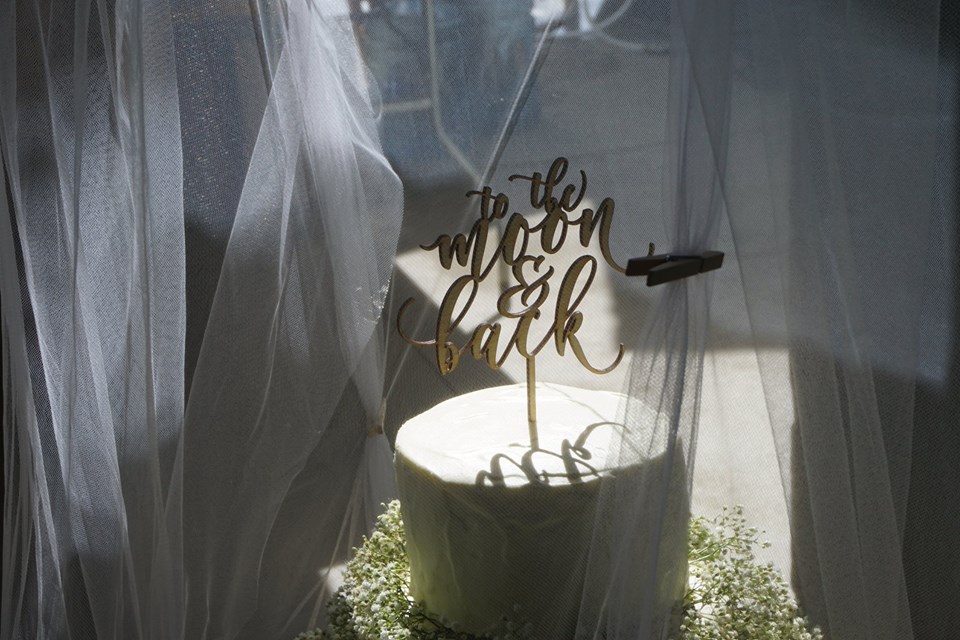 The cake had to be draped with a Tuille Canopy prior to cutting to prevent bug invasion! Treats for the kids: Mallory and I made fresh canning jar sugar cookies for the kids (all 28 of them+) cellophane wrapped them and placed them in a basket to give to the kids once they were seated. We also provided juice packs at the bar and skittles! See the photo below: 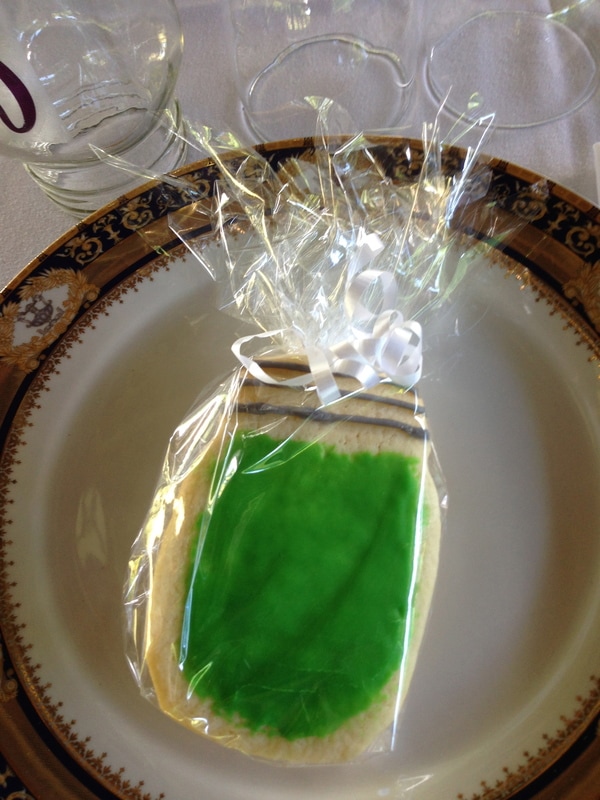 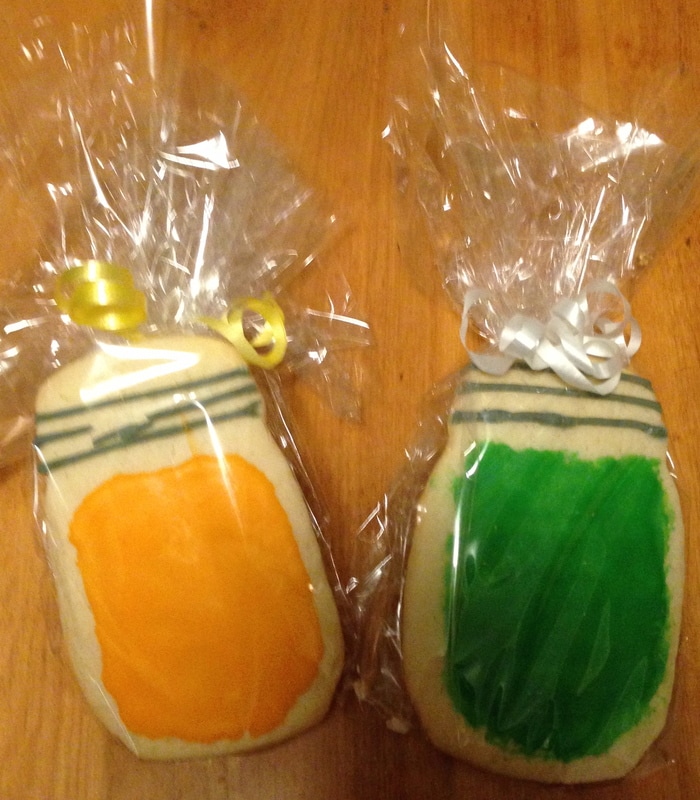 Treats for all at the late night table: Many, many family members made homemade cookies and squares including: Mom of the groom (famous Chocolate Chip ), step mom of the groom (Famous Cinnamon pinwheels), aunt of the bride (Famous Ginger Snaps) (Alison), step grandma of the groom (famous date squares), aunt of the bride (famous peanut butter marshmallow squares) (Rosemary), friend of the family (Katrina L) (famous peanut butter balls and chocolate covered oreos) and yours truly (famous sugar cookies and gluten free desserts). We ended up with a variety of goodies!! Such wonderful home made baked goods. Some of the treats were the bride's favourites and some were the groom's favourites. We also added to the late night table by supplementing it with Vincenzo's (from Waterloo, Ontario) Antipasto platters (a personal favourite of the bride). I never had a chance to get a picture of this table! It was enjoyed by many !! Speeches and a Presentation of a Gift: Our Nephew and MC extraordinaire, Derek, kept the flow of the speeches going, shared personal, funny stories about the bride and groom, made announcements and kept the evening on point and it was awesome! 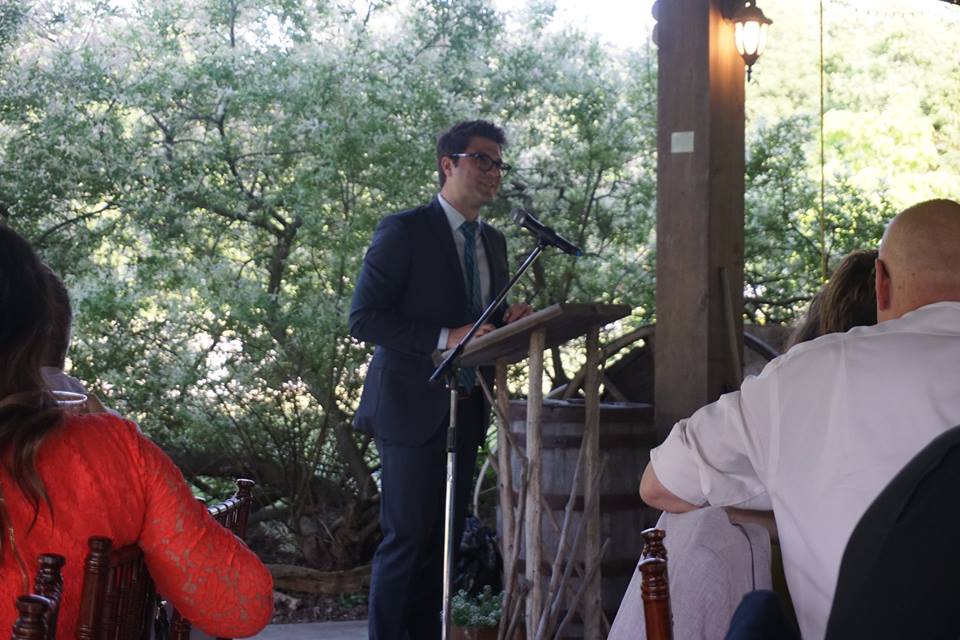 Derek our fantastic MC ......and finally when it was time for speeches, my husband graciously thanked my daughter Mallory and myself for all the work we had put into the wedding and shared his sentiments about marriage and the bride and groom. It was then time for the mother of the bride (yours truly) to speak, she had 2 cute stories about the groom and stated she would get too emotional to talk about the bride but that she had a quilt to present and read the label on the quilt out loud. See this label below: 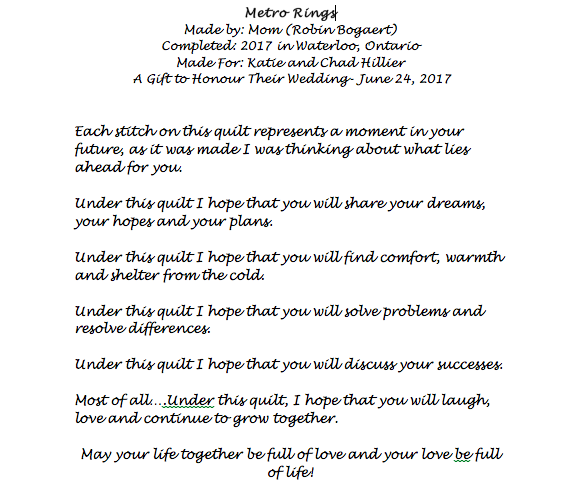 See the picture of the quilt below: 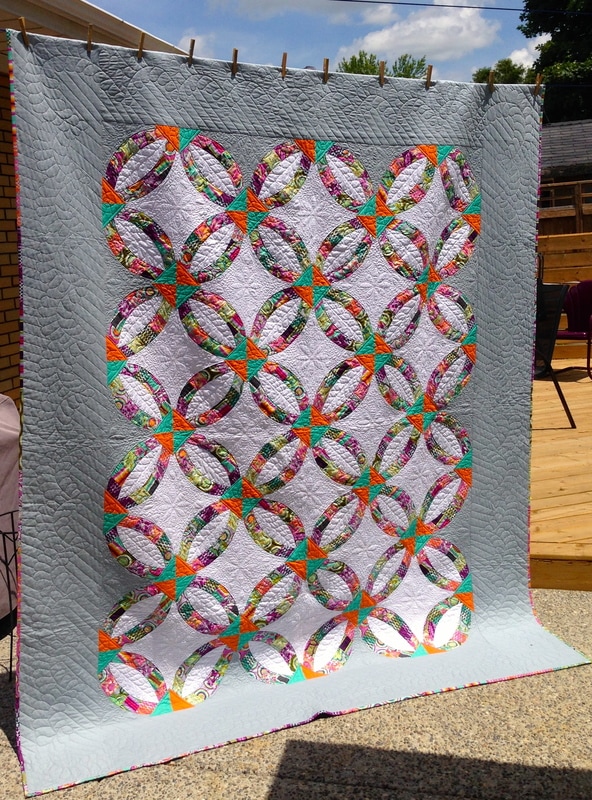 Metro Rings for Katie & Chad (Fabric by Tula Pink, Pattern Design "Metro Rings" By Sew Kind of Wonderful Yes it took time for all these DIY's and yes lots of effort, but I would not have changed a thing. Anything worth it in life is worth doing right! We have new appreciation for the role of the decorator! However, while respecting the custom look this bride and groom requested and budgetary constraints, we were determined to give this Bride and Groom the best and nothing less. Post Wedding Day Breakfast: for this I need to credit the Porritt Family with special thanks to my parents Stan & Linda for cooking up the pea male bacon and pancakes and for the rest of my siblings and in laws for setting up and taking down, greeting guests at the stone retreat house. The Porritt family were especially wonderful for a lot of the physical set up and take down of all of the wedding venue and for that I will be eternally grateful! I'm sure I will be called upon for future weddings and I welcome them to keep me in mind to DIY at their own family weddings! Thank you for having the patience to read this blog post, hopefully it inspires you to do DIY with your wedding plans or the plans of others. Feel free to share these ideas and it would be my hope that your wedding will be as memorable as my daughter and brand new son in law's was! 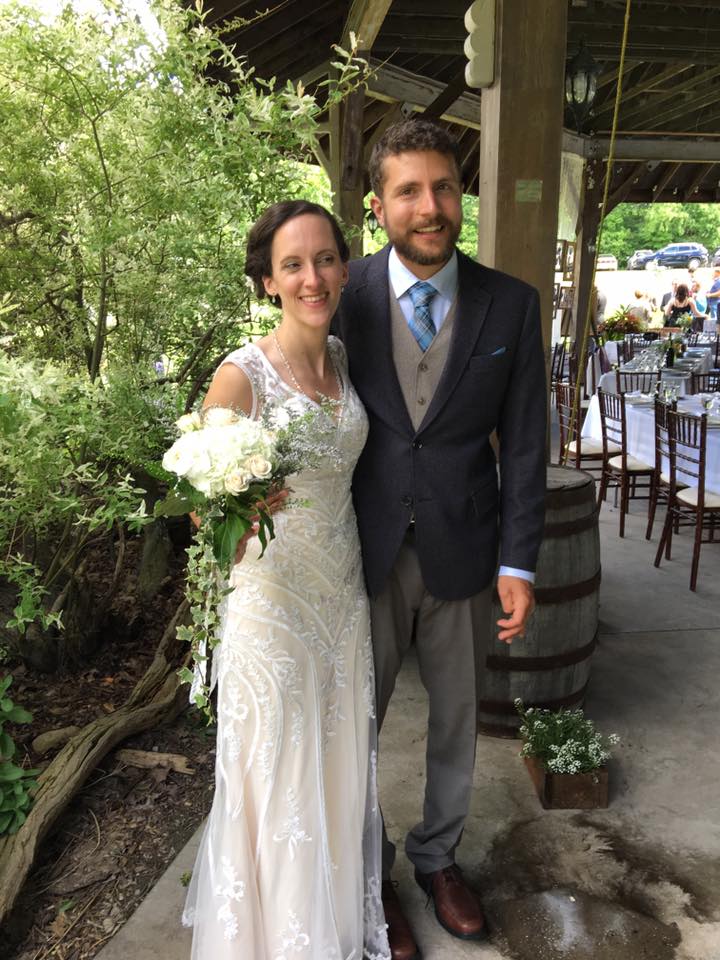 Newlyweds Mrs. Katie and Mr Chad Hillier! To all of you- friends and family who attended and assisted in any way to DIY, set up, take down and make Katie and Chad's day memorable, we thank you from the bottom of our hearts! You contributed in starting of Katie and Chad's life together in the most positive and loving of ways! They certainly felt the love!!
Vendor Credits: Fantastic Location: Riverstone Retreat Centre, Durham, Ontario www.riverstoneretreat.com Awesome Food by: Carolyn Helder www.countrystylebbqcatering.com Great Rentals (linens, glass wear, tables, chairs): Four Season's Party Rentals, Markdale www.fspartyrentals.com A DJ who kept the party hopping!: Brent From Spin Doctor, Kitchener www.spindoctorproductions.com Katie's Bridal Gown: Ballett's Kitchener balletts.com Grooms Suit: Moores www.mooresclothing.com Happiness is home made ❤️❤️ All the best to Katie and Chad as they enter married life and embark on an exciting adventure together❤️❤️
5 Comments
Katrina Clarke
6/28/2017 09:35:14 pm
A beautiful day! All of the DIY projects show an abundance of love and talent! And I'm sure everyone involved with cherish the memories of this beautiful wedding time forever!
Robin
6/29/2017 09:29:36 am
Thank you Katrina, we sure will!
Mabsy
6/28/2017 10:11:34 pm
Robin, this blog is totally awesome! The wedding was so amazing BEFORE I even knew about all the talent & work that went into it! I cannot believe Everything your whole family put into every single little detail, it brings tears to my eyes to even think about all that love! Everything from the decor, the place settings, the flowers, the bar, the food, the music, I can't even begin to list all the amazing work you put into this very special day. Thank you so much for inviting us to celebrate with all of you and your amazing family! It was a truly memorable week-end for us. A wonderful wedding from start to finish.
Robin
6/29/2017 09:37:23 am
Thank you Mabsy, It was great great having you as our long time friends there to share with us. KATIE AND CHAD remarked on this after the wedding that it was so nice to see everyone, especially when they are so far away. As for the details and work, it was so worth it! 11/6/2022 10:49:52 pm
Thank you so much for sharing this! It is so inspiring and we got a lot of ideas. This is also a must read for all people who's looking for an <a href="https://www.windsongtagaytay.com" title="event's place" alt="event's place">event's place</a> that is perfect for any kind of occasion. Kudos! Leave a Reply. |
Follow Me:
Welcome!Hi I'm Robin and I am a professional long arm quilter, pattern designer and teacher. I am passionate about all things quilty!  

Categories
All

Sponsors
This blog contains affiliate links. This means that we endorse products.
We do receive rewards for these endorsements and this helps to keep this site alive and well. We support products which we believe are the best quality and to inspire your creativity! |

 RSS Feed
