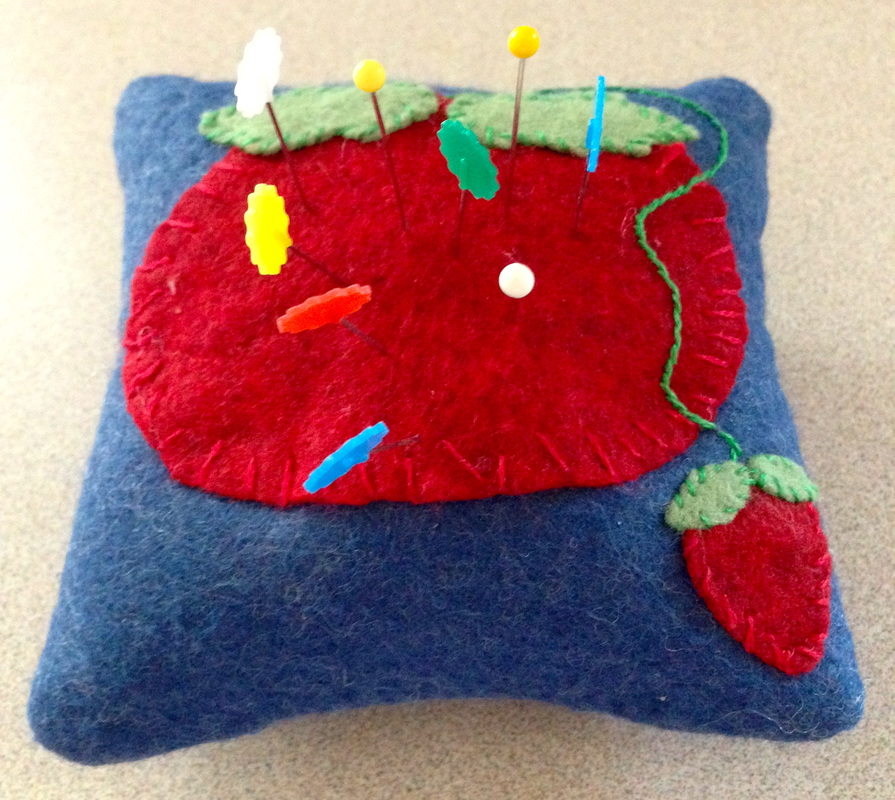
 There is a FREE PDF download of this pattern in the SHOP section of this website to get this free download please click here Basically you cut out scraps of red and green felt, blanket stitch appliqué the tomato, strawberry and leaf designs to the top of a 5.5 x 5.5 square of felt, add a vine, sew the front to the back right sides together, stuff and stitch closed. So easy, cute, whimsical and useful. 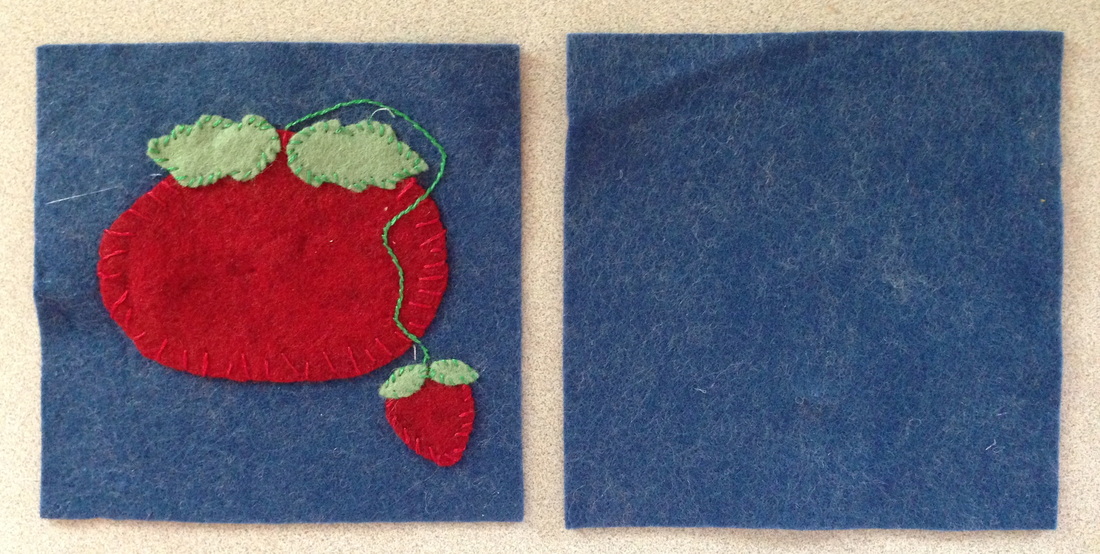 #1 Download the free design, cut out of felt and appliqué the design to the front piece of felt 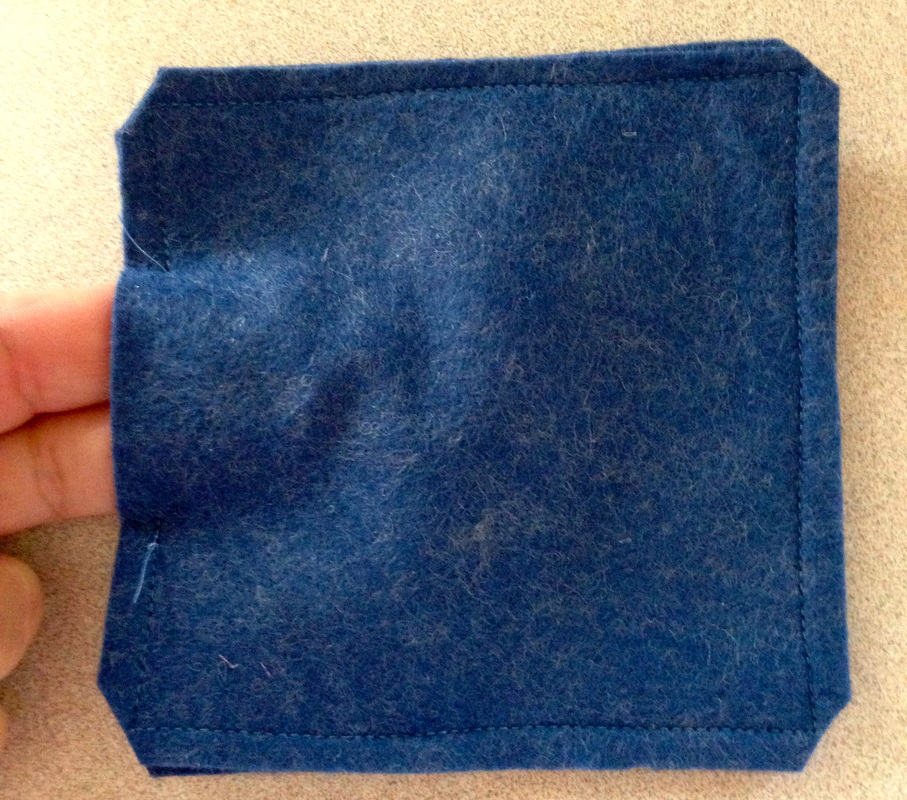 #2 Sew with right sides together and leave a 2" gap for stuffing 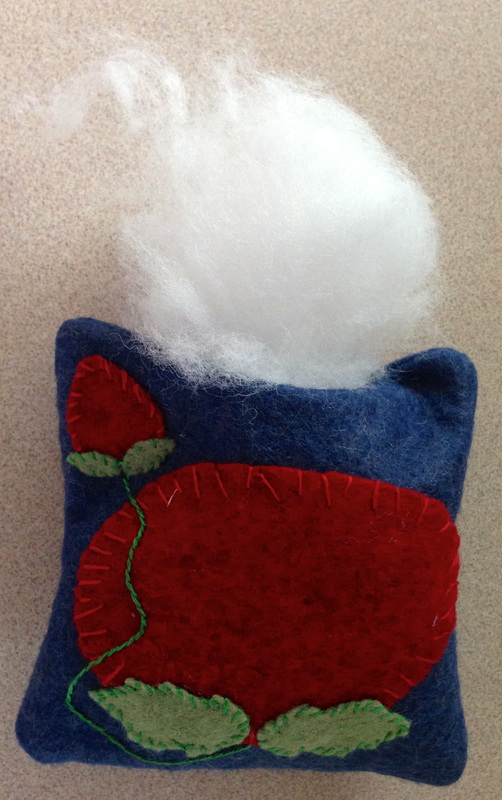 #3 Stuff with fiberfill or walnut shells 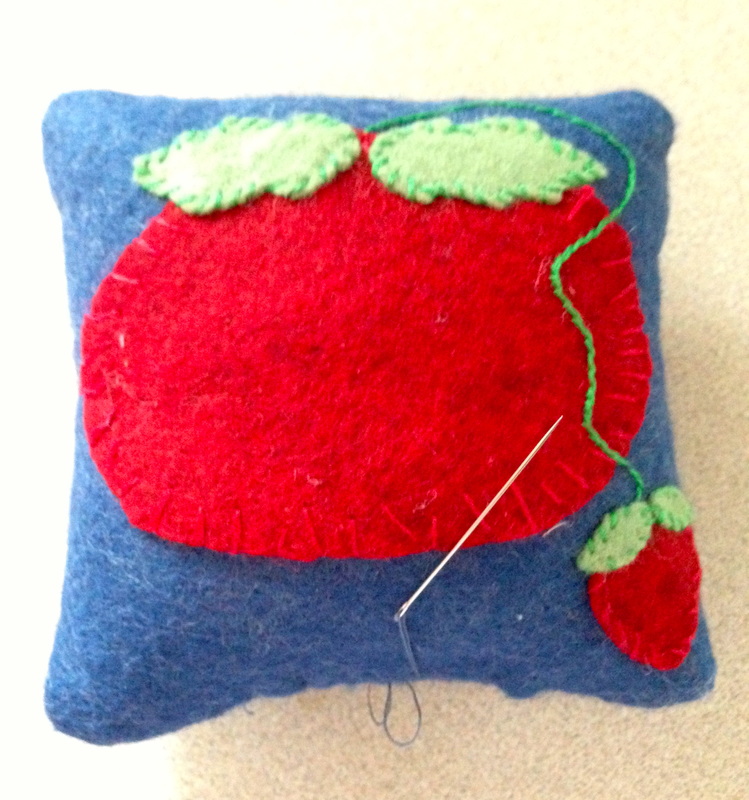 #4 Slip stitch your opening closed 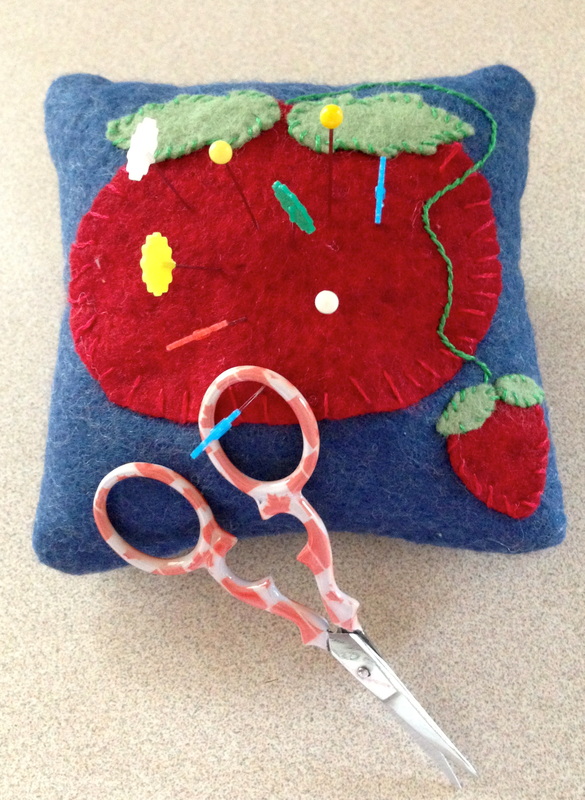 #5 done and ready to use I hope you are able to try this easy tutorial, you can download it for FREE here
Enjoy this one hour project! Happy Tuesday!
0 Comments
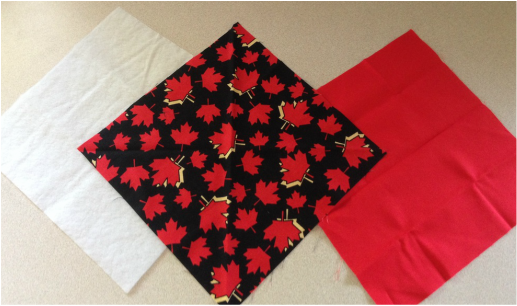 What can we make from the fabric above? A Canada Day Candy Dish! 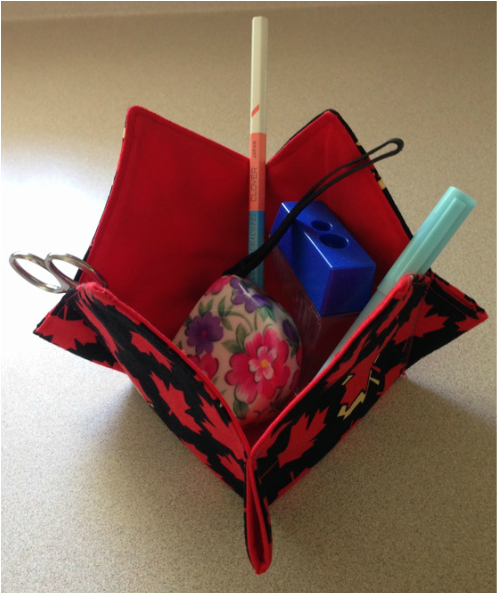 I'm showing it filled with gadgets but you could use it as a Candy Dish filled with "red" candies as well! You will need: 2 complimentary 9" squares of fabric 1-9' square of thermore or fusible fleece Thread to match How to make it: 1) Place both pieces of fabric right sides together on top of the fleece 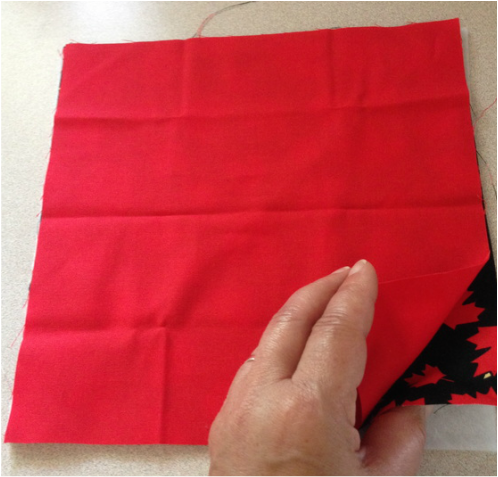 2) Pin if needed and sew all the way around leaving a 3" gap for turning. 3) Sew 1/4" around perimeter 4) Turn to the right side 5) Top stitch 1/8" from edge around the perimeter to & gap seam. 6) Lay fabric right side up in front of you, measure 2 3/4" from each corner of your fabric and place a chalk pencil mark at 2 3/4" away from each corner. 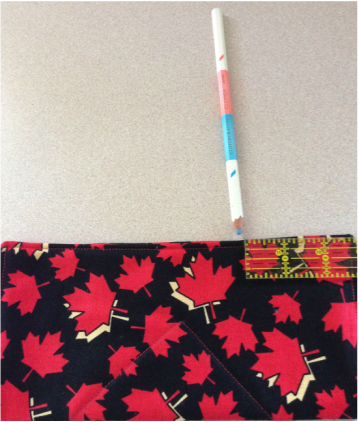 7) Fold the square wrong sides together matching the two marked spots on each side. Draw a line on the right side of the fabric from the matched & marked points to the corner of the sewn square in the centre. Sew on this line using a back tack stitch at the beginning and the end of this seam. This will create the side wall flaps that stick out. 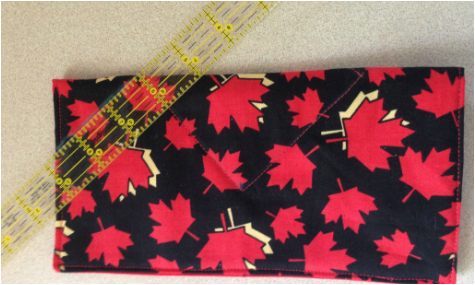 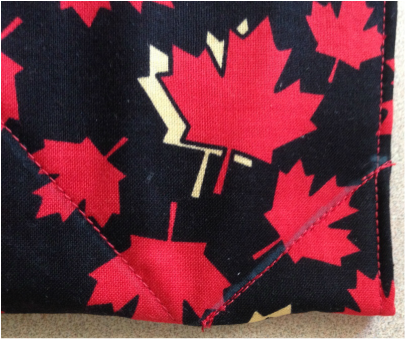 8) Repeat step 7- 3 times until your "Canada Day Candy Dish" looks like the picture below: 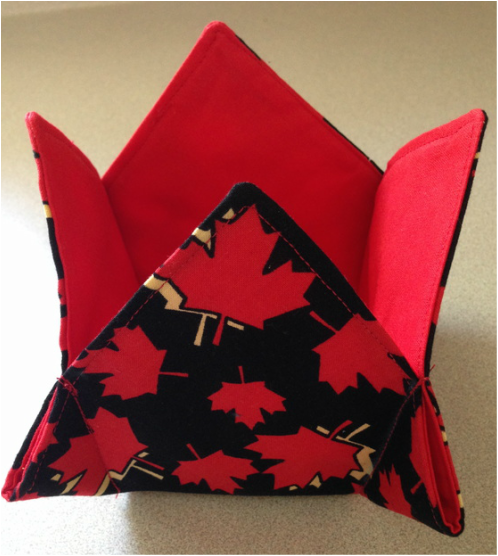 Fill 'er up! Happy Tuesday🍁
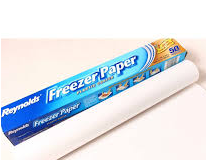
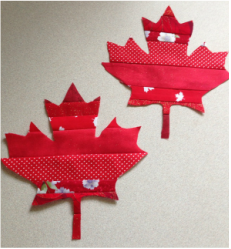 Canada Day is coming up fast and furious on July 1, 2016 and I will be vacationing at that time in a few Eastern Provinces. I cannot think of a better way to celebrate than by travelling and seeing other parts of our beautiful country. I made the placemats below to use at home and to pay homage to this special holiday. Canada Day has always been significant to me, not only from a historic perspective but also because my Wedding Anniversary is June 28th and many moons ago.... my husband and I celebrated Canada Day on our honeymoon. So it holds nostalgia and positive memories for me! I'm sharing with you a tutorial for some Canada Day placemats below 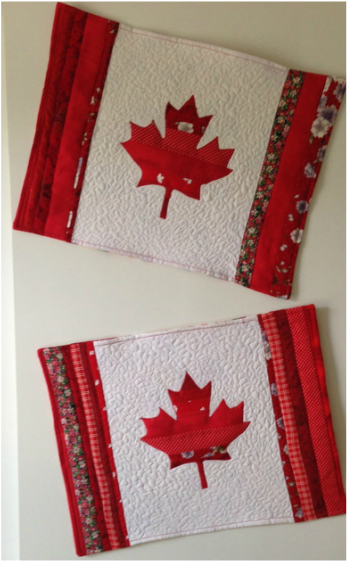 Strata constucted Canada Day Place Mats -Finished Size 14 x18" What you will need for 2 placemats: Strips of fabric to make a "strata" of red" fabric about 26 x 15" of fabric 2 -White fabric 11 x 14" 2-Backing fabric 14 x 18" 2-Batting 14 x 18" White thread to quilt around maple leaf Red thread for piecing and appliqué Fusible Web Parchment Paper Freezer Paper A sharpie permanent marker A "purple thang" or turning tool Pattern for Maple Leaf- Download it for free here How to make the placemats: 1. Sew together various strips of red/burgundy fabric in various widths ( 1", 1 3/4", 2", 1.25" etc ) they should all be at least 15" in length. Sew until you have approximately 26 x 15", use scraps for this with various patterns. 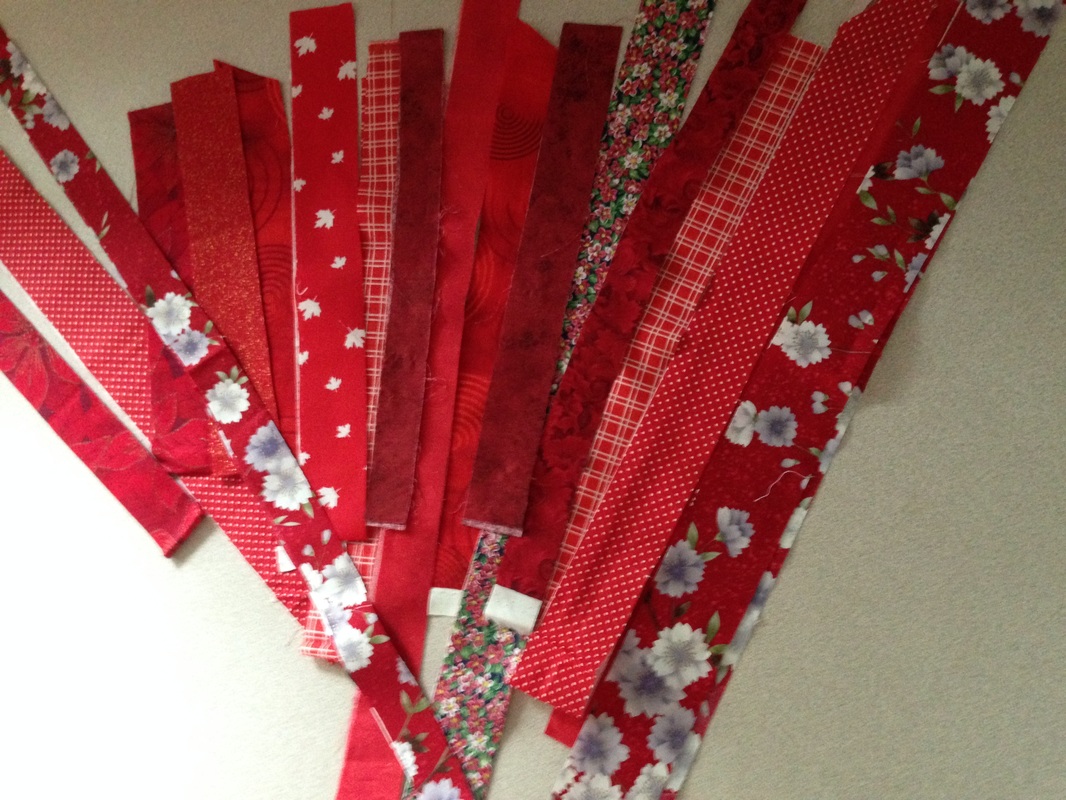 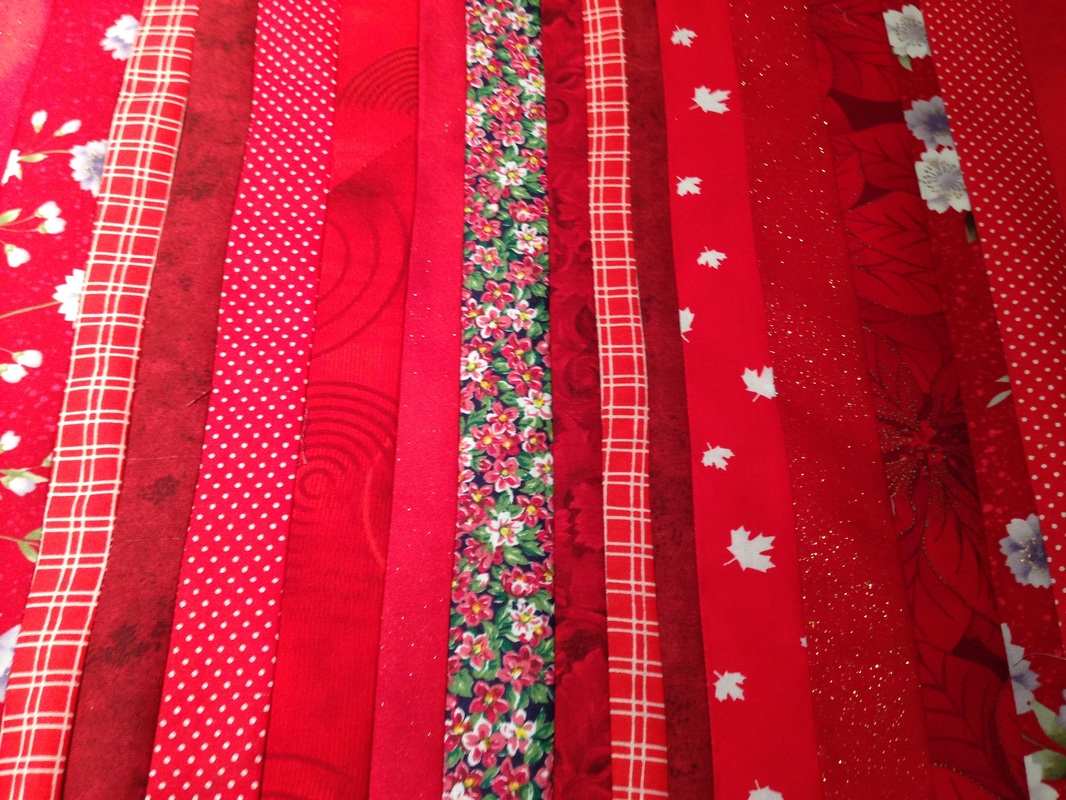 2. Square up your "strata" fabric and cut 4- 4" x 14" pieces and set them aside for the placemat borders. 3. Cut 2 pieces of fabric for the centre from white 11 x 14". 4. Sew 2 of the 4 x 14" strips to the sides of the white centre fabric. You should have enough fabric left to cut your leafs out. 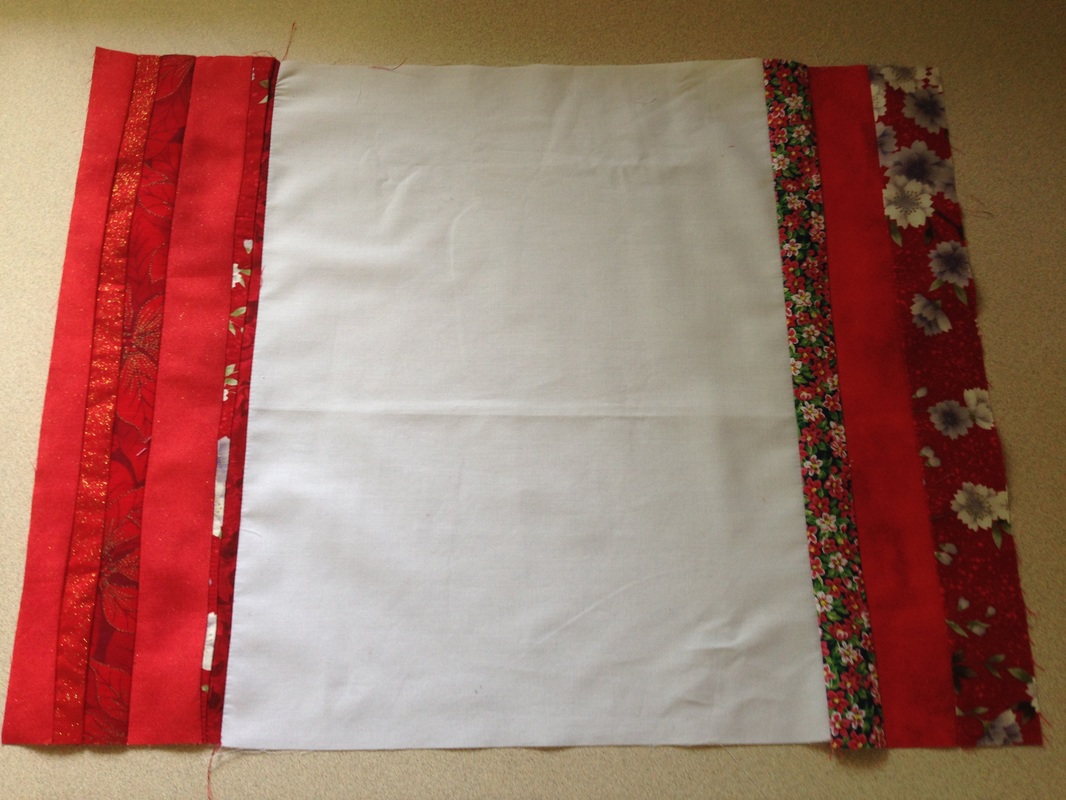 5. Using the pattern provided in the shop and free patterns section of this website, trace it onto the matte side of freezer paper with a sharpie marker. Cut it out roughly. 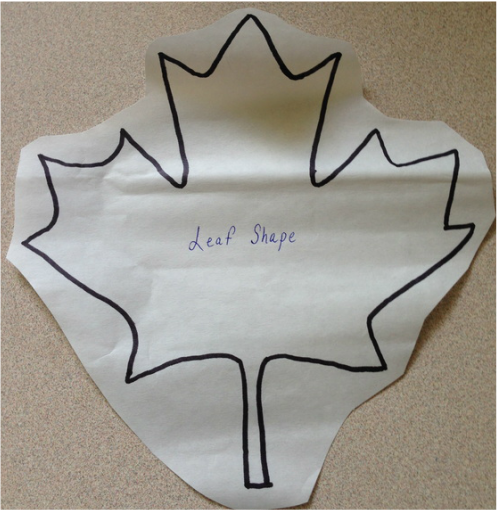 6. Iron the shiny side of the freezer paper to the right side of the strata fabric with the fabric widthwise on the leaf shape. 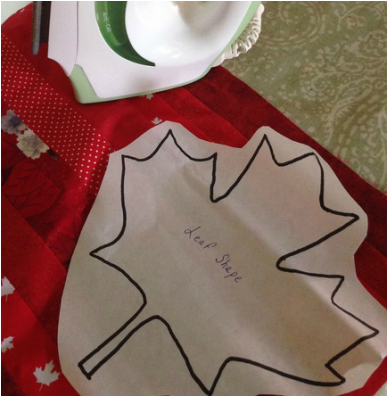 7. Cut your leaf out using the freezer paper as your guide. 8. Lay your leaf shape wrong side down to the glue side of fusible web, place parchment paper over the shape and iron the fusible web to the wrong side of your leaf 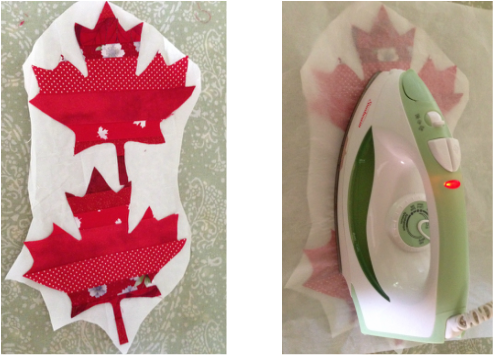 Fusible web on the wrong side of the leaves and parchment paper on the top to protect your iron 9. Find the centre of your placemats by measuring or folding your placemat centres and iron the leaves wrong side down to the right side of your white fabric. 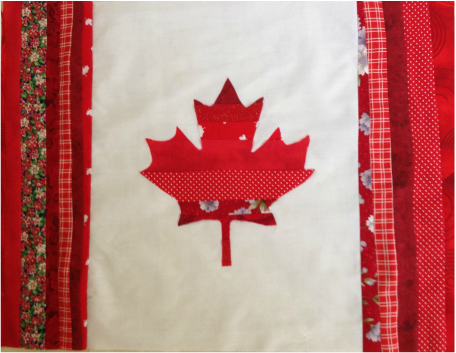 10. Lay your maple leaf placemat and backing fabric right sides together on top of your batting and sew 1/4 around the perimeter leaving a 3" gap for turning. Note: if you wish to bind your placemats, you would simply sandwich them as if they are quilts at this point, quilt and bind. 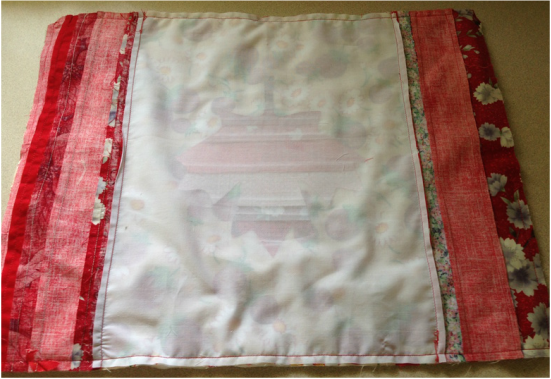 11. Clip your corners and turn the placemat to the right side (use a purple thang or turning tool to push out corners) and top stitch 1/4" around the perimeter. Satin stitch or zig zag your maple leaf through all layers and quilt as desired. 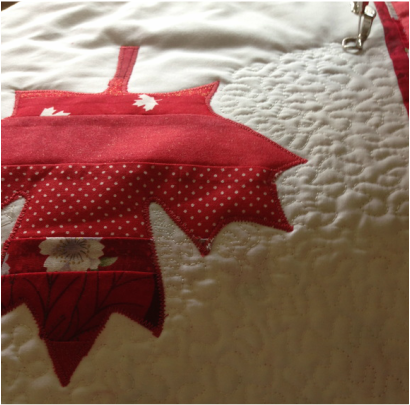 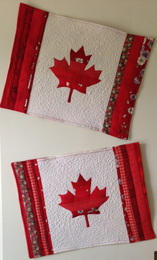 Your placemats are now ready for a Canada Day Celebrations. Enjoy!
Watch upcoming blog posts to see where these placemats travel to......🍁🍁 I think everyone loves bags to tote their stuff right? I find that I personally make totes for others and then find a shortfall for myself. So, I decided recently to make one with a gathering of friends. A fellow guild member, Heather from Elmira Needle Sisters told us all about this tutorial once we admired her beautiful bag. This bag is super easy to make with strip piecing and simple pin tucking. You can use a Jelly Roll for the strips. Check it out below: 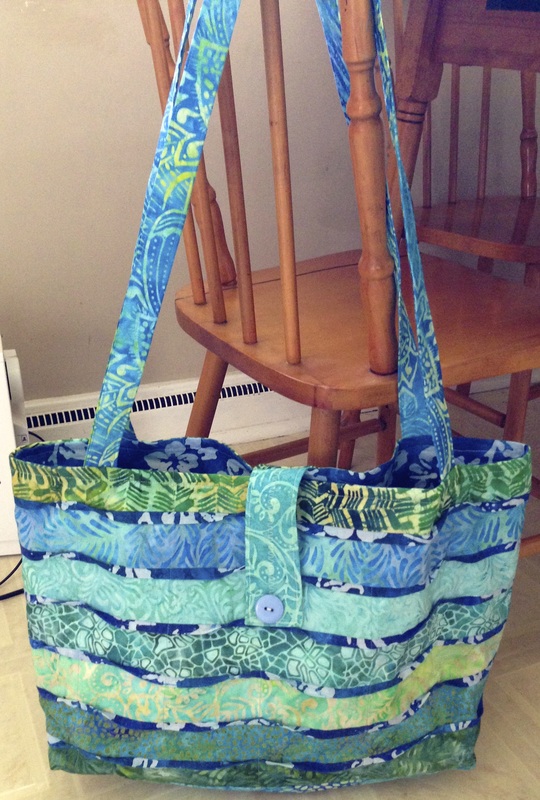 The Wave Goodbye Tote- modified By modified above I mean, I added the front tab and a zippered pocket inside. A pic of my sisters bag is also below: 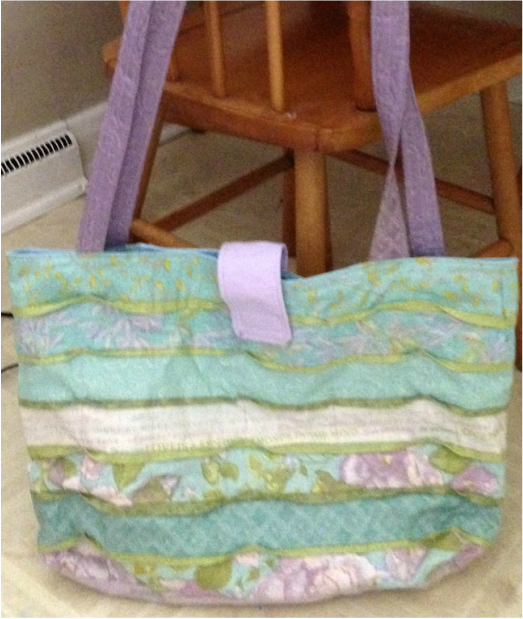 Alison's Wave Goodbye Tote 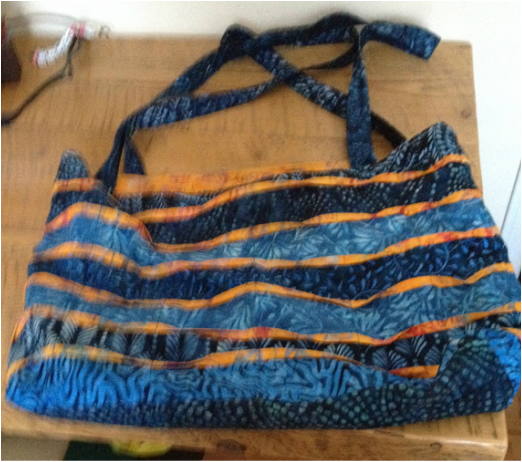 Linda's Wave Goodbye Tote If you would like to make this easy and fun bag click on the link for the tutorial here or go to weddingdressblue.wordpress.com and in the search box insert The Wave Goodbye Tote. This tutorial is fairly straight forward, no quilting required and fast and easy to sew together. Have a great Tuesday everyone! 😊 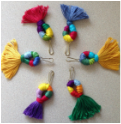
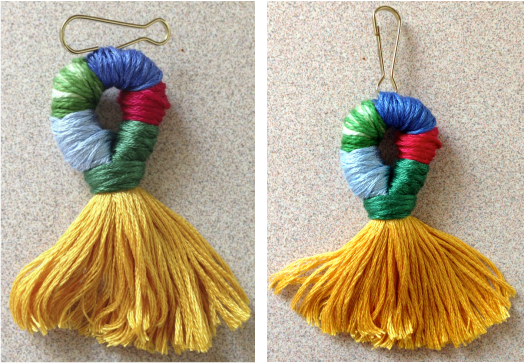
This is the last of my 3 part series on zipper pulls. These tassel like zipper pulls are super easy to make, so colourful and you can make them in 5 minutes!
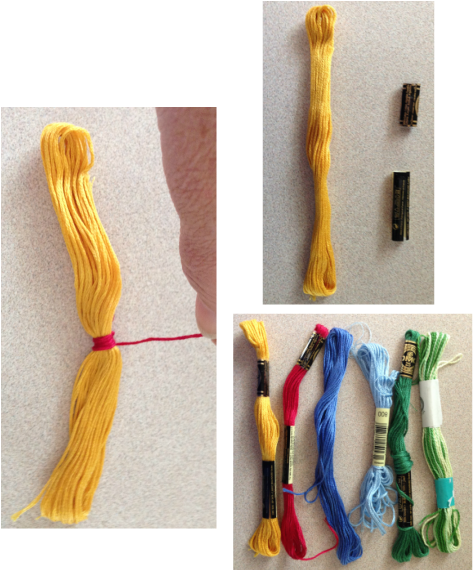
The look awesome added to a new quilted bag or spring/summer purse because they add such vibrant colour and a big splash of happy. What you will need: 6 Skeins of different coloured embroidery floss Scissors Lanyard Hooks Source for these:
How to make it:
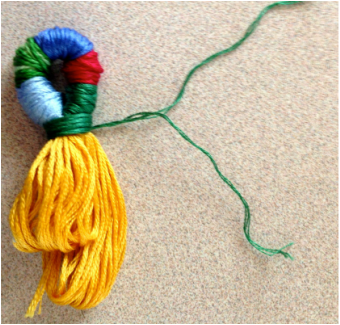
4. Continue to tie and wrap other colours evenly on each side of the center wrap incorporating your tied ends into the wrapping until it looks like the picture below

5. Bend your skein in half and using about 10” of the last colour of floss, tie your wrapped loop, split the floss in half and use these split ends to tie it tight.
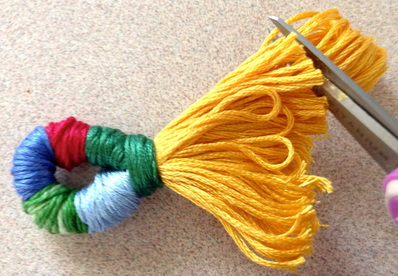
6. Cut the looped ends of your tassel so that they are even
7. Attach your lanyard hook onto the top of the wrapped loop and attach it to your zipper!
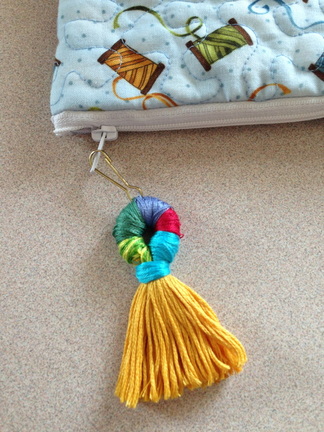
Bright pretty and practical!
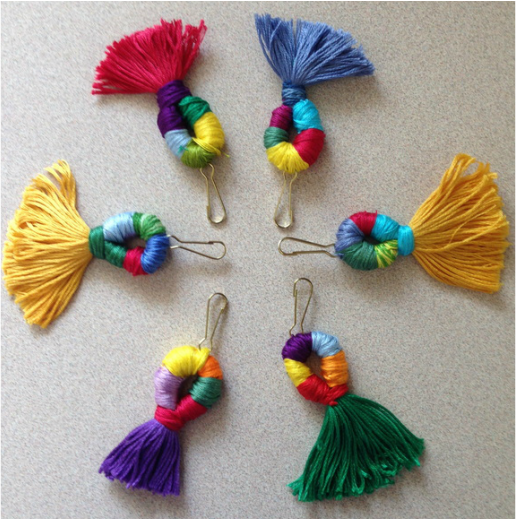
I had so much fun making them, I got a little carried away!
I hope you enjoyed this tutorial, that's the end of zipper pulls for now. Happy Tuesday! ?
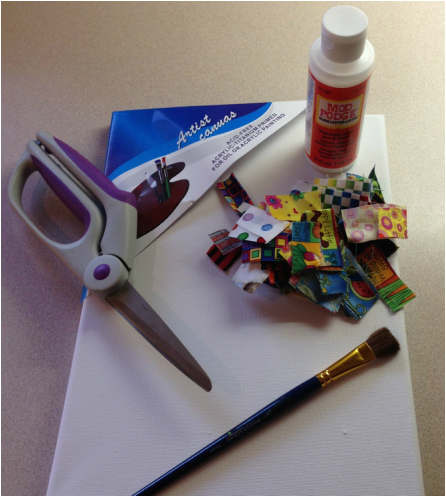
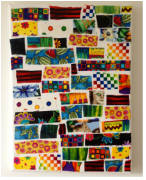 I experienced a weekend of fun with Mother's Day (family BBQ) and my daughters Graduate Exhibition at the Ontario College of Art and Design University in Toronto. ( I will be posting more about this in June when she graduates) So today's "Tuesday Tool or Technique", is inspired by fun and "artful" experiences. The little item above is a Art Collage made with some of my quilting cottons, specifically from my "brights" stash. This is also a very simple craft/art that you could do with your children or grandchildren or a great rainy day activity! Depending on your theme/fabric/colours/shapes and number/size of canvasses, you could make this collage project into great art for any room in your house as well. I have to say I did enjoy doing it. But then I think I am a child at heart! Life is too short to do stuff you don't enjoy doing right? Go ahead and try it and channel your inner artist/child and have fun! What you will need:
 How to Make it: 1. Cut out some fabric shapes. 2.Spread a layer of mod podge on your canvas as you go. 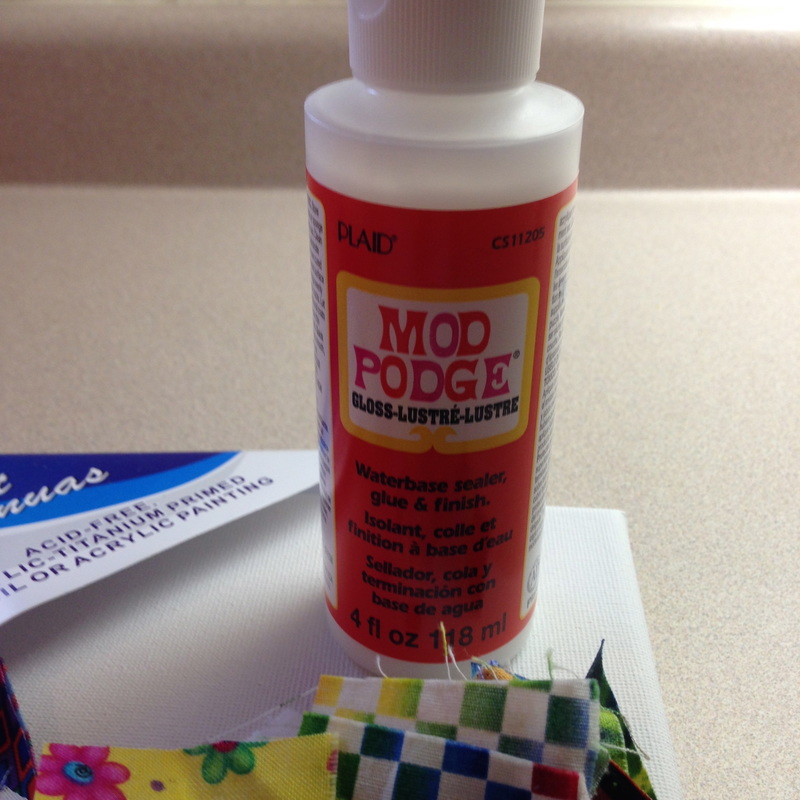 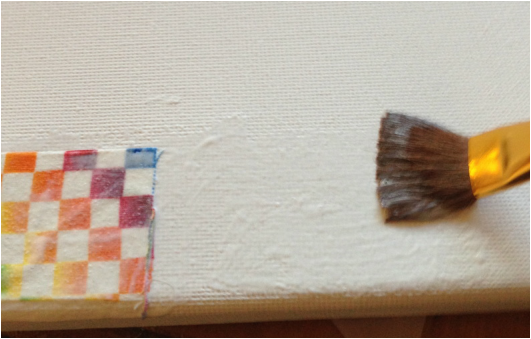 3. Randomly place fabric shapes on the canvas and brush more mod podge over them, leaving a little canvas gap between them until you have the canvas filled.  4. After the first layer of mod podge dries, you can coat it with another full coat to seal it and make sure all fabric is glued down. 5. Admire your efforts, you now have some inexpensive modern art to adorn your home! 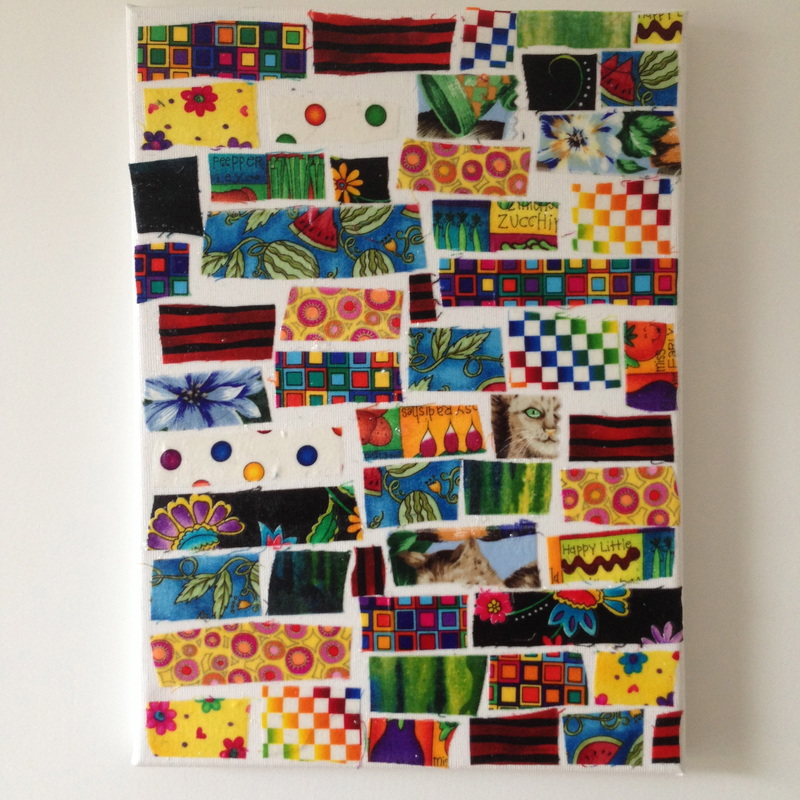 Have a great Tuesday!😊
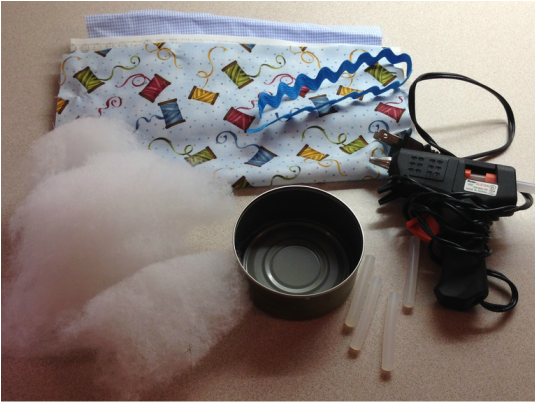
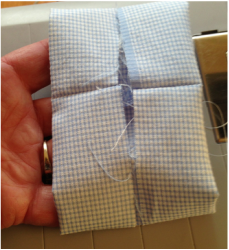
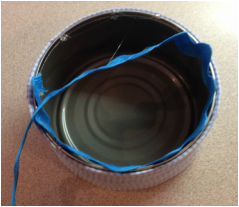
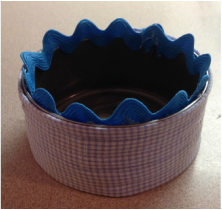
 Hold aloft to us the lowly Tuna Can! Todays Tuesdy Technique is kind of crafty! You can make a pretty & practical pin cushion from a tuna can - Who knew? 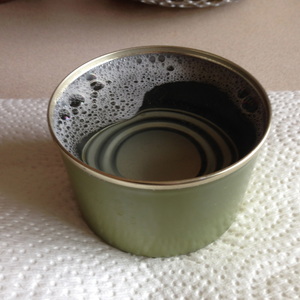 Wash out your tuna can thoroughly! You will need:
 How to make it: ( Looks like a lot of steps but really it's a 1/2 hour project tops!) 1. Fold your sleeve fabric in 1/2 on the long side & press it. 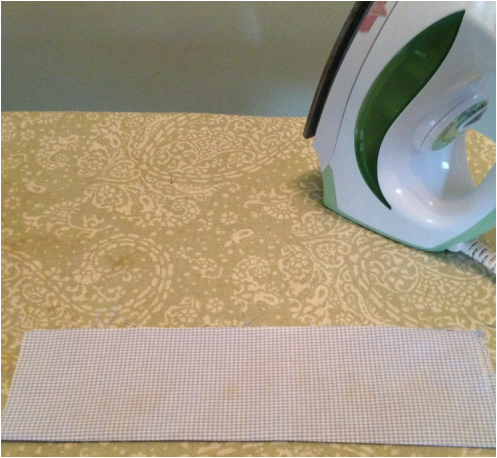 2. Fold each side toward the centre fold you just made as if you were making the straps for a purse.  3. Unfold it. 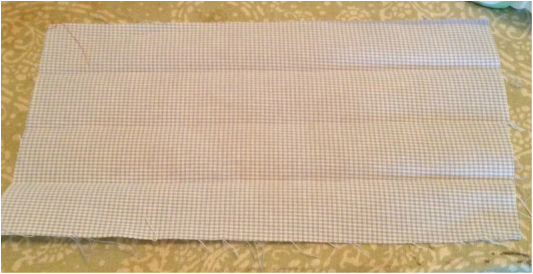 4. Bring the short sides together right sides together and sew a 1/4" seam to make a tube. 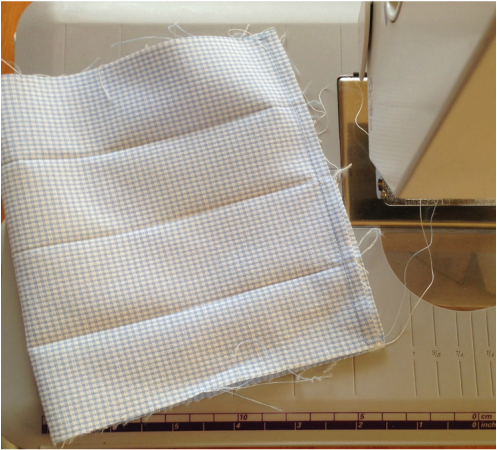 5. Finger press the seam open and fold one side down on the fold and then the other side.
6. Fold it once more from the centre enclosing the raw edges. 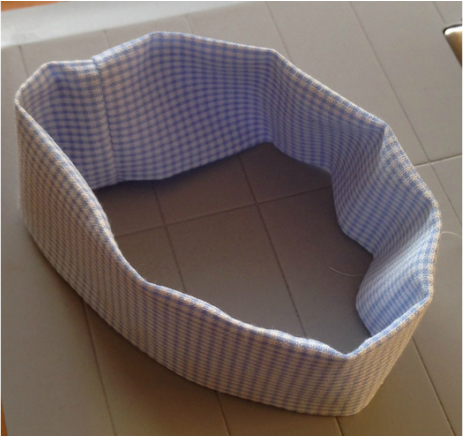 7. Audition it on your tuna can, it should fit snuggly. 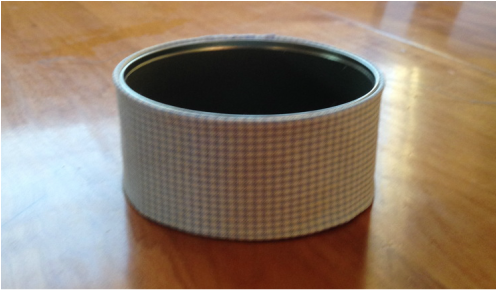 8. Top stitch it! 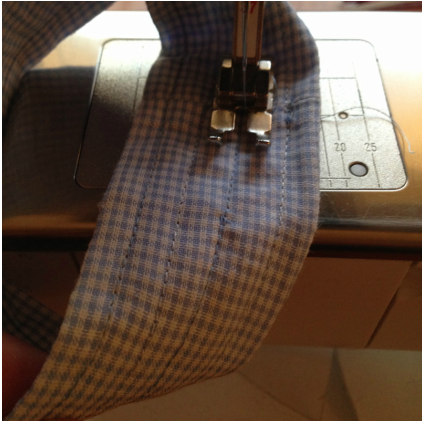 9. Place it back on the tuna can and dab a little glue under it to secure it in place. 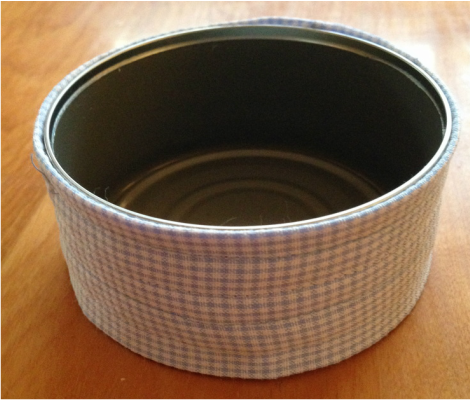 10. Glue rick rack on the under side of the top of the tuna can.
11. Place your stuffing on the wrong side in the middle of your pin cushion fabric and gather it tightly with your hand. 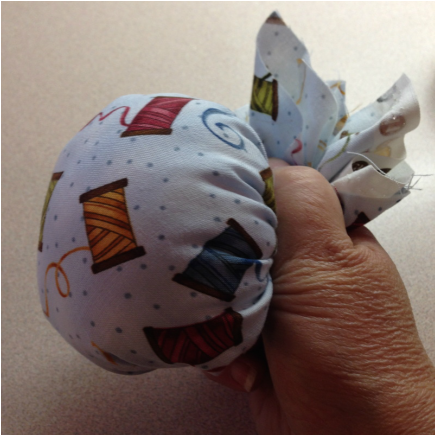 12. Sew it to gather it tight. 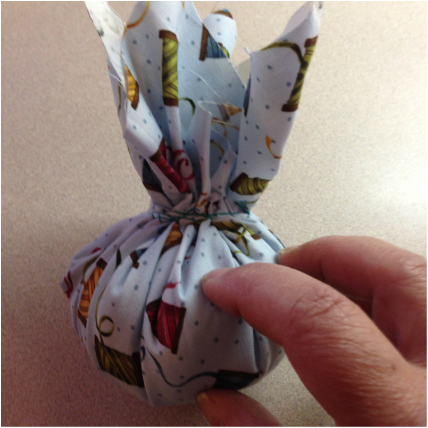 13. Put some glue in the bottom of the can & then stuff your gathered fabric into the tuna can base. 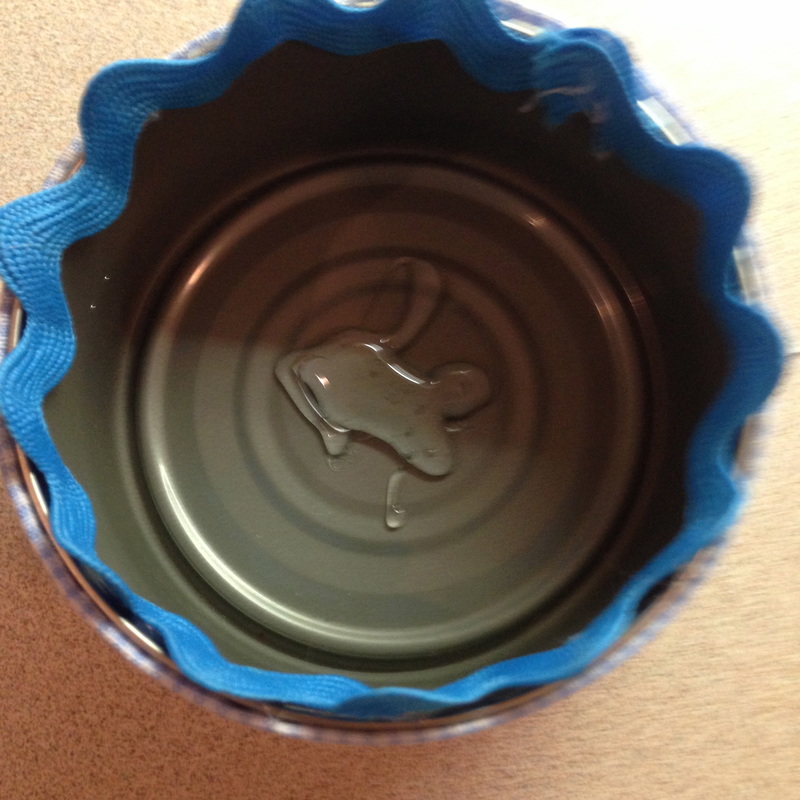 ... And there you have it, a very sturdy, large and practical pin cushion made from a recycled, reused and repurposed tuna can. I can't wait to make more!  Happy Tuesday, I hope you enjoyed this tutorial and will make use of your tuna cans in the future! 😊😛
I decided after one of my recent posts about appliquéing and the birdie pillow, I wanted to spruce up my guest room with more pillows. I did not want the pillow to be elaborate or difficult to construct so I got to thinking...... What if?.... I used my rectangular doily I recently purchased? (I love linens and lace, they are textiles/fabric after all, lol) You could also use antique doilies or embroidered linens in the same manner and make this easy pillow. I decided to appliqué it loosley on top of some really nice Tula Pink gold/yellow fabric to bring out the yellow in my duvet cover. Before you think why duvet and not "quilt", I know I will eventually make a quilt for that room! 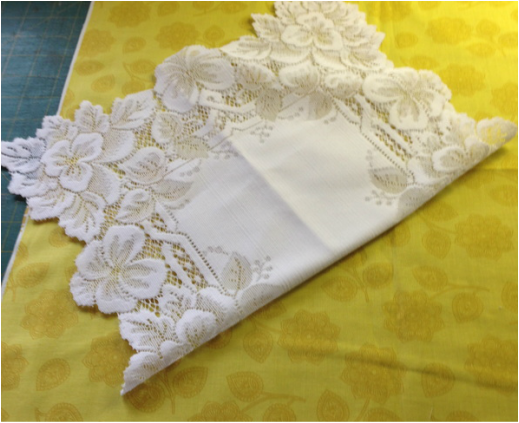 Tula Pink Fabric "Eden Henna Mustard" & my lovely rectangular doily I measured the fabric 2" bigger on all sides and cut it so that the doily would have space around it to show off the fabric. I centred and pinned the doily first and then appliquéd it by hand with a whip stitch discretely through the lace and pillow top fabric. 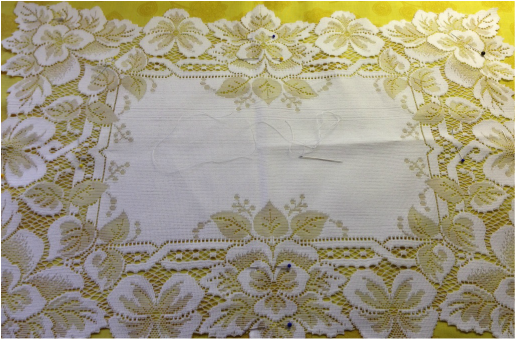 I then pinned the back of the pillow to the pillow top with right sides together. 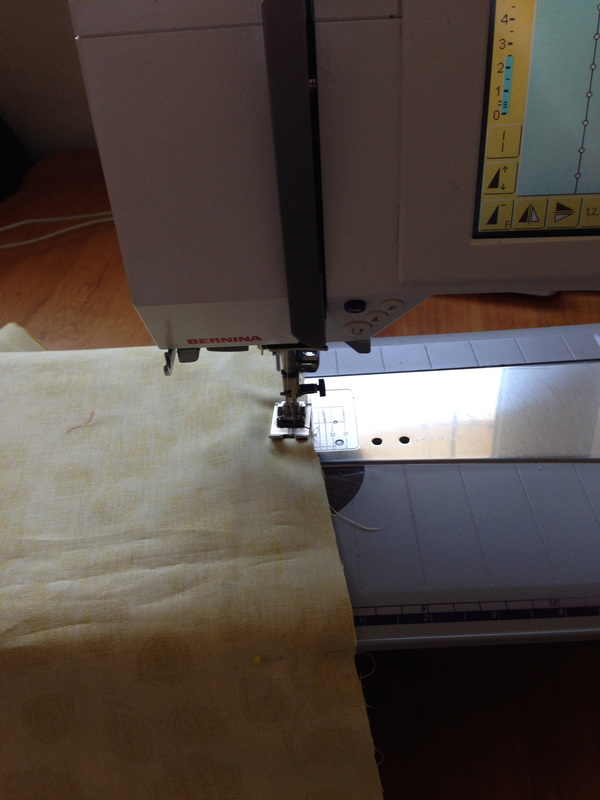 I sewed it all around the edge with a 1/4" seam allowance, leaving a 4" gap on the short side for turning and stuffing. It was then turned to the right side stuffed and the opening was slip stitched closed. 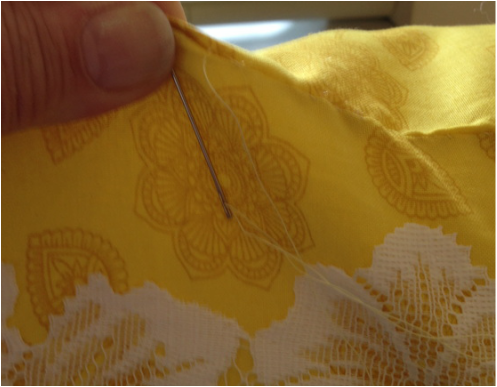 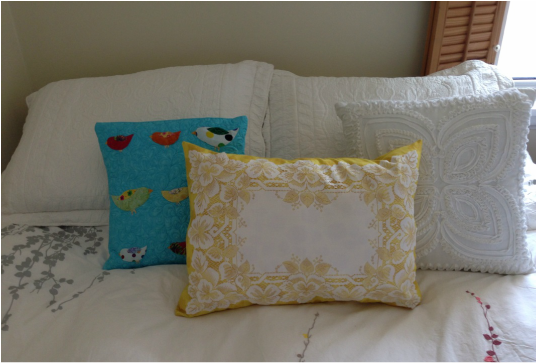 ....and there you have it, another pretty little pillow for my feminine, cottage style guest room.
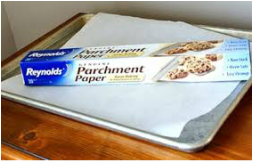
Happy Tuesday! ☀️🏠 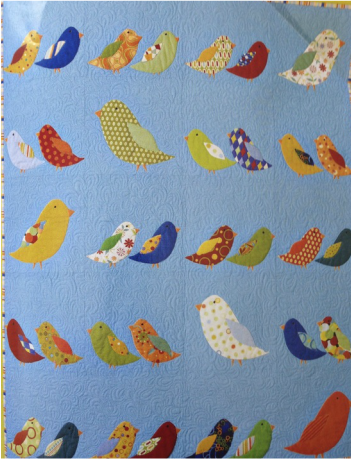 Kevin Kosbab Designer- Birds of a Feather from Feed Dog Designs I found this quilt in the magazine I purchased some time ago "Make It Modern" Better Homes and Garden Jan 2013. The designer is Kevin Kosbab of Feed Dog Designs. I have wanted to do something with it since I got the magazine because it's adorable, cheerful, springlike and colourful and there is lots of quilting space. I also wanted to share with you my method for appliqués to avoid my directional issues with reversing designs for fusible appliqué...... and I use freezer paper. I am making a personal project with the birds but you could use any appliqué design. Your main tools will be Reynolds white Freezer Paper, a sharpie marker, fabric, parchment paper, an iron and Fusible Web
How Make Appliques with Freezer and Parchment Paper 1) Trace your appliqué design using a piece of freezer paper (on the dull/matte side) and a permanent marker, the way it is shown facing you. Cut it out roughly 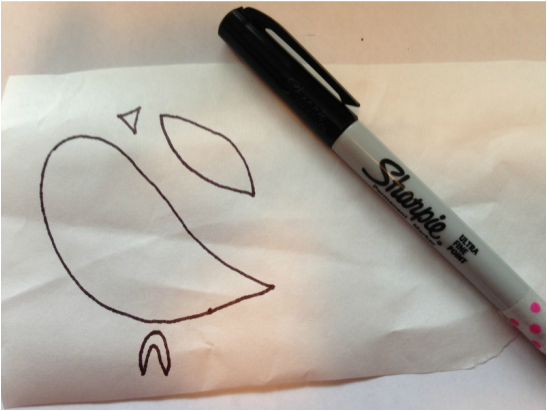 Draw the design on the matte side of freezer paper 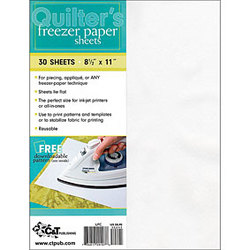 ***You could also print it out onto computer sized freezer paper, if you have a design from the computer and use freezer paper sheets available at Connecting Threads- How cool is that!- click on the image to the left to obtain these if needed/wanted!*** 3) Iron the freezer paper design to the right side of the fabric (wax side of Freezer Paper to the right side of fabric) - Believe me it will stick only temporarily and not leave a residue! 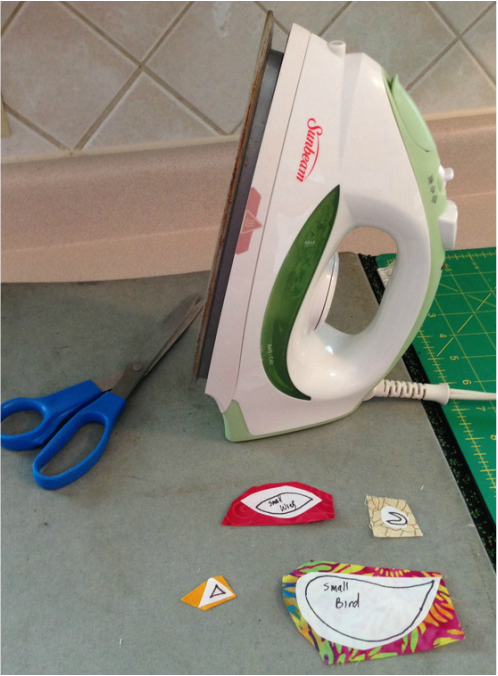 Freezer paper ironed wax side down to right side of fabric 4)Press the fusible web to the wrong side of the fabric 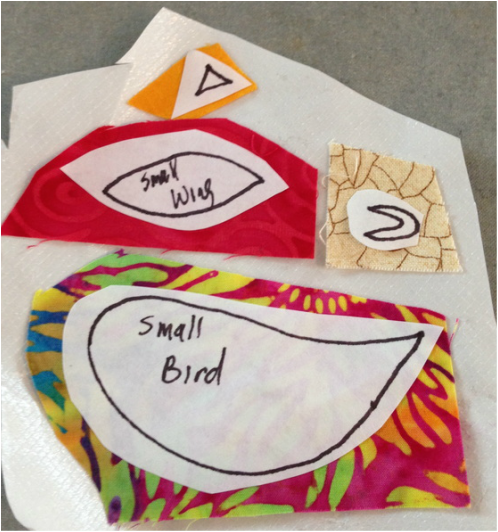 Appliques placed on fusible web wrong side down to the fusible web 5) Cut your appliqué out on the sharpie marker line, remove your freezer paper * You can use this same design over and over, just iron it to fabric with wax side to right side of new fabric, no need to draw your design over and over!* 6) Satin stitch, blanket stitch or appliqué stitch as desired to a background fabric. About Parchment Paper: -You may wish to lay a clean piece of parchment paper between your iron and your appliqué surface to protect your iron -You can build your appliqués on parchment paper -Parchment paper is a great tool in place of a silicone/lead pressing sheet (and it's a lot cheaper!) and fusible web will not stick to it and it will protect your iron as it has a non stick silicone treated finish... not just for cookies anymore! 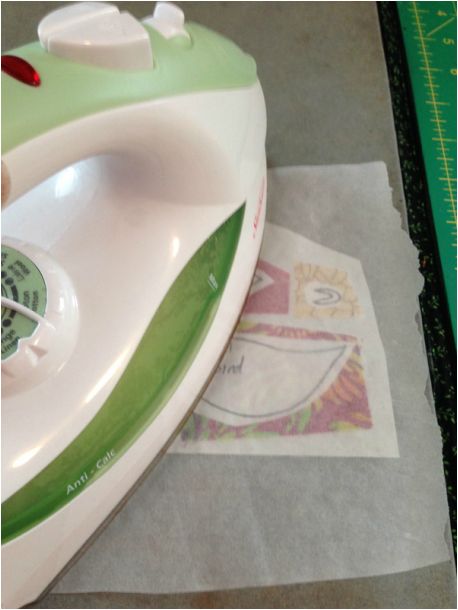 Place parchment paper over your appliqués while ironing to protect your iron from fusible web glue 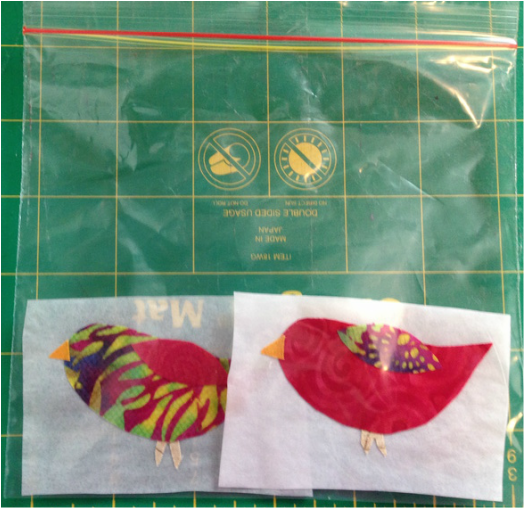 appliqués built on parchment paper and placed in a zip lock bag for future use 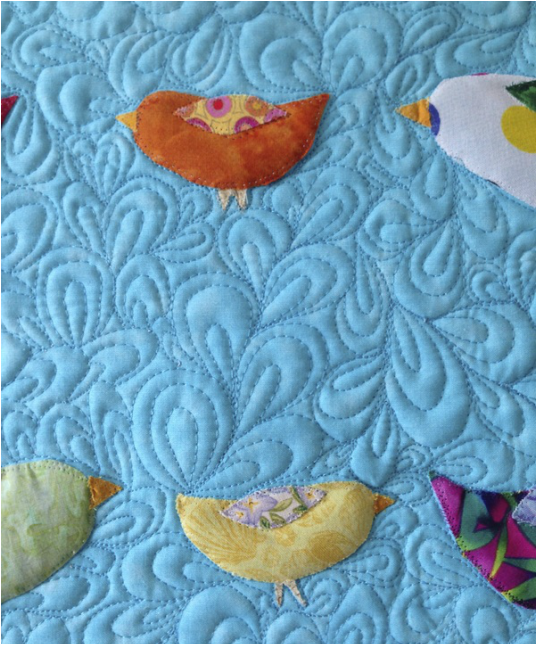 A close up of my appliqués and quilting 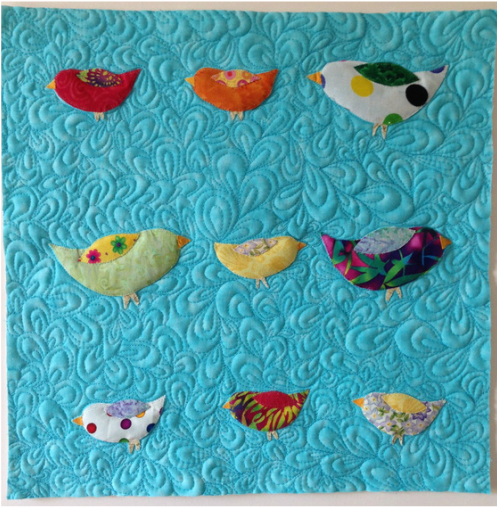 My little "quilt" 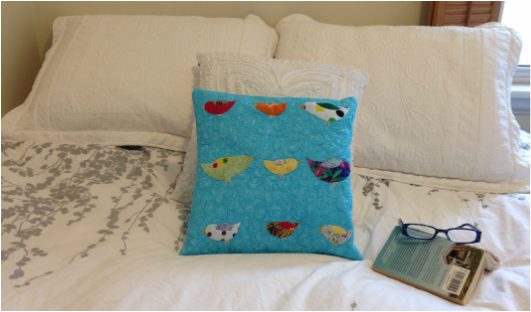 I actually made it into a pillow for my guest room! Happy Tuesday, I hope your week is going well! 🌷 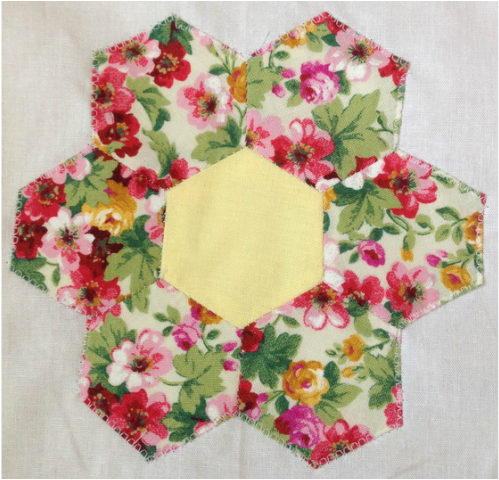
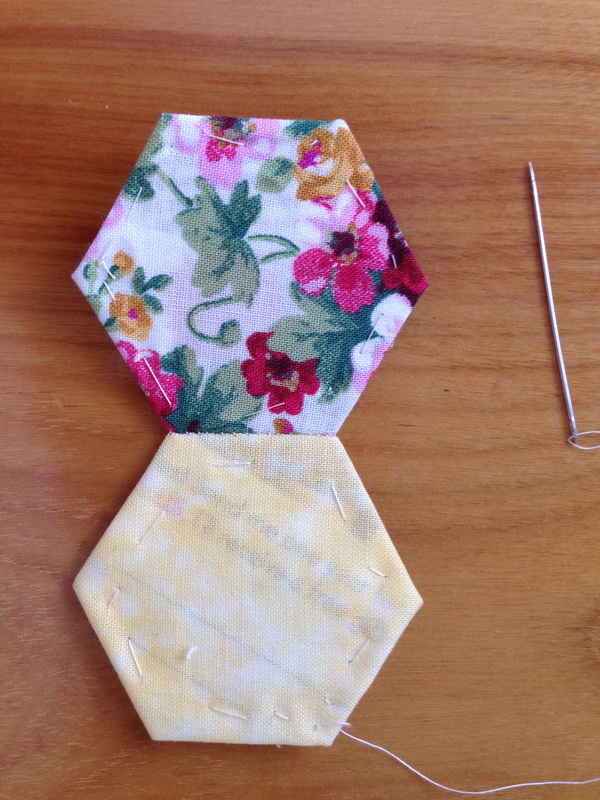
Classic "grandmothers flower" english paper pieced quilt block
As my blog followers know, I do a feature every wednesday on work with English Paper Piecing and I had someone ask me recently how to do it.
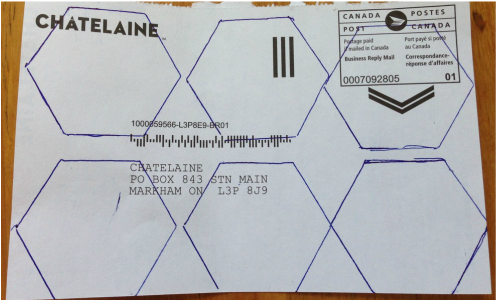
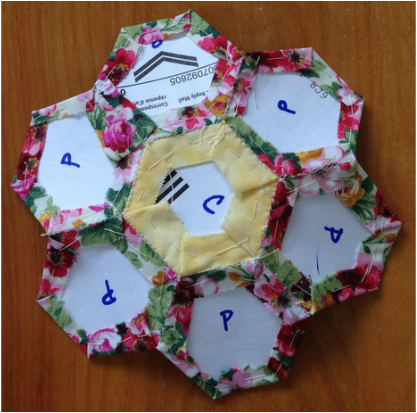
I assumed wrongly that everyone knows how to do it! So today I am sharing how to do EPP (english paper piecing) and sharing with you some resources that are very helpful to make these effectively. I hope if you try it, you become as addicted to making EPP pieces as much as I am!!! I know at least one person in my life who claims that I am the one at fault for their EPP addiction. Yeah! it's a good thing. It's a fantastic past time and it makes you feel productive while sitting for long car rides, watching TV, waiting at appointments, watching children's activities etc. My sister also claims that doing EPP stops her from thinking about snacking as well and I am sure we could all benefit from this "side effect". It's also a great small scrap buster! I am sure I have made hundreds of EPP pieces and I hope you will too❤️ How to start: 1) Assemble some card stock or the subscription cards out of magazines as shown below (they are the perfect weight for hexi papers): 
reuse and recycle these subscription cards
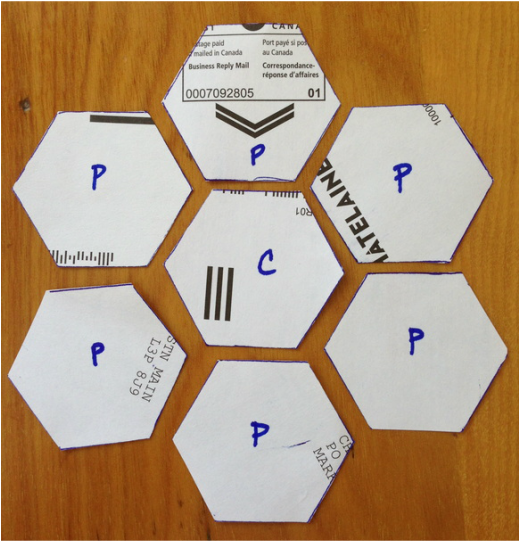
2) Print off hexi shapes from "images" in google of "free english paper piecing hexagon templates" or from free sites on the internet that provide EPP shapes or get them from a book. Trace the shape onto the back of your card stock (I cut out one shape to trace it). To make a "grandmothers flower" you will need 7 hexagons (any sized as long as all 7 are equal sized to make your flower, large or small). Draw them out accurately using a thin line pen or architectural pencil
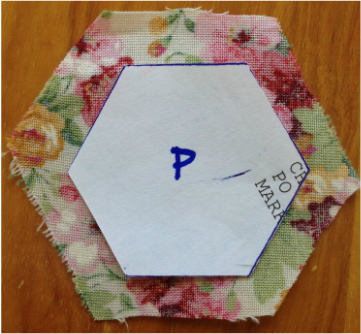
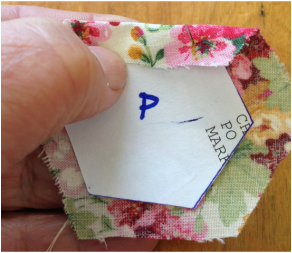
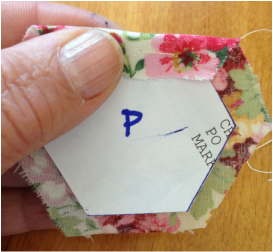
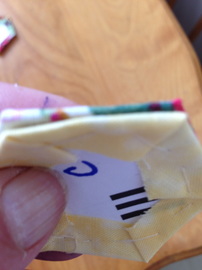
3) Cut out your hexi papers accurately, mark your centre with a "C" and your petal with a "P" especially if the centre and the petals are a different colour.
4) Cut out fabric 1/4" all the way around bigger than each hexi paper shape
5) Wrong side facing you, use a household (basic sewing) needle & generic, neutral coloured sewing thread and fold the fabric tight against the edge and baste all edges. (be careful to keep 1/4" seam allowance all the way around as you fold and baste). Fold down at corners as you go, use a large basting stitch - these basting stitches will be removed later. Tie a knot and cut off the thread when you are finished. You are basically sculpting the fabric to fit the shape of the hexi fabric
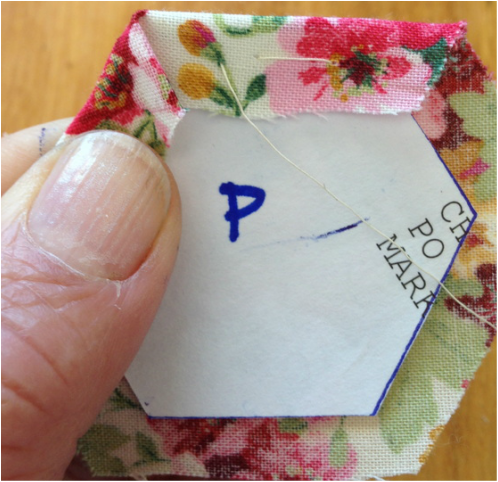
fold the next edge and corner
Baste along the edge and over the corner fold, it helps to keep your corners snug and sharp
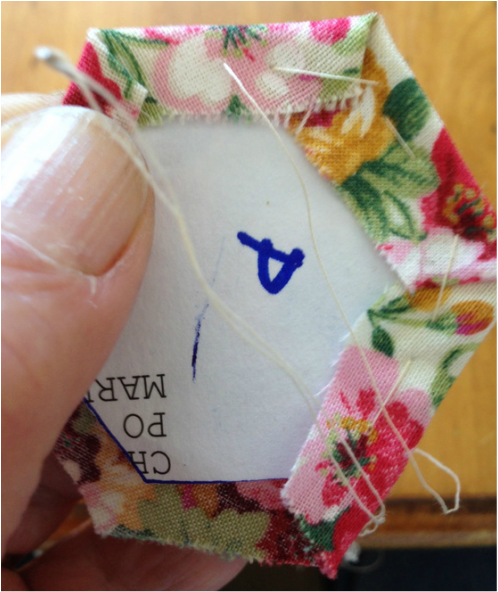
keep basting until it looks like this on the wrong side
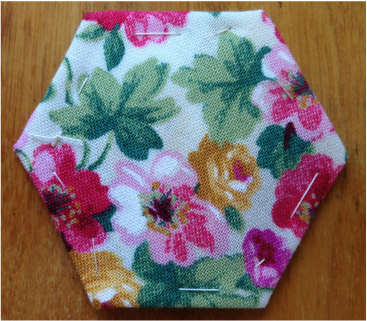
and it looks like this on the right side
6) Make 5 more petals and one centre ( I like to see the centre a different colour)
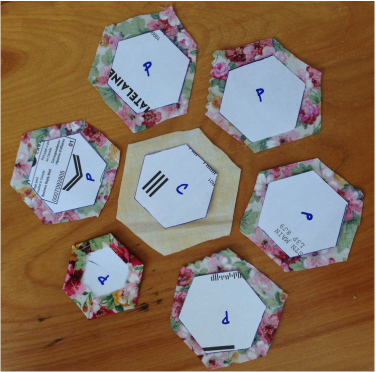
paper and fabric all prepared for basting
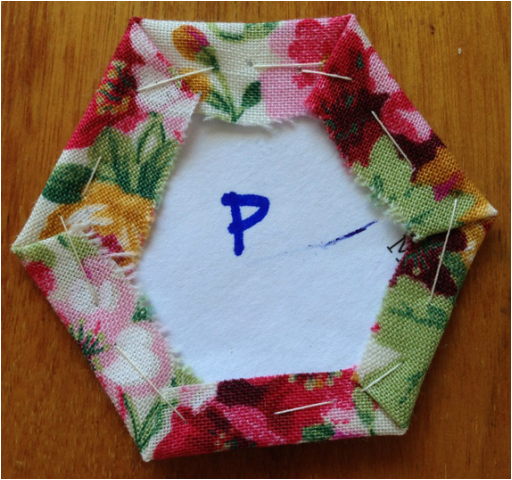
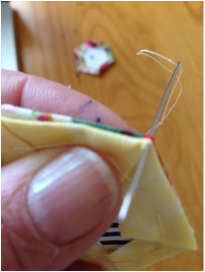
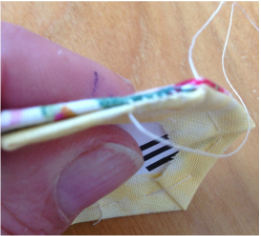
7) You will now be slip stitching your petals to your centre right sides together
8) slip stitch a petal to each side of the center right sides together until it looks like this:
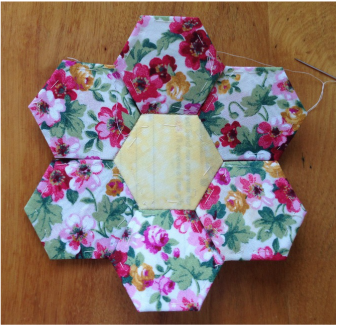
9) Hold sides of each petal right sides with the one next to it and slip stitch
10) Once all petals are slip stitched, it will look like this:
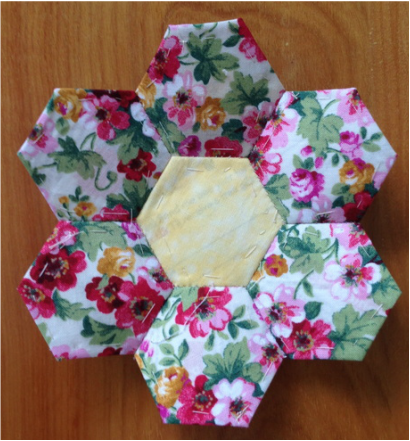
Front Side
Back side
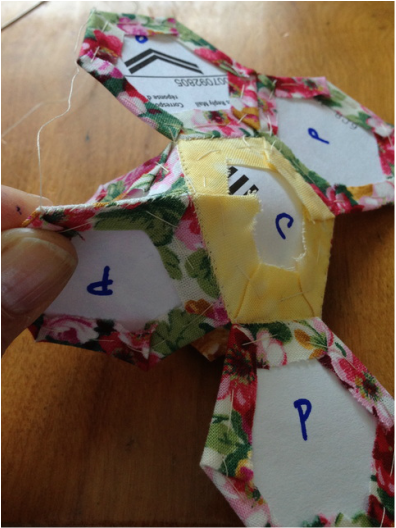
11) Press your flower and decide if you are joining it with more EPP or appliquéing it onto a background
NOTE: a) If appliquéing it onto a background, press flat with a hot iron, remove basting stitches (NOT THE SLIP STITCHING) and pop out the papers and press again it is now ready to appliqué. b) If piecing with more EPP, do not remove basting stitches until all pieces are joined with another. Never remove slip stitching as this is what holds your piecing together. This tutorial is just to get you thinking about EPP. I recommend a wonderful book with all EPP shapes is "All Points Patchwork" by Dianne Gilleland, this I would personally consider a bible of EPP. It contains many shapes beyond hexagon with print outs available for 11 different geometric shapes, lots of small projects, wonderful modern ideas for EPP, how to piece together EPP shapes and fantastic illustrated instruction. If you want to get serious about EPP, I highly recommend this book. This is what is looks like: 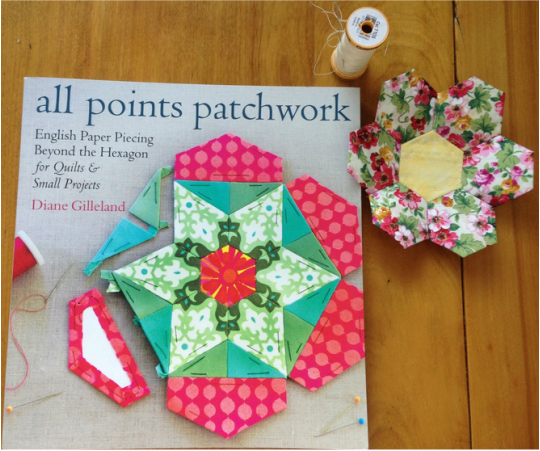
You can get it if you like by clicking here
or click on the amazon link below:
Happy Tuesday Everyone, I hope you enjoyed this tutorial and that you will attempt this technique. Please send us your pictures when you try it!
|
Follow Me:
Welcome!Hi I'm Robin and I am a professional long arm quilter, pattern designer and teacher. I am passionate about all things quilty!  
  Categories
All

Sponsors
This blog contains affiliate links. This means that we endorse products.
We do receive rewards for these endorsements and this helps to keep this site alive and well. We support products which we believe are the best quality and to inspire your creativity! |
 RSS Feed