|
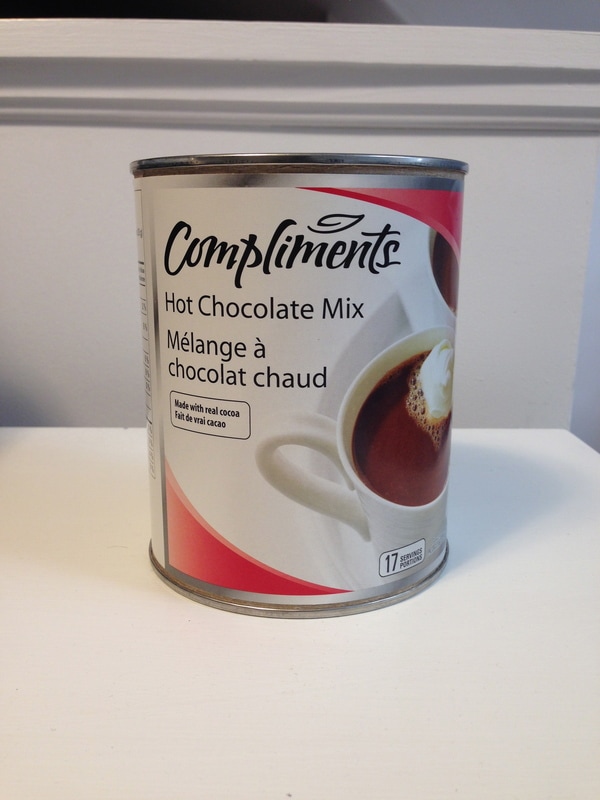
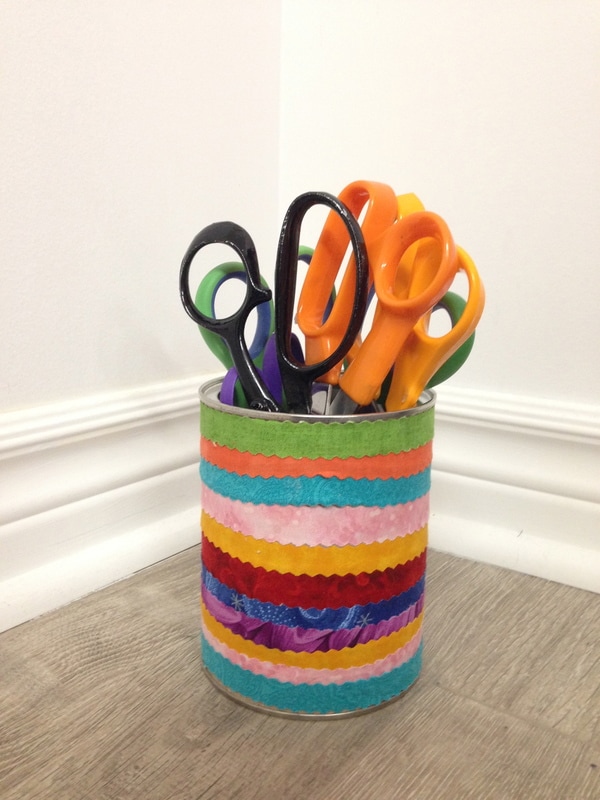
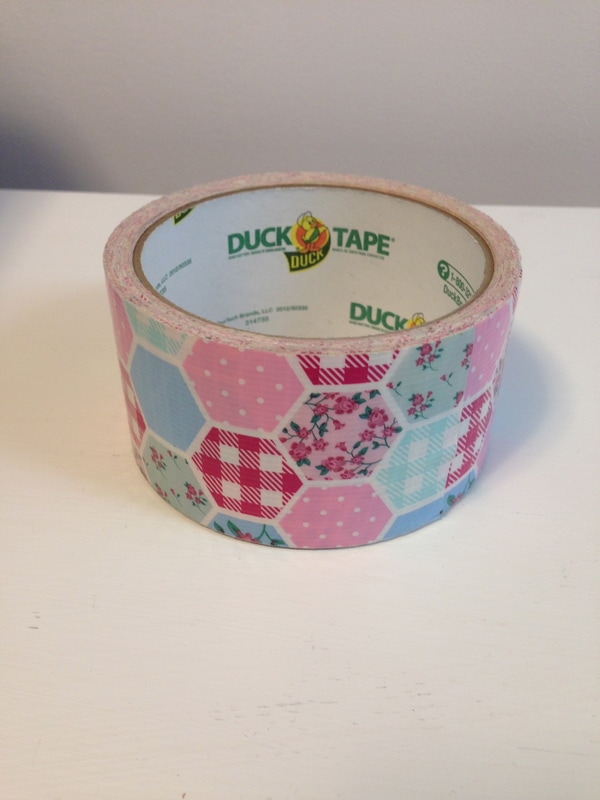
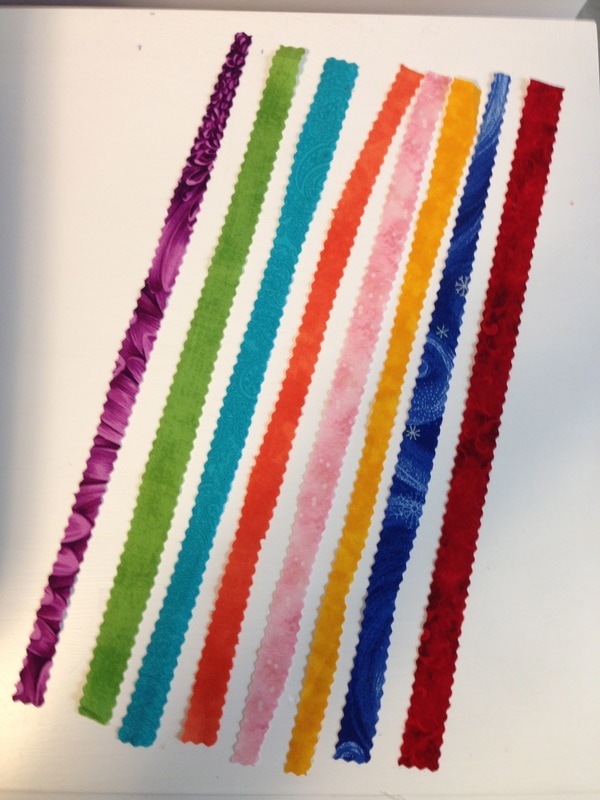
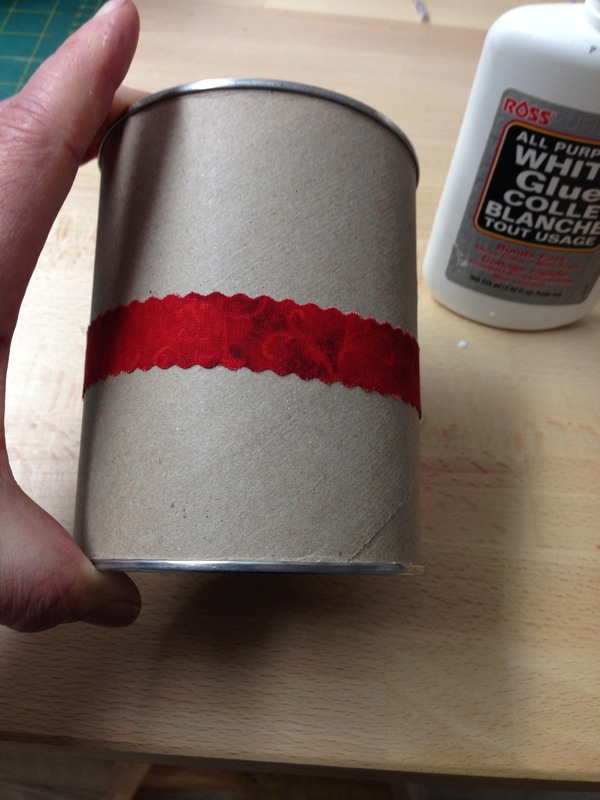
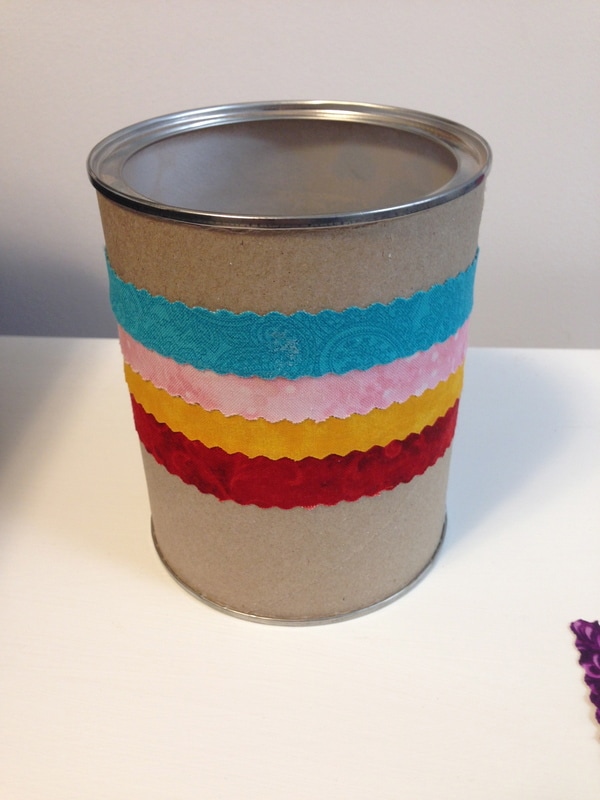
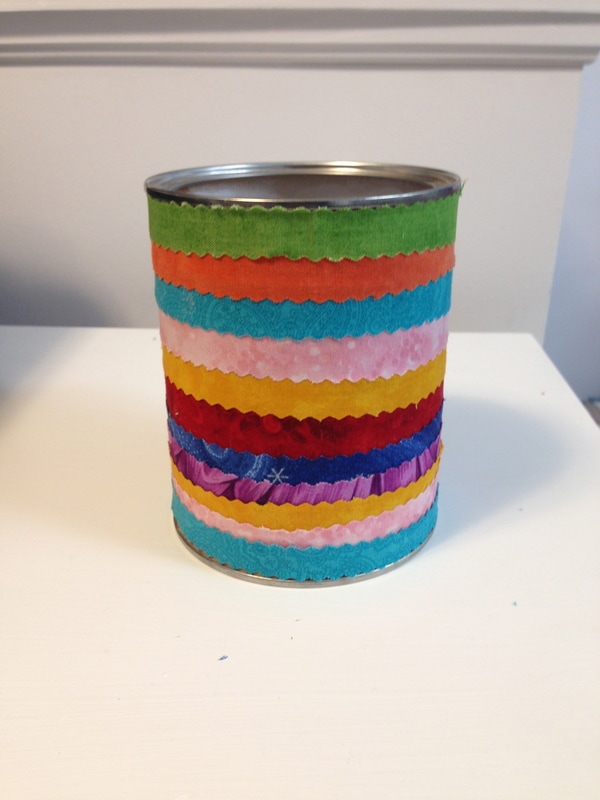
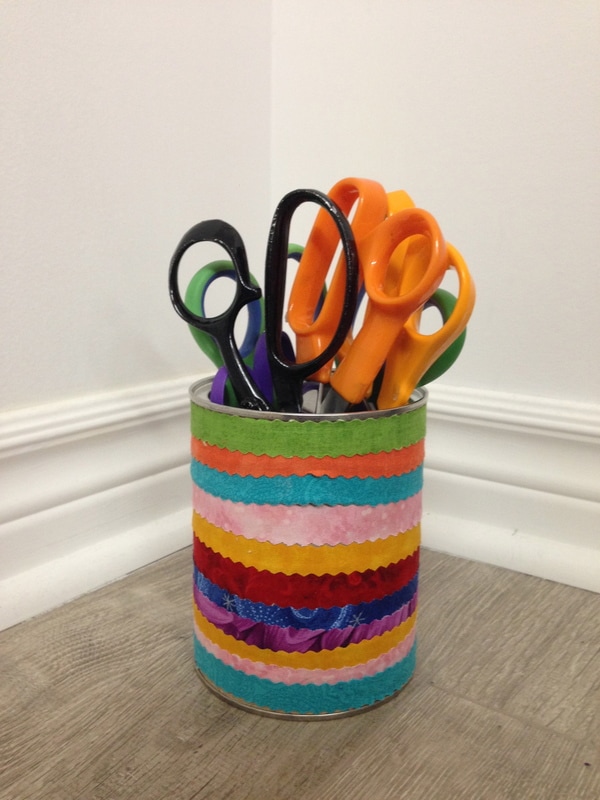
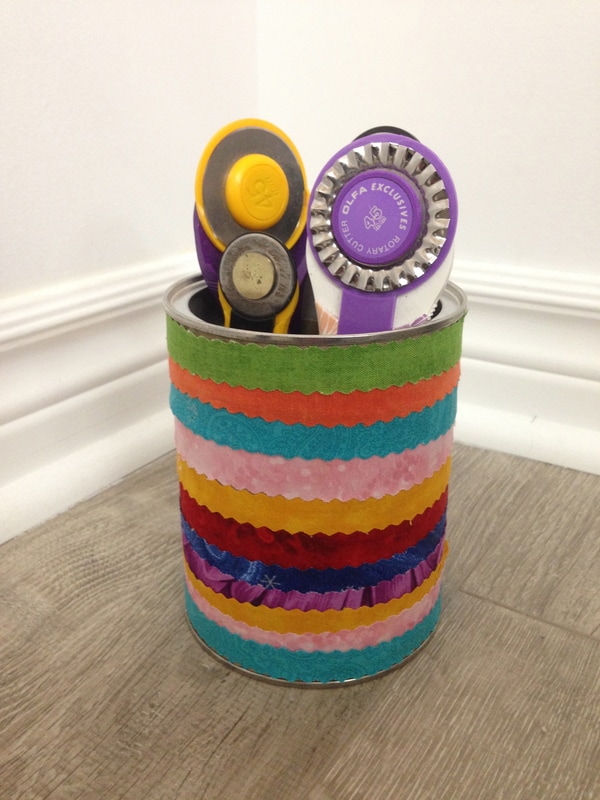
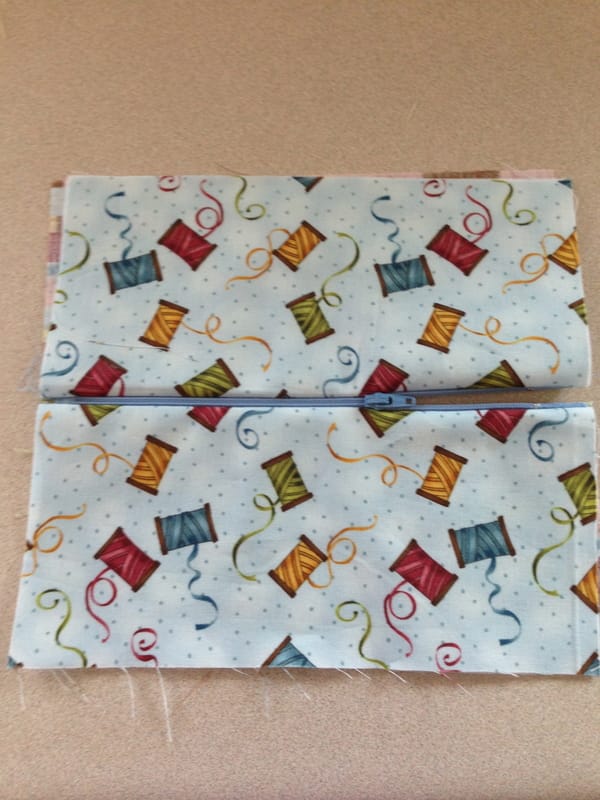
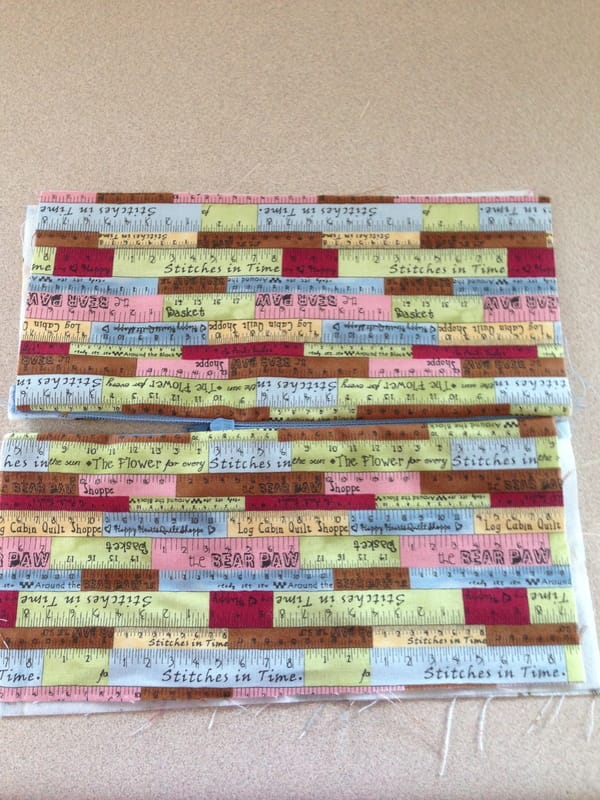
Starting my year off right with one of my resolutions....a reused/recycled project. This is a scissor/tool organizer from reused hot chocolate containers. Read more to see the versatility of this project. We are in the "thick" of hot chocolate season and there is no better beverage than a cup of steamy,sweet,delicious hot chocolate after all that snow shovelling! The City of Waterloo experienced the most snowfall in December 2016 compared to many years before. I now consider myself an authority on hot chocolate consumption! If you have kids or grandkids, you may even go through more hot chocolate than we do. This project is a way to start of the year gently with a project that is easy, very useful and involves reusing and recycling and there is no sewing required! This project is a no brainer and I can thank my sister Alison for the idea. Thanks Alison! Originally, Alison gave me the idea of making an eye glass organizer with these empty containers. If you are like us and at an age when we have multiple drug store glasses everywhere, then you would find this idea useful. See the picture below: 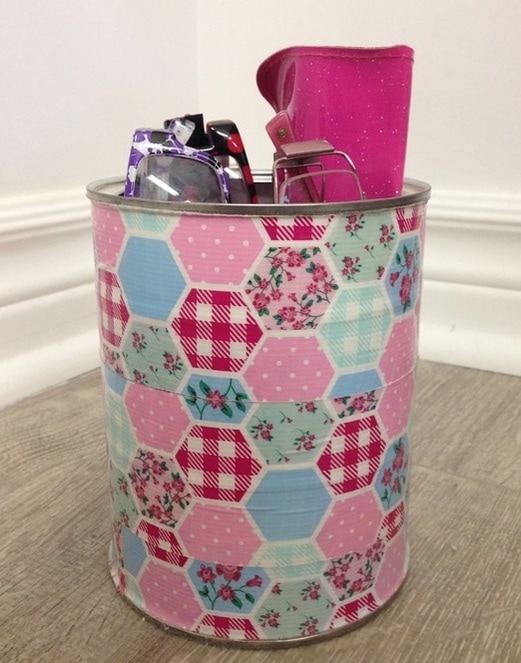 The above eye glass organizer is made with an empty hot chocolate container, 4 toilet paper rolls and decorative "Duck" brand tape. It sits on the desk in my kitchen at all times and I have found it to be a great go to spot to keep my many pairs of classes (I actually think I need one in every room in the house and I am working on it). There are some cool craft projects on the Duck brand website check it out here Don't you just love the above "quilty" pattern? I am truly obsessed! Sorry, I cannot find the source for this but I think I purchased it at Walmart? To make the striped scissor/tool organizer shown you will need:  A hot chocolate container 12 1/2" (32 cm) diameter and 5" (13cm) tall, strips of fabric 14" long (cut with a pinking shear or wavy rotary blade), 4 toilet paper rolls and... 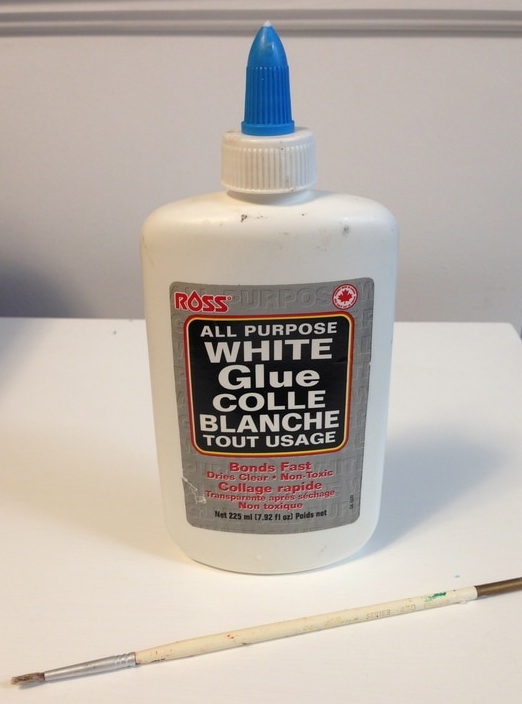 Cheap school glue and a paint brush to apply the glue. The inspiration for the colours in this hot chocolate container/organizer was fabric for roman shades I am making for my sewing studio see the fabric below: 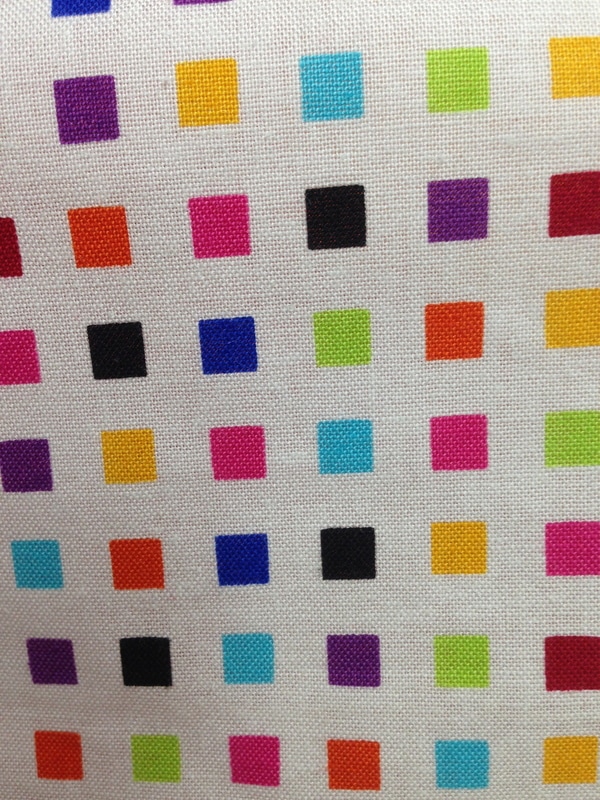 Isn't it pretty? Stay tuned for a show and tell of my roman shades in the very near future! How to make it: 1) Tear the label off your hot chocolate container and recycle the paper! If you cannot get the paper off thats ok as it will get covered. The fabric nd glue will just adhere better to the matte cardboard. 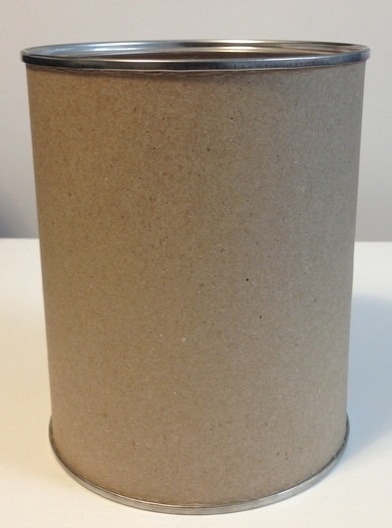 2) Start adding the strips by putting a dab of glue on the back center of your container and on the top of the strip and wrap it around over lapping it slightly, hold the fabric for a minute until it starts to feel like its holding. It is that simple! 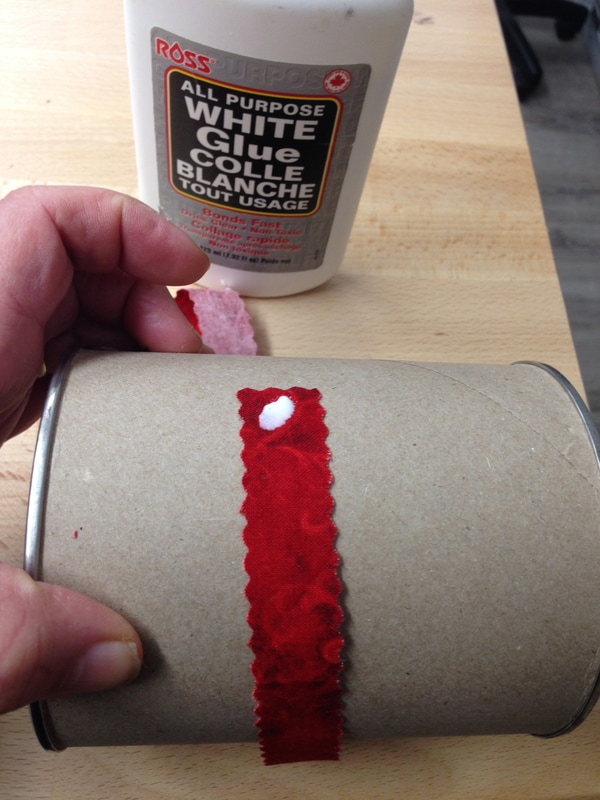 3) Keep adding strips until your container is covered with fabric 4) Insert 4 toilet rolls inside- they will fit tightly and may distort somewhat but thats ok, they are just there to support your tools and will not show once you have your container filled.  5) Fill it with tools such as scissors, rotary cutters, small rulers, pens, pencils, markers, craft supplies etc. (*What to do with the plastic lid? It makes a great round plastic template for a circular applique or cut it up into shapes as a piecing template* You have now recycled something, avoided the landfill and made a new purpose for it! Make this in colours to suit your sewing room. I hope you enjoy this quick and easy project. Happy Tuesday! 😊 This just in! (10:24 am Tuesday January 10th) Mabsy has sent me 2 pictures of recycle containers she made with dollar store sparkle gems! See below:  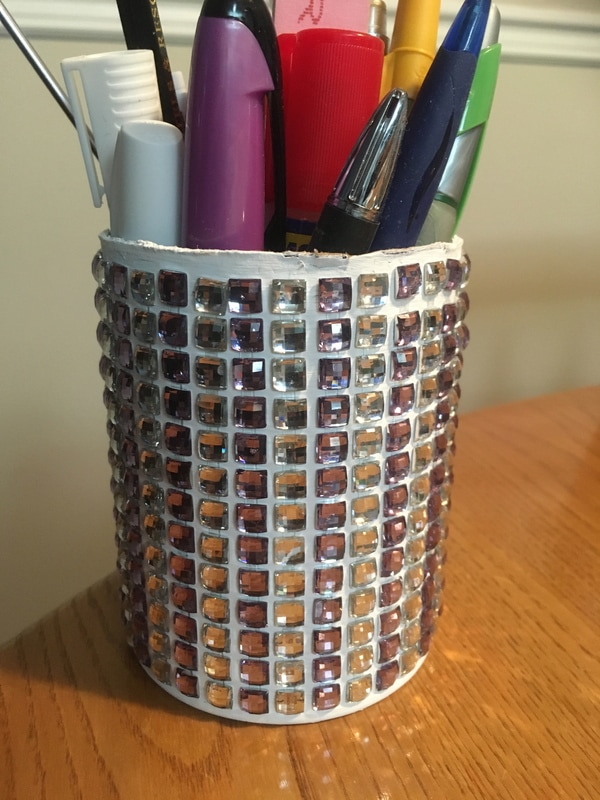 Way to go Mabsy! These are beautiful with the "bling" on them. Another unique way to look at this project. Thanks For Sharing!
2 Comments
Happy New Year and Happy January! I am writing this post at the request of a friend nearby who saw my pouch sitting about in my studio and she said: "Why don't you do a blog post on that?" This is for you Joan! I am sure everyone will find it useful and lets face it totes, bags, pouches.... you can never have enough as they are so useful! It also just happens to be that time of the year to get organized and these little totes are very helpful. 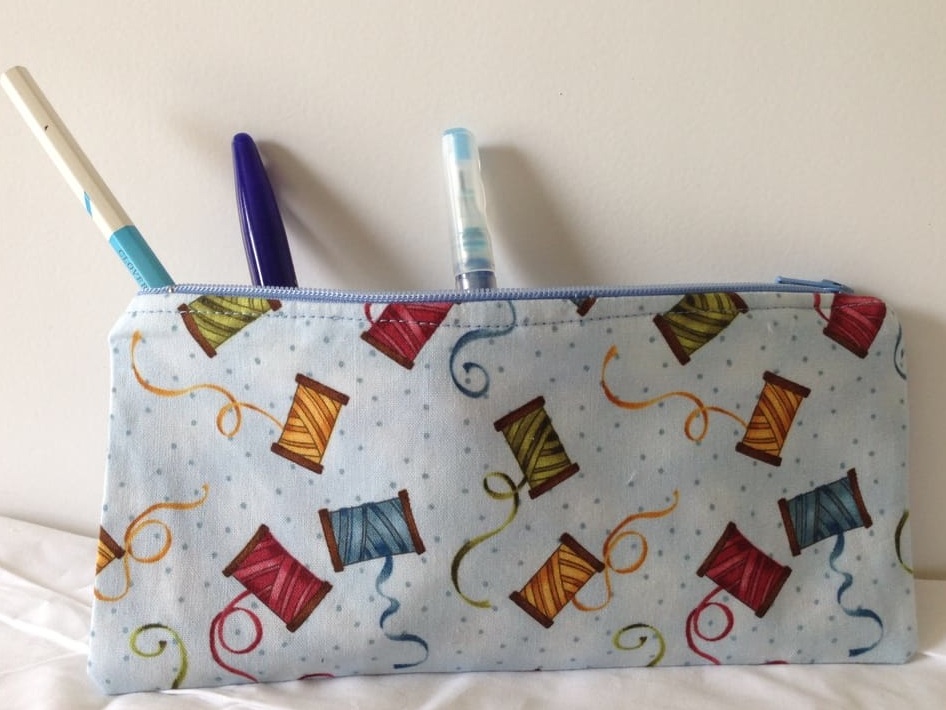 What you will need: 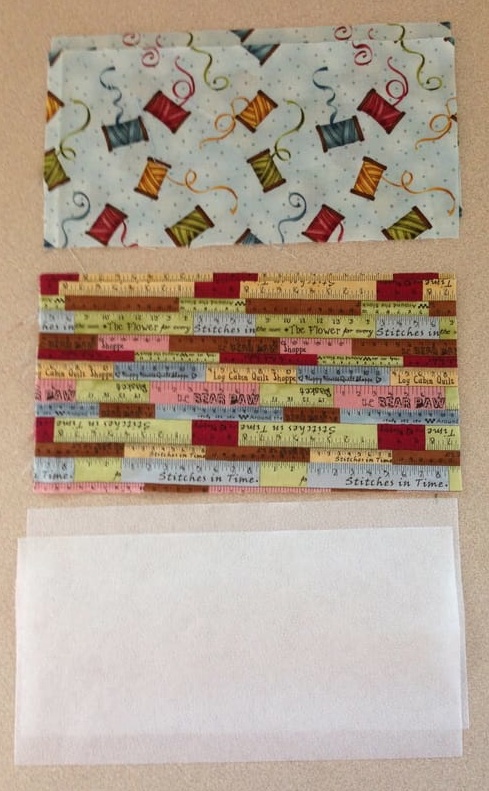 2 pieces of lining fabric, 2 pieces of outside (main) fabric and 2 pieces of fusible lightweight interfacing Note: your fabric can be any size you wish, pencil case sized, make up bag or a simple tissue tote size. You choose. You will also need......  A zipper slightly larger than the length of the opening of your pouch Also required: A zipper foot Thread to match An iron Sewing Machine Scissors How to make it:
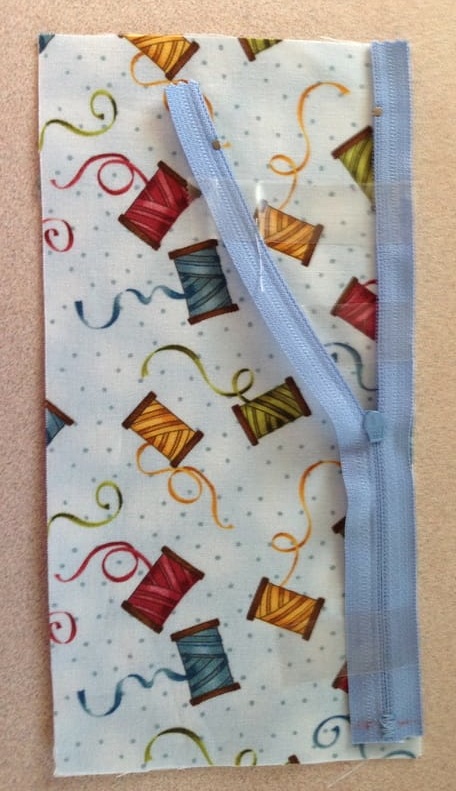 3. Lay the right side of the other main fabric on the other right side of the zipper and sew it with a zipper foot 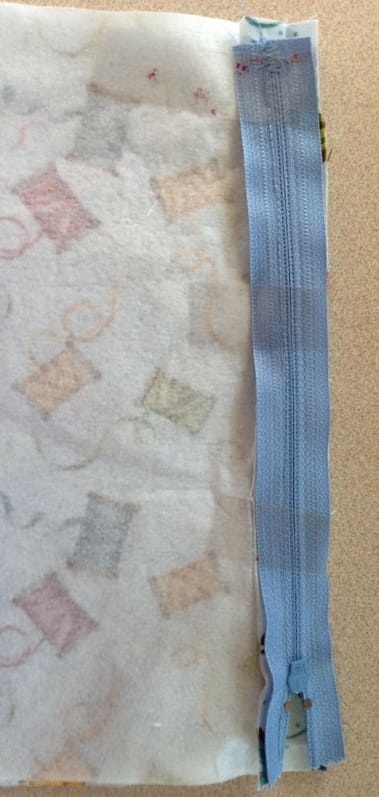 hard to see in the photo but one edge of the zipper is stitched and the other edge is temporarily taped ready for sewing with the zipper foot, Right side of the fabric against the right side of the zipper 4. Flip the whole project over and place the right side of the lining flush with the wrong side of the zipper and tape or pin in place. Sew on the previously sewn line with a zipper foot. 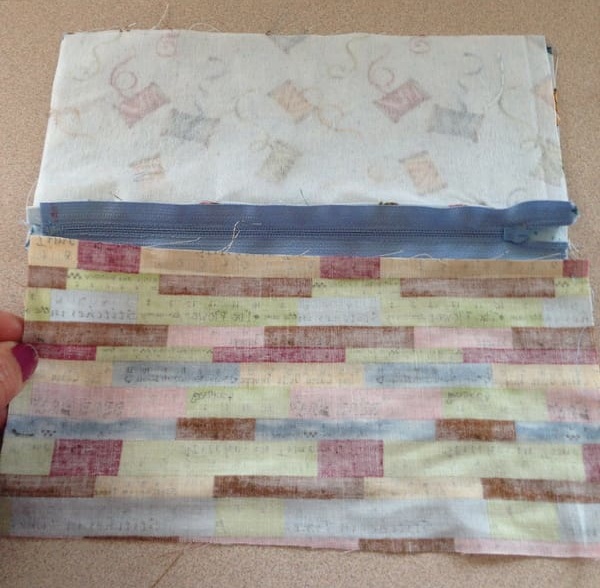 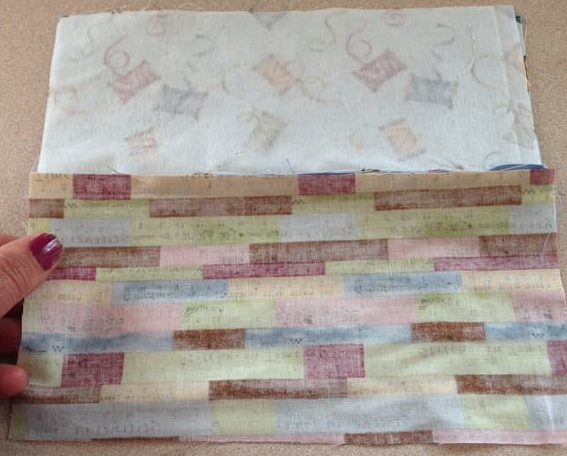 right side of the lining now sewn to the wrong side of the zipper on the same line as for the outside (main) fabric 5. Do the same as in 4 with the other right side of lining fabric on the other wrong side of the zipper. 6. Trim your zipper if necessary and make a new zipper stop by zigzagging over the zipper end. Zigzag stitch all raw edges. 7. Press the lining and main fabric away from the zipper so that they look like the pictures below, trim all edges so your project is now square: 8. With your zipper open, line up the project with right sides (main fabric to main fabric and lining to lining together) and sew down the sides and bottom with a ¼” seam allowance. Zig Zag stitch your raw edges if you like. Your opening for turning will be your open zipper. 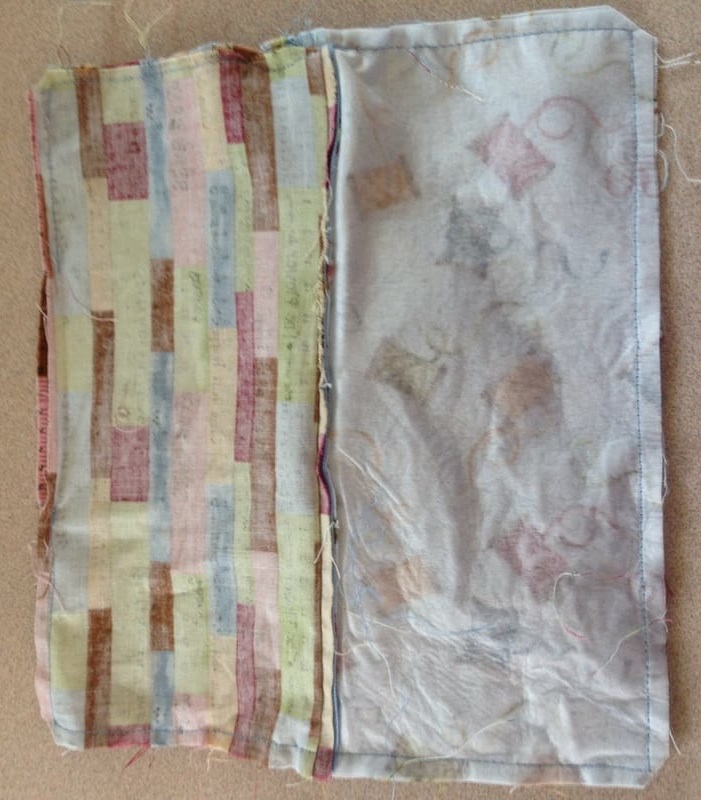 Showing back side of the pouch 9. Turn your project to the right side through the zipper, tuck your lining inside the zipper. 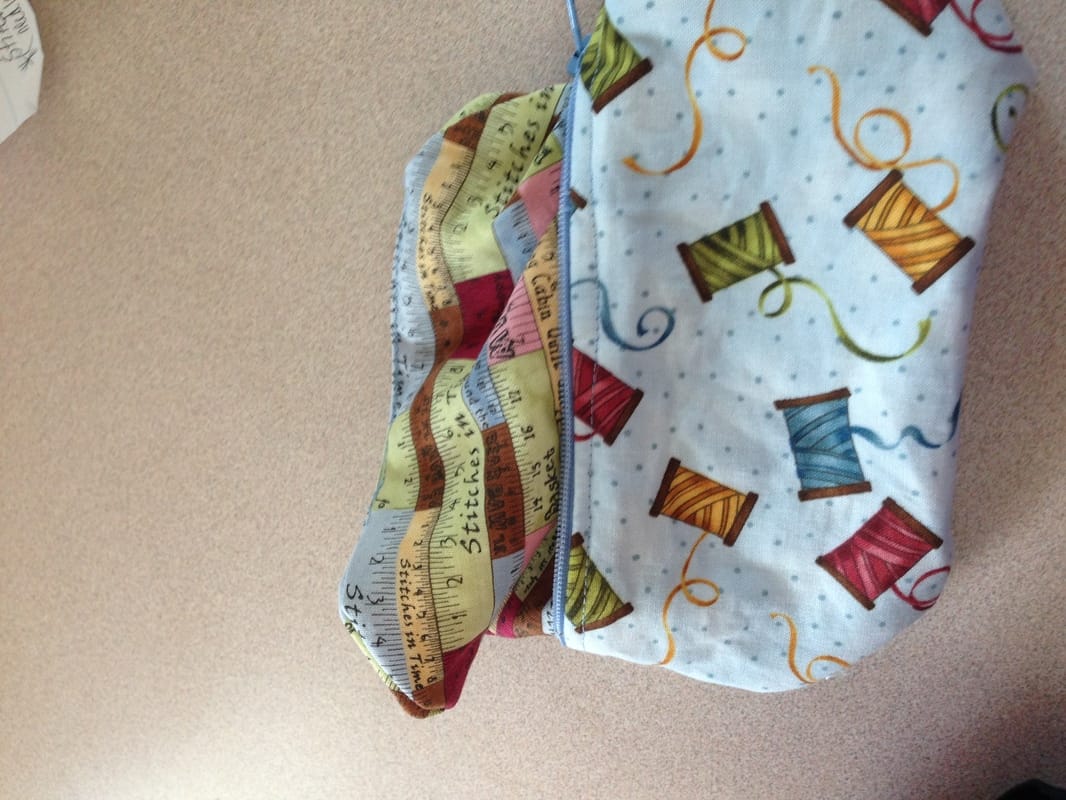 Top Stitch 1/4" from the top edge of the zipper all the way around once your pouch is turned. 10. Admire your efforts! Store pencils, pens, quilt markers, scissors, makeup, nail polish, toiletries art supplies etc. 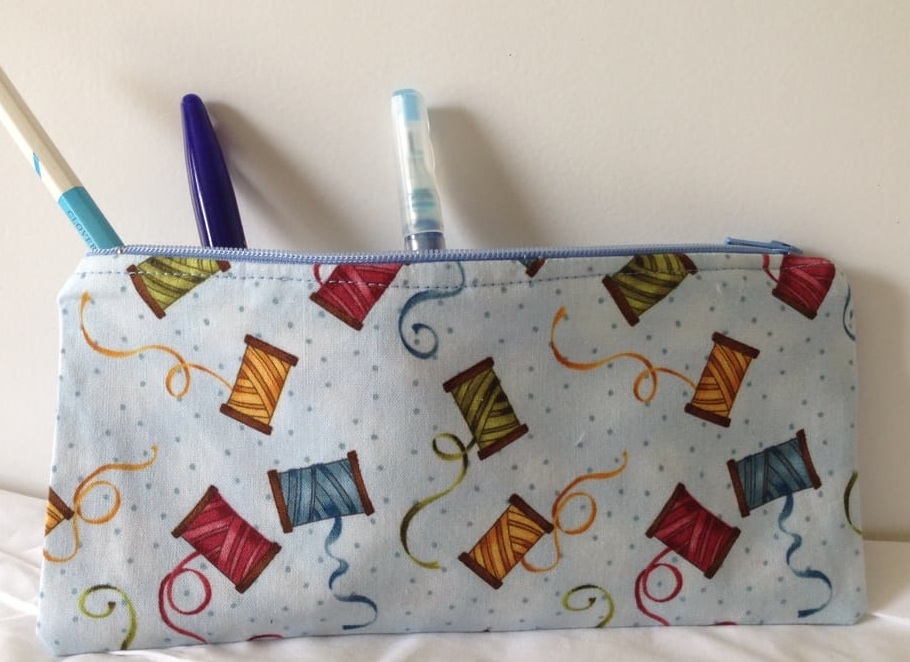 Get a head start on Christmas and gift giving in 2017 and make many of these handy pouches!!
Happy Tuesday, I hope the rainy weather (here in Waterloo, Ontario) is not affecting your creativity! 😊 Need a hostess gift? There is no time left for an elaborate project? Christmas is coming upon us rapidly. Yikes! The below project is super easy, a very useful gift and it will cost you very little. 4 wee coasters and a nice candle votive wrapped in basket wrap. 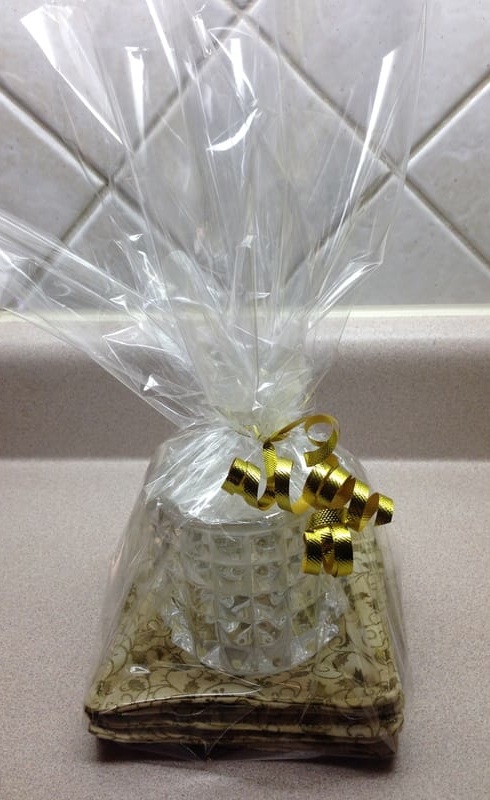 Votive Candle and Coaster Set All you need is: Scraps of Batting 4.5 x 4.5 Scraps of Fabric 4.5 x 4.5" square (8 of them for 4 coasters) A piece of card board 3.75 x 3.75" square One small votive candle holder ( I got mine at a gift shop for $3.00) One small votive candle (to match your fabric) Basket wrap Curling Ribbon A sewing machine Thread to match your fabric Scissors 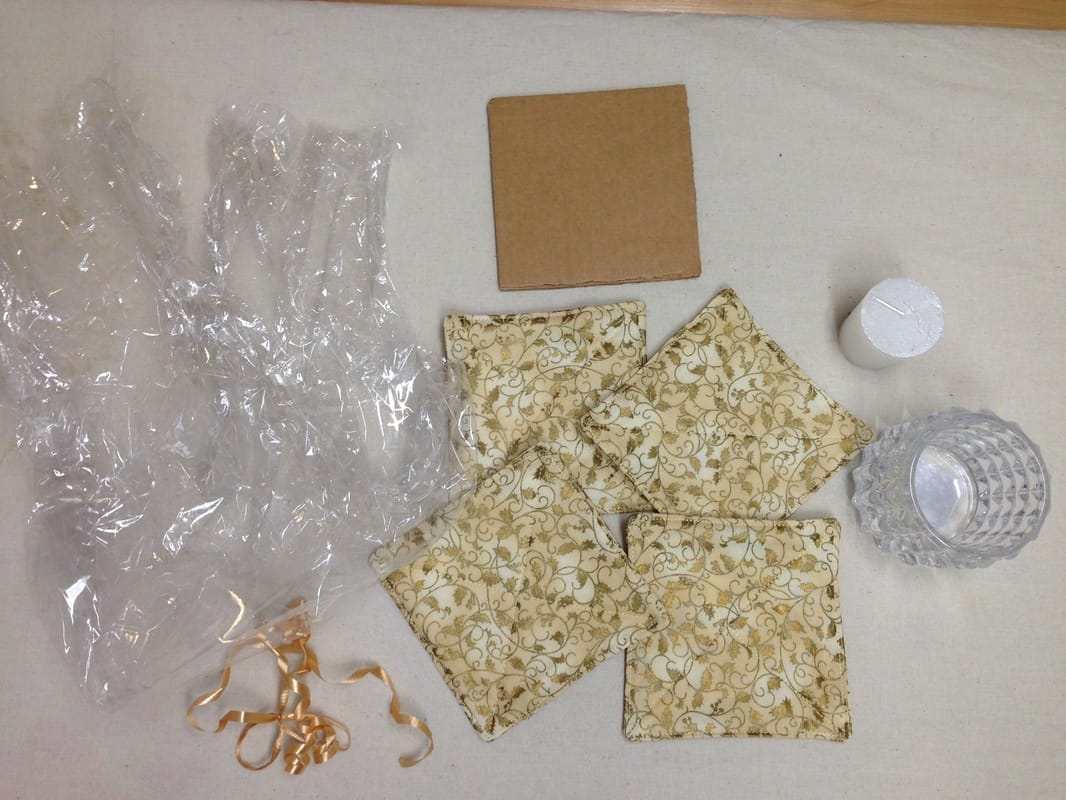 What you will need How to make them: 1. Make Littte Quilt Sandwiches: Lay batting down on a hard surface, lay fabric on top of the batting with the top fabric and backing fabric right sides together on top of the batting 2. Sew 1/4" around the perimeter of your quilt sandwich, leaving a 1.5" opening for turning. 3. Clip corners and turn your coaster to the right side. 4. Press and top stitch 1/8" from the edge to close your opening and make your square look finished. You can also quilt in the center if you like. 5. Make 3 more 6. Pile all 4 coasters on top of your card board neatly and place a votive candle holder and candle on top (this will support your votive candle) 7. Wrap with basket wrap and secure with curling ribbon 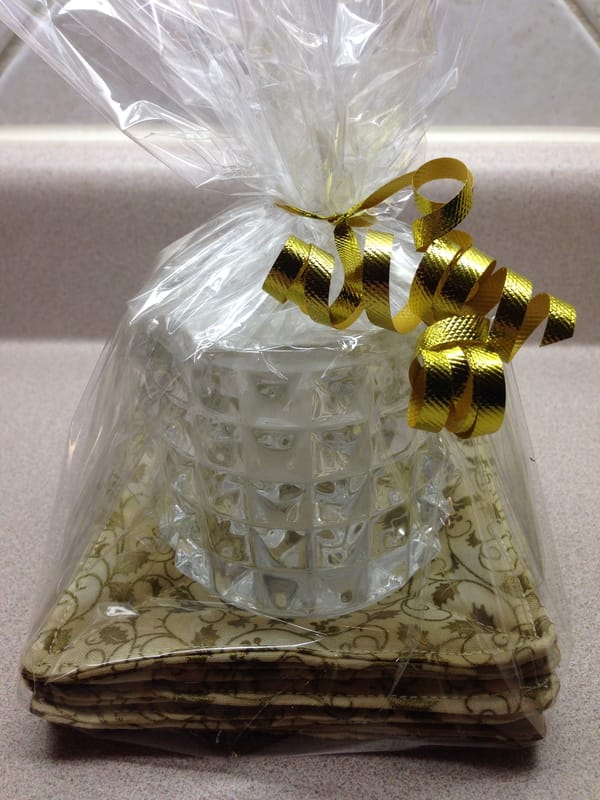 Voila! A very useful and pretty hostess gift made in the "Nick" of time!
Happy Tuesday! Merry Christmas Preparations!🌲 It has snowed and snowed in Waterloo! I have not been as inspired to make snowflake decor for some reason ( I think it is because I am shovelling exhausted!!) My daughter Katie on the other had has completed a blog post about crochet'ed Snow Flakes she made as part of her window decor. She is currently residing in Kitimat, BC Canada. See photos below: 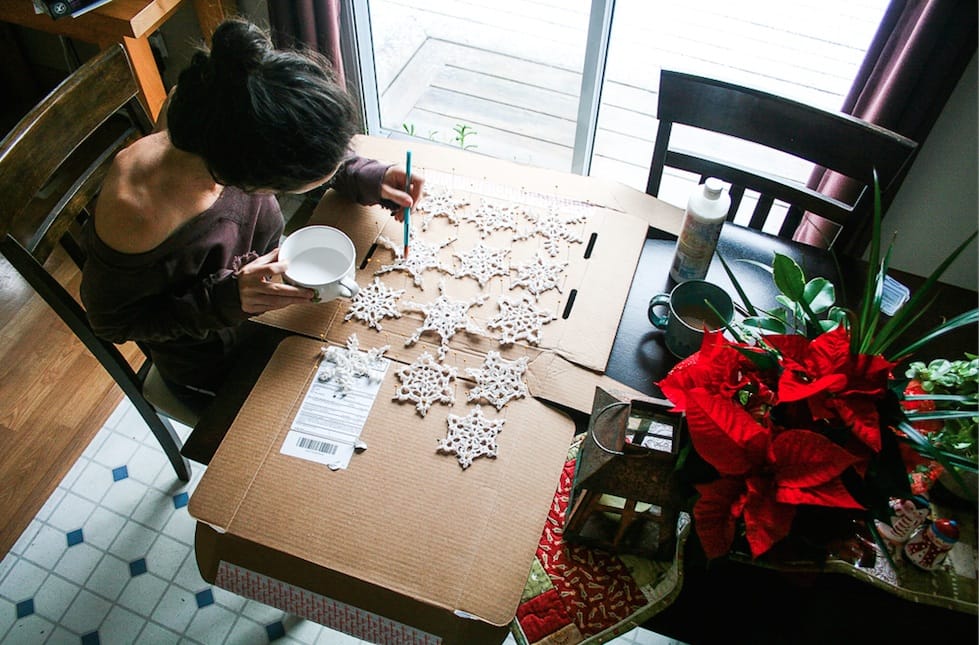 Katie is painting "stiffener" on her snowflakes Recently, It had snowed there a lot!  Abbie (the family pooch) on a walk in the Kitimat forest 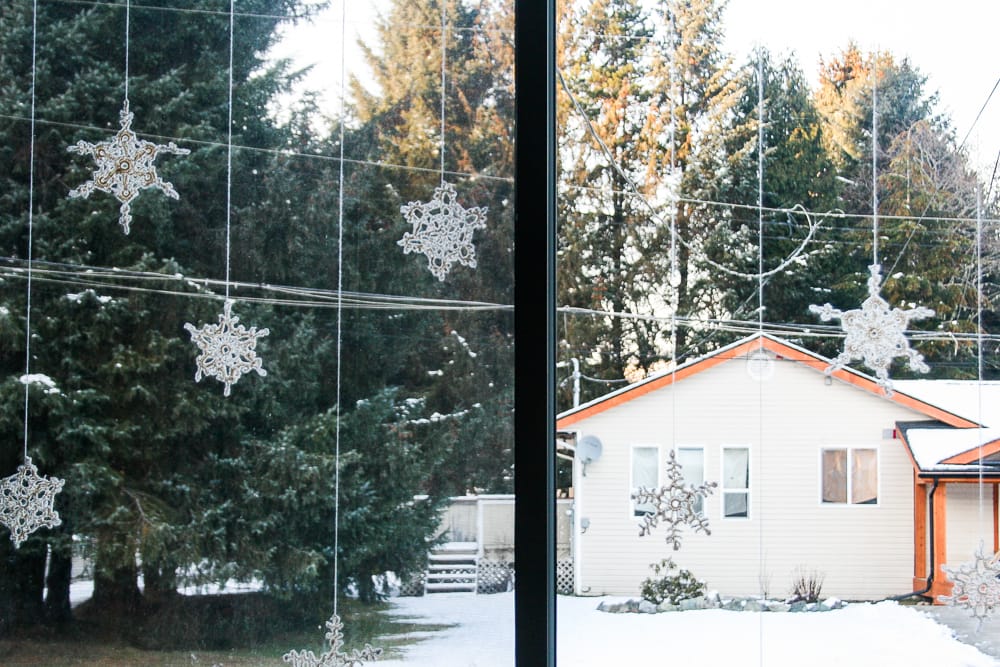 Aren't they pretty like that? The link on how to make these gorgeous hand crocheted snow flakes is here
We don't have to "dream of a white Christmas" in Waterloo this year, it will definitely be white! Stay Warm Everyone!⛄️ Hi everyone, I just wanted to share with you a post from a talented little lady! My daughter! Katie is in BC as some of you know and has no family there so she and her fiance are trying to create some of their own little family of 2 traditions. The photo below shows the advent calendar she created to enjoy the season with her partner. Such a great idea. Little gift bags with goodies and each day of December's date on them until Christmas. Also very ambitious, but as she tells me some of the gifts are notes with activities in them -so not so expensive. I know we only have a few weeks left but would this not be fun for the days until Christmas when you have visitors? Or use this idea next year for sure!! Romantic, ambitious, creative, yes that is my Katie. Enjoy! the link to her website is here 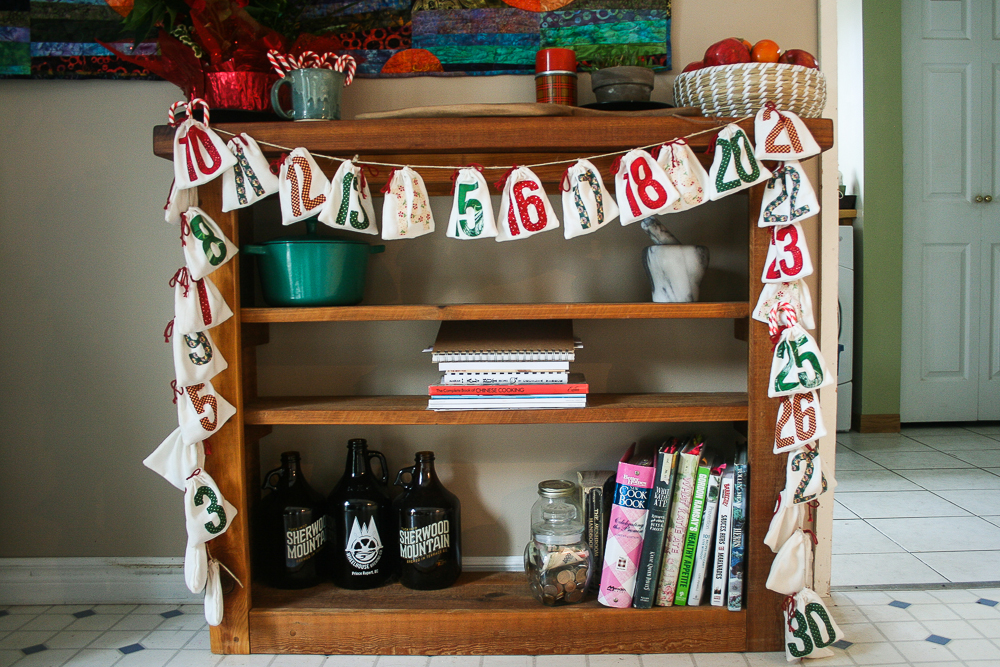 Happy Thursday!🌲🌲🌲
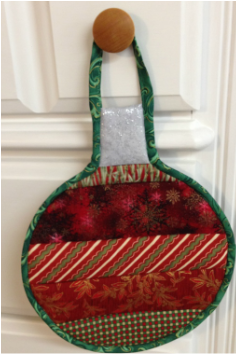
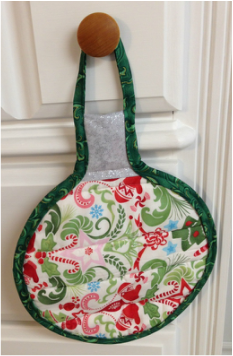
This super easy "ornament" shaped hot pad makes an affordable gift for all the cooks on your list this Christmas! 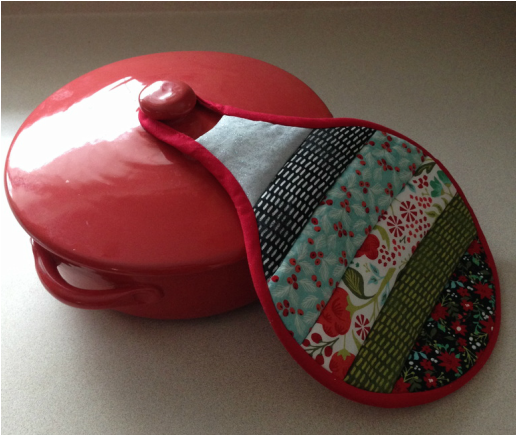 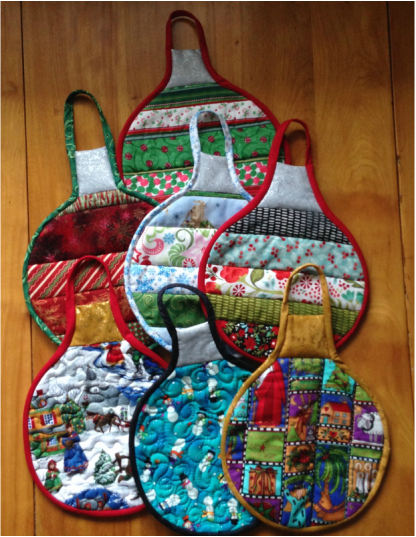 I got a little carried away making these because they are quick and easy to finish in time for last minute gift giving At this time of the year we all have the Christmas parties to go to, last minute gifts to give to hostesses, teachers, neighbours, hair stylest etc. This project is perfect because: 1) It takes very little time to make 2) It takes very little fabric 3) It provides immediate gratification 4) It is reversible 5) It is very practical and ..... 6) It is a holiday oriented project by virtue of the fact that it looks like a Christmas ornament. If you are an experienced sewist, this is a half hour project. If you are a beginner and have an hour to spare, that's all the time it will take to finish one! The more you make, the faster you get it done!! 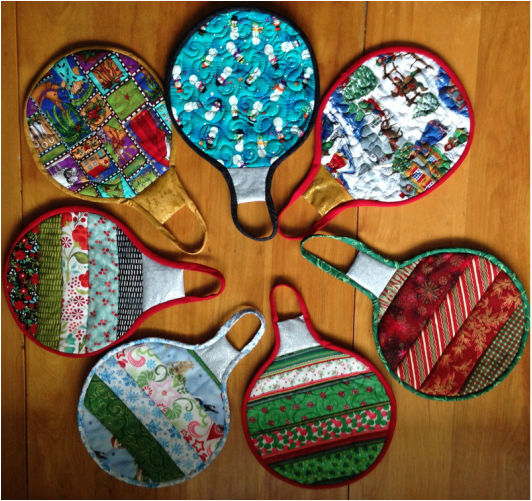 Front of the "ornament hot pads" 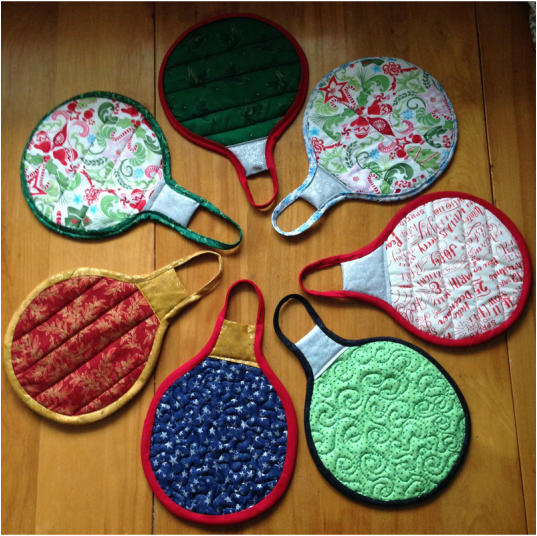 Reverse Side! How to Make a Christmas Ornament Hot Pad: You will need:
1) Sandwich your backing wrong side up with the batting and insulbright on top facing towards you (you can baste this sandwich with pins or 505 basting spray if you wish) 2) Press layers together with an iron 3) If adding strips audition your layout  auditioning 4) Lay #1 strip 2" down from the top edge of your quilt sandwich right side facing up, lay #2 strip on top of #1 right sides together with top edge matching, quilt through all layers 1/4" . (For experienced sewists- you are strip quilting as you go the entire 10 x 11" piece leaving a 2" space at one end) 5) Press # 2 strip up and away from #1, continue with the rest of the strips until the rest of the 11" length is filled with strips of fabric *** You can also use just an entire piece of Christmas fabric that is 10 x 11" if you do not want a striped ornament*** 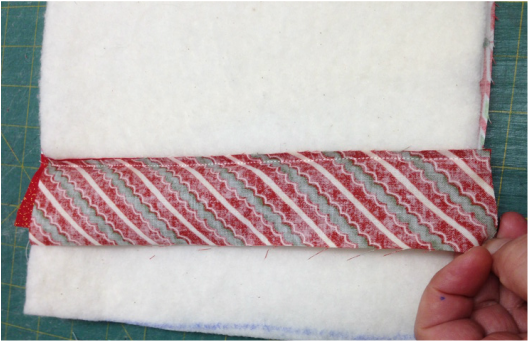 Lay strips on top of each other, quilt through all layers 1/4" from the top as described in 4) above 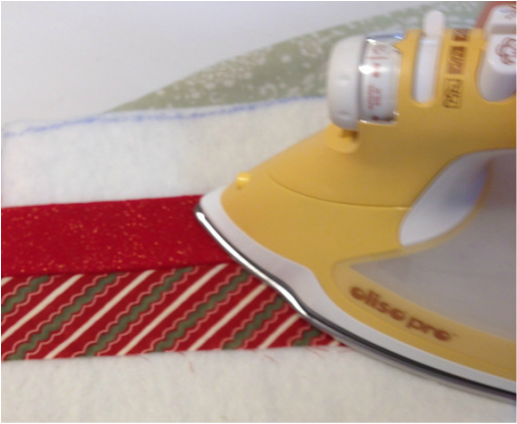 Press away from the previous strip as described in 5) 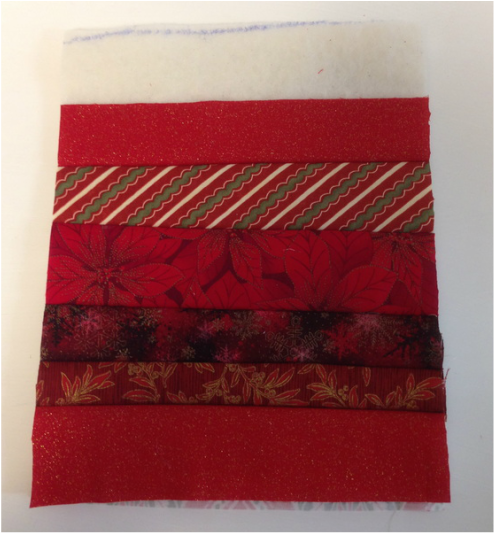 Your striped ornament quilt as you go fabric should look like this 6) Add the silver or gold ornament hanger fabric by first ironing one 3 1/2" edge under towards the wrong side 1/4". Lay the raw edge of the non ironed side flush with the top strip right sides together and sew with a 1/4" seam allowance through all layers as you did all the other coloured strips. 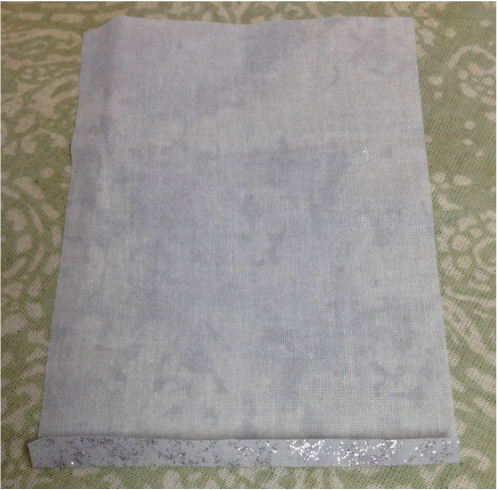 one short edge pressed 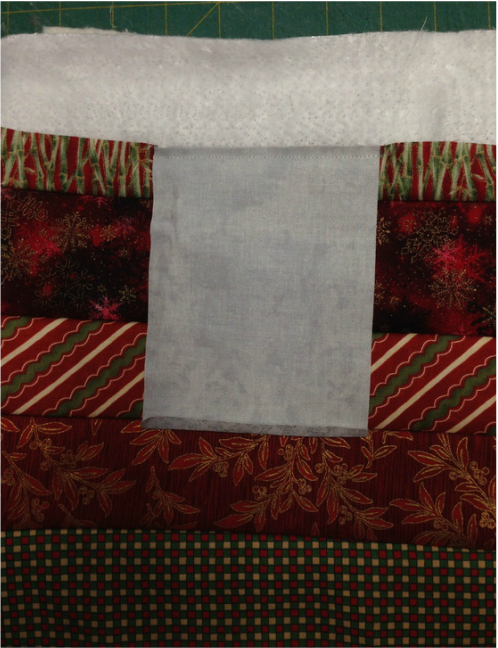 Sew through all layers with a 1/4" seam allowance and centred on the top strip flush with the edge 7) Press towards the top and away from all the other strips 8) Fold this silver/gold fabric over the remaining batting and tug on the fabric so that the folded edge lays beyond the sewing line on the back that you created in 6). Pin along the pressed edge to hold in place and sew through all layers, stitch in the ditch from the front seam on the silver/gold fabric seam you just created. (you should catch the pressed edge all the way along to secure) 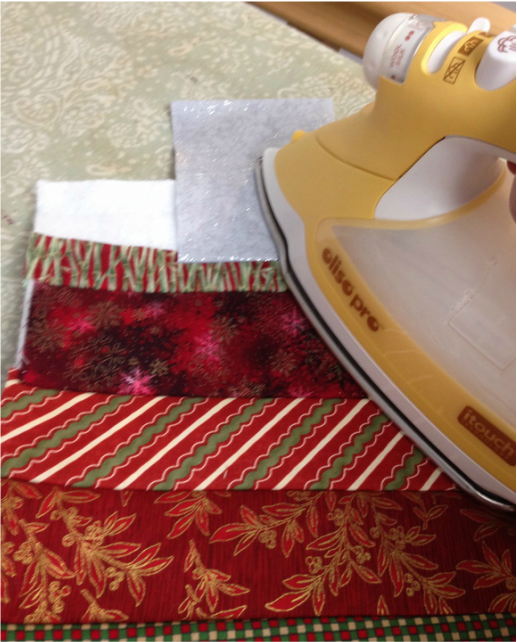 Press away from your stops and wrap around the batting to the back of your project as described in 8) 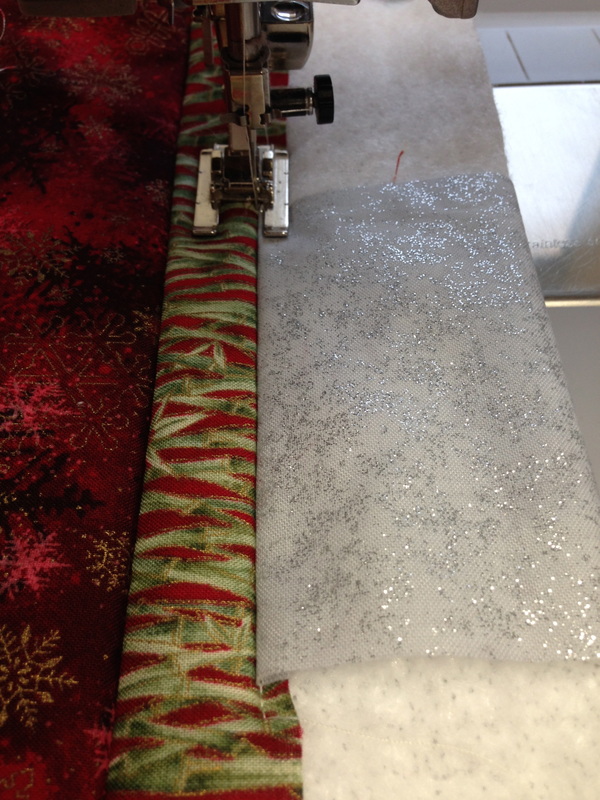 Stitch in the ditch catching the pressed fabric on the back  The back of your project should look like this 9) Using the free pattern PDF pattern download found here (also found in the Free PDF pattern download section of the "SHOP" tab above) Trace out your ornament shape using a frixion or erasible fabric pen and start cutting it out thoough all layers  This is what it should look like now! 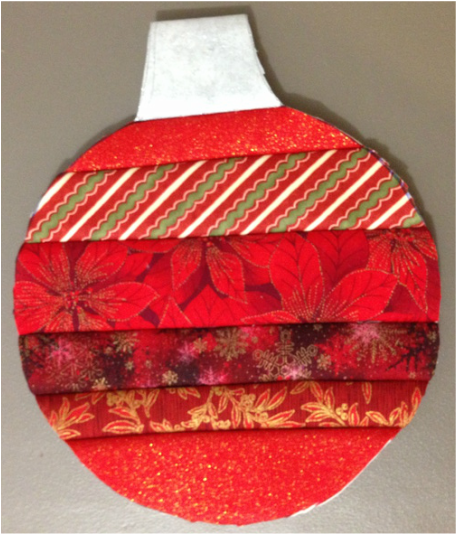 10) It is time to bind your project now. Bind as you would a quilt starting with the bias binding sewn to the right side of your bulb and sew slowly to allow for the curve and a 1/4" seam allowance, sewing and stopping at the top of your silver fabric. Tack a few stitches back and forth. 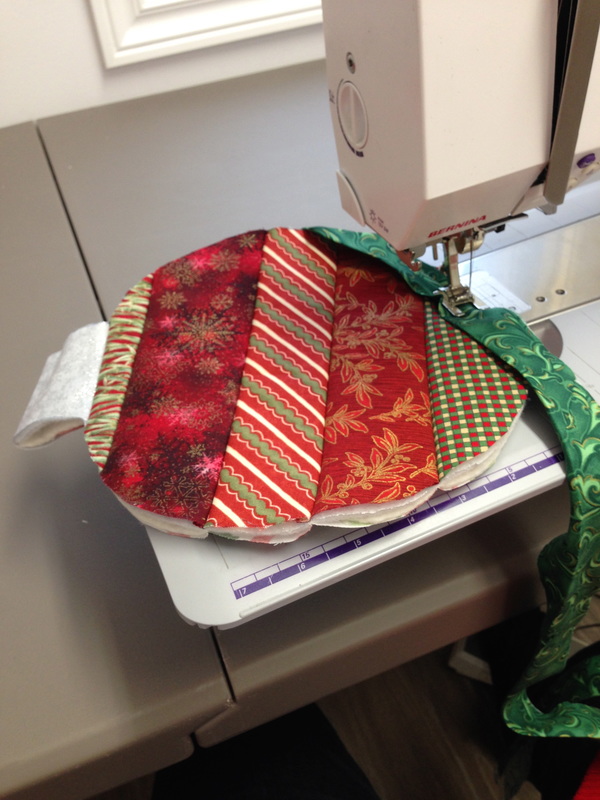 starting to sew on the binding 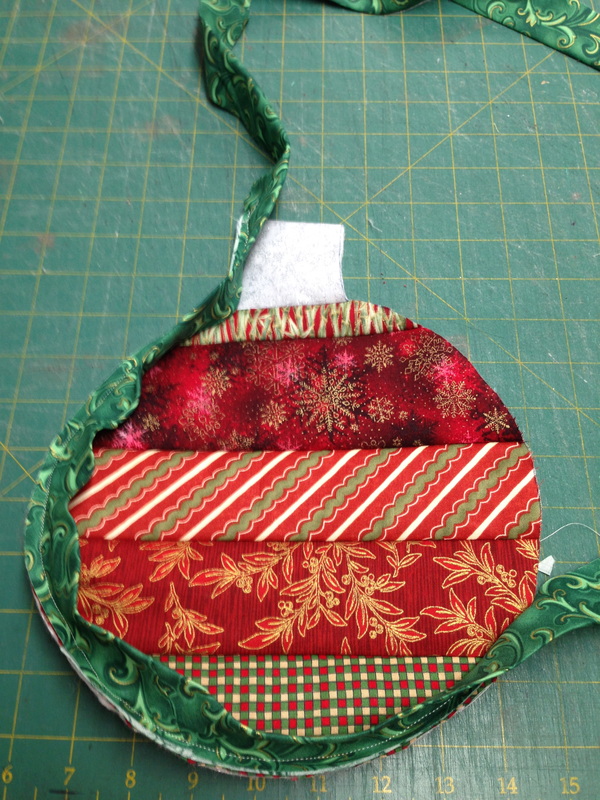 stop at the top of the silver fabric and tack stitch back and forth 11) You now need to make a 6" loop for the top of your ornament (also useful to hang on a nob or hook in your kitchen) To make this loop with your right side of your project facing you and the binding folded edge tucked towards the back of your fabric, you will fold the raw edge of the binding toward the center of the binding for 6" beyond the top of the grey fabric and press. See photo below. 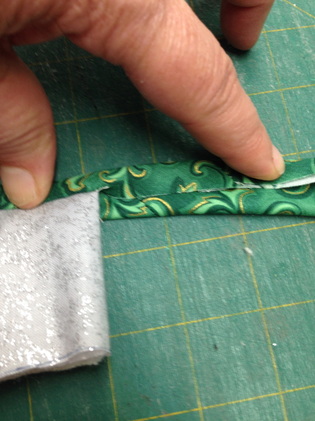 First fold of the loop 12. Fold again to create a finished edge that looks like the photo below, fold and press for 6" 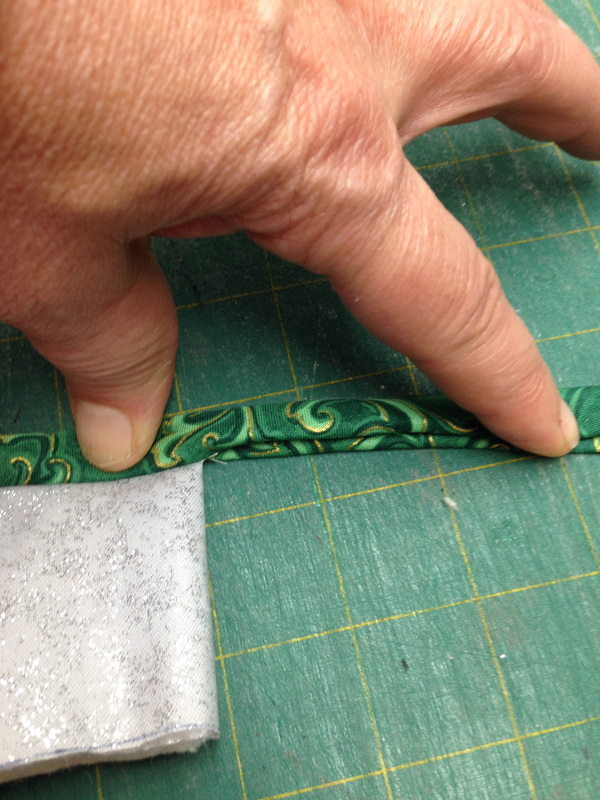 Second fold of the loop 13) Pin and top stitch the loop close to the edge with matching thread, stopping at the 6" mark 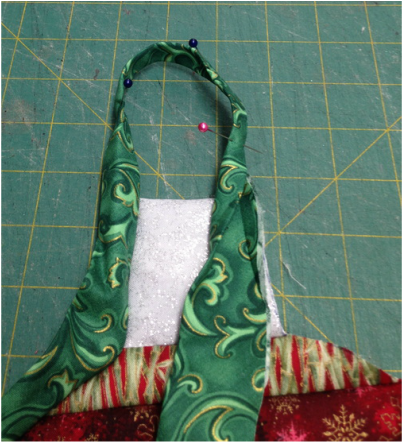 Pinning the loop after it's pressed 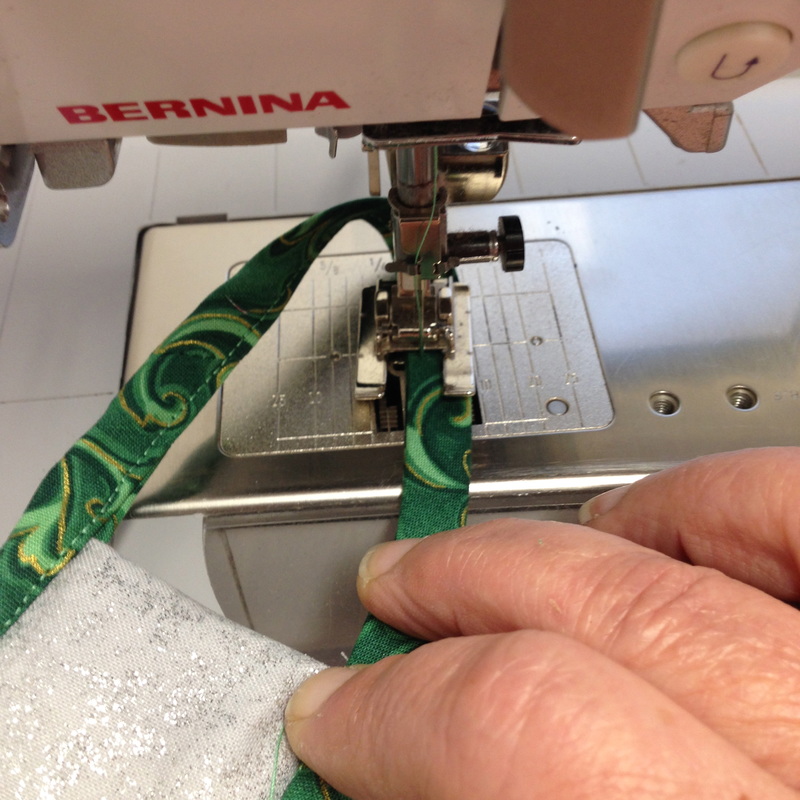 Top stitching the loop 14) Resume the sewing of your binding onto the other side of your silver section making sure the fabric is not twisted and laying the raw edge of the binding against the right side edge of your project. Finish of your binding as you would on a quilt. 15) Wrap the folded edge of your binding to the back and sew by hand or machine as you wish to complete your binding and......TA DA! Admire your efforts!
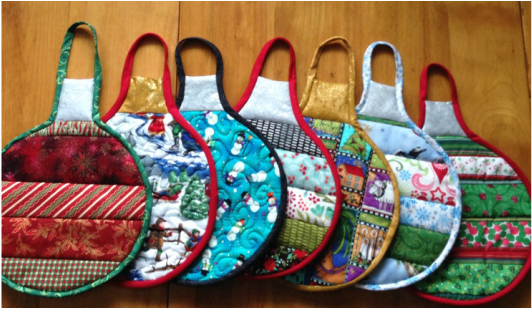 Make lots of them! 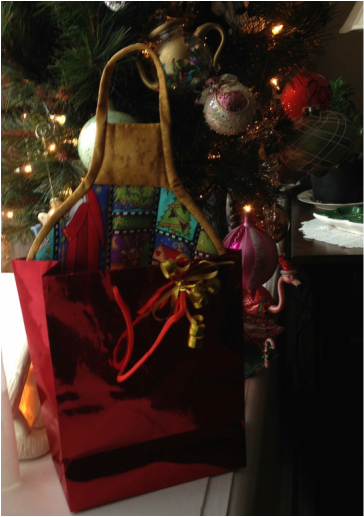 So pretty under the tree. Add some homemade goodies and you have a very nice, inexpensive gift! Happy Tuesday, Happy Christmas Sewing!🌲🌲🌲
 Double ended oven mitts trimmed with ric rac! Double ended oven mitts trimmed with ric rac! Over the next few weeks I will be sharing with you projects which are oriented to gift giving, getting ready for the holiday season and utilizing ric rac as a trim. You are probably thinking, ric rac is a bit too retro? I think it's fun to incorporate this trim on projects! That's my story and I am sticking to it!! It is a trim that can appear modern and fun or vintage... you choose. The story of ric rac (also spelled rickrack & ricrac) goes back to the 1800's. Ric rac has been described as a flat narrow zig zag shaped braided trim used for clothing and curtains. Before the popularity and availability of sewing machines and sergers it was used to conveniently finish the edges of fabric. This trim became popular and peaked in use in the 1970's, at the time of "Little House in the Prairie" and likely as I surmise, along with the increased use of the home sewing machine. Any way I cut it, ha ha pardon the pun! I like it for the following reasons:
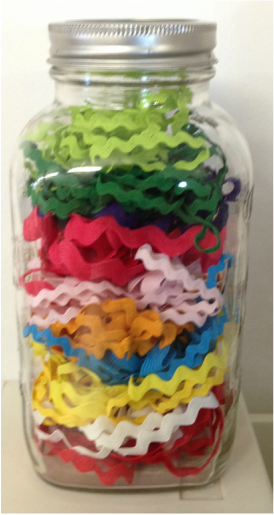 My jar of ric rac, a great way to store it Now on to the project at hand...... Double Ended Oven Mitts, so handy to hang conveniently on your oven. No need to hide these beauties away! A great gift for the chef/baker in your family or keep to use for your kitchen! I am keeping mine, I need it for upcoming Christmas decor and baking.  Project #1 with Ric Rac, Double Ended Oven Mitts What you will need:
 This is what I used with a layer of batting How to make your double ended oven mitts:
mitten front rounded areas. 5. Baste at the edge of 2 of the mitten fronts, the 2 pieces of ric rac to the straight edge of the mitten. See below: 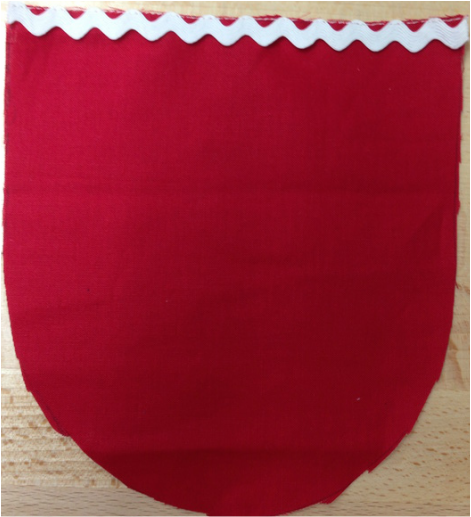 6. Attach the trim piece (3 x7") right side down to the ric rac and sew with a 1/8" seam allowance  7. Repeat for the other pocket as in 6 above. 8. Sew the back of the front pocket to the other side of the trim (green) as shown below (right sides together). Make 2 of these 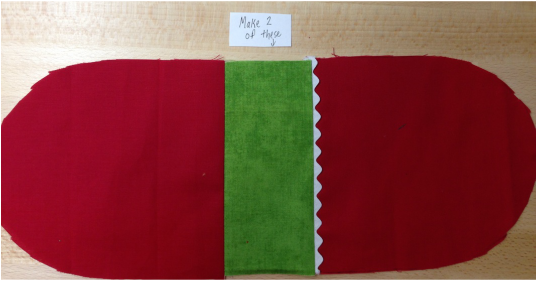 9. Applique or embellish if you wish now on the ric rac side of the front pocket. See below: I cut out some owls, fused them with fusible web and used invisible thread to appliqué them. 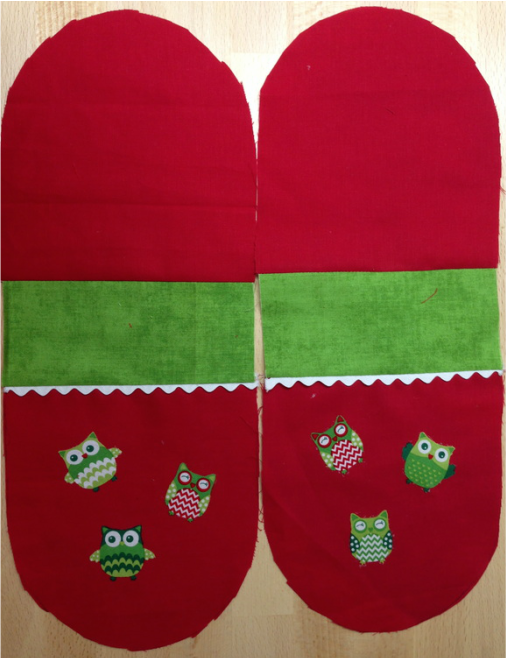 10. Fold your mitten fronts over the 7 x 8 1/4" pieces of batting. (Batting sandwiched on the inside of the mitten) Trim if necessary. Stitch in the seam ditch between the trim and the ric rac and sew all around the outside edge of the pocket to hold together- 1/8" in from the edge. Repeat for the second pocket. 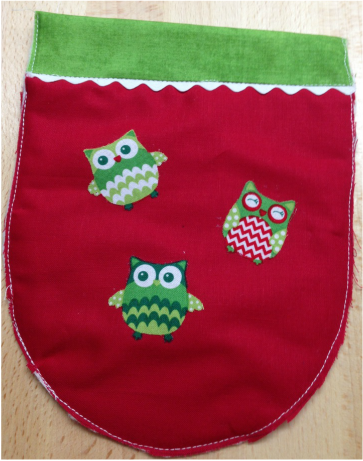 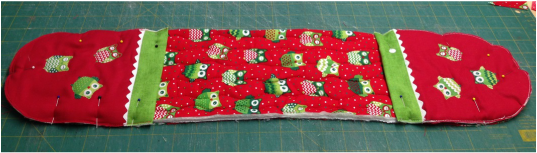 Pin all around pocket edge 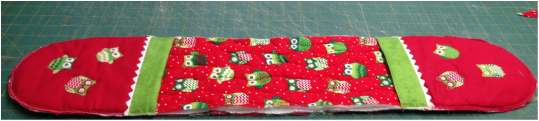 Sew with a 1/4" seam allowance all around pocket edge 12. Bind with pre-prepared bias, 2 1/2 double fold binding using a 1/4" seam allowance. Bind as you would a quilt! See below: 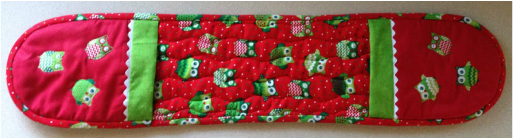 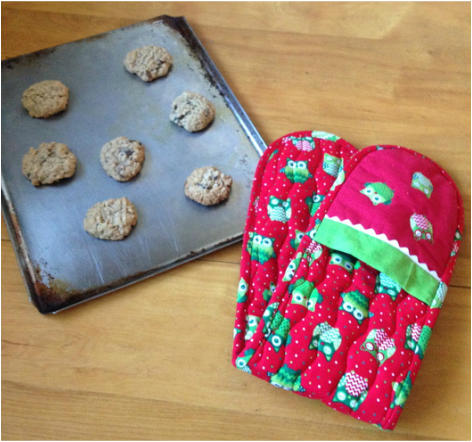 You are now ready to put your double sided oven mitts to great use or save them for someone special this Christmas.
Doesn't that ric rac look adorable!! Happy Baking and Happy Tuesday! Are you looking for a quilt to piece in a weekend? You have found it, this is it! It can be done!! 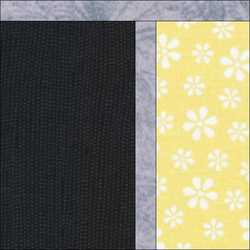 Block 1: Make this super easy block, make more and flip the blocks to make a really interesting quilt!! ***This is layer cake friendly, read on to see more*** My quilt (shown below) is from a yellow, grey and black modern layer cake collection of fabric with 42- 10" pieces. All 42 pieces were used with no waste and you will also need a coordinating sashing fabric (mine was grey). I also used fabric in black for a wide (5") outside border to make it a queen sized quilt. Cutting instructions for one block: Cut the top grey strip 2 1/2" x 11 1/2", Cut the middle grey piece 2 1/2" x 10", Cut the yellow piece 4"x10" and the black piece 6 x 10" (alternate your colour combinations and sizes). So if you have a 10 x10 layer cake piece, you are making one cut at the 4" mark. 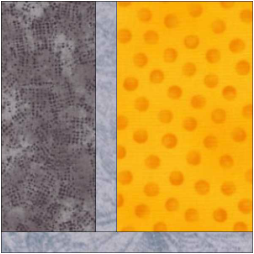 Block 2: This is the same block just flipped so the grey sashing is at the bottom. To make a quilt, sew 21 of each block (they are 12" finished sized blocks) and alternate block 1 and block 2 in rows until you have a quilt like the one I made below - there are 6 blocks across and 7 down: 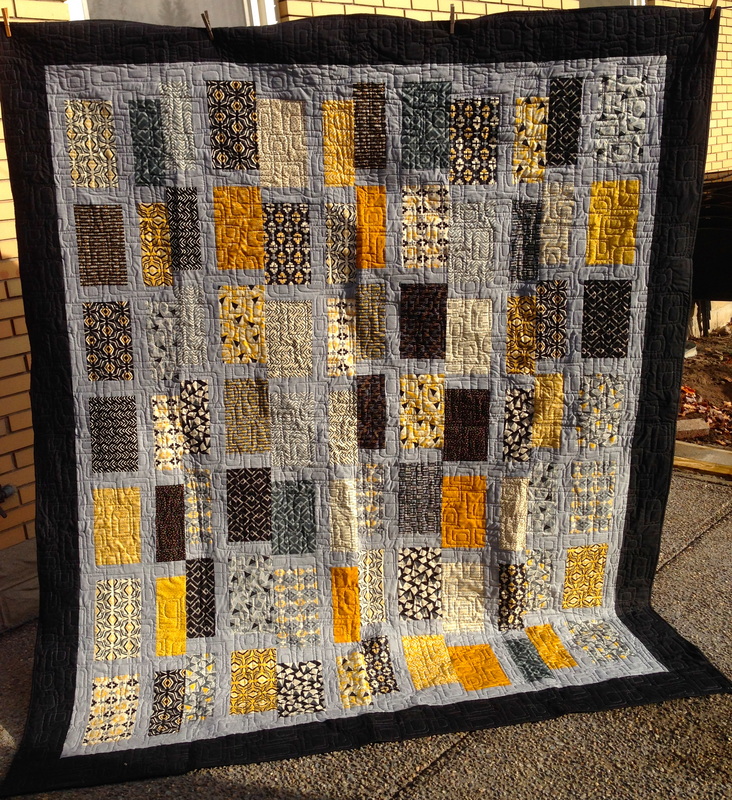 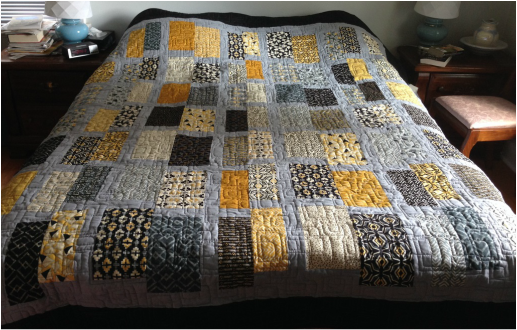 The part of the quilt that includes the blocks measures approximately 69 x 83.5 and then a 2" inside border was added (grey) to make the blocks look like they are floating. A 5" outside border (black) was also added. The final measurement of my quilt is 81 x 95.5 and it fits my queen sized bed nicely. If you like more overhang on your bed, simply make your borders bigger. 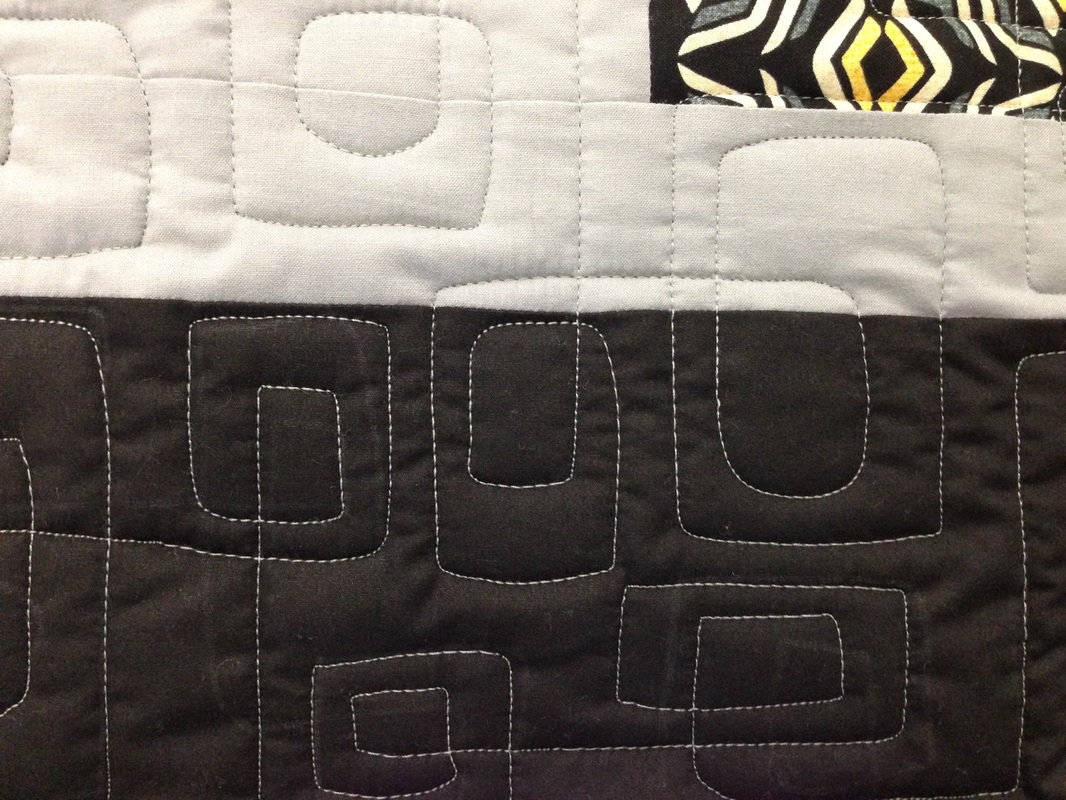 A close up look at the modern quilting to go with the modern fabric If you have a layer cake or a collection of fabric, I challenge you to make this easy quilt. With the holiday season coming, it just may be a quick but effective quilt to make for your family this season! If you try this, please send photos, we are happy to share your work on this blog. Also, feel free to contact us with any questions by clicking on the more tab above and clicking on contact. Happy Sewing and Happy November! 👍 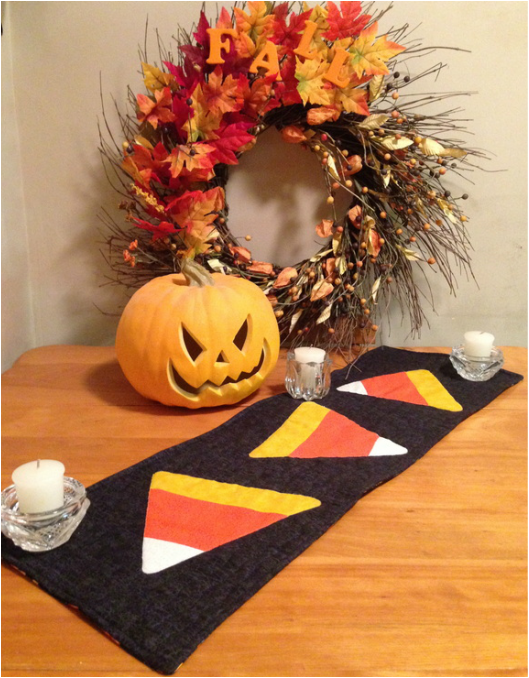
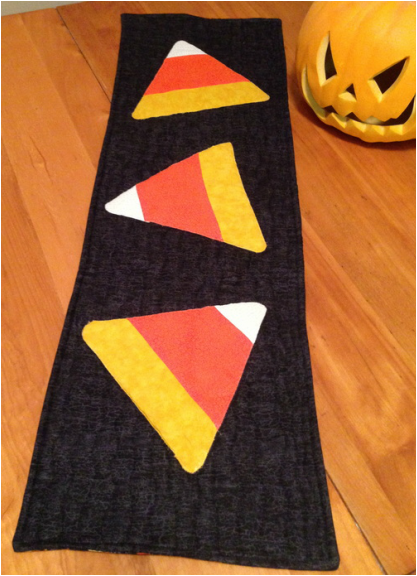
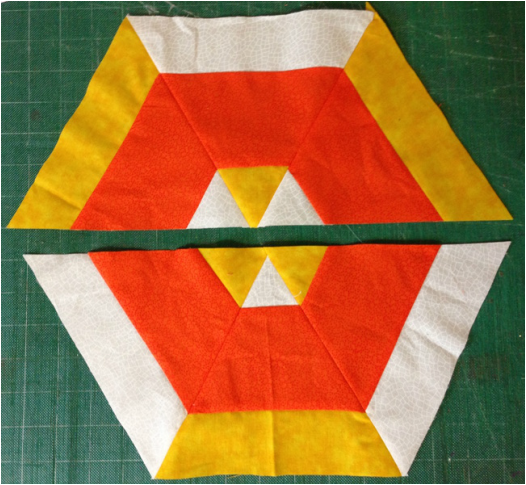
Candy Corn Table Runner/Candle Mat
You can make this baby in 4 hours tops! This was my Sunday project to get me into the spirit of Halloween!
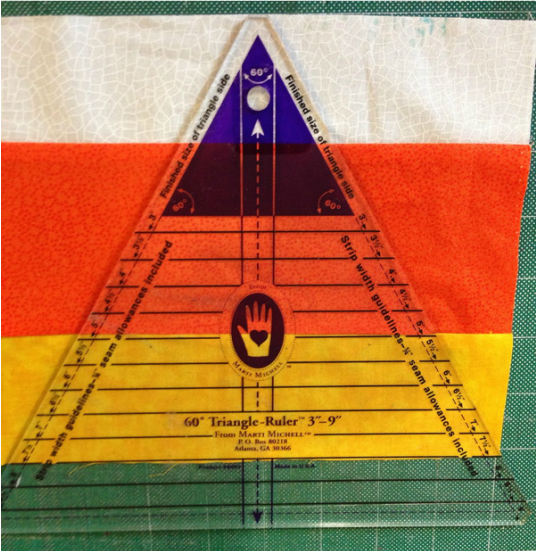
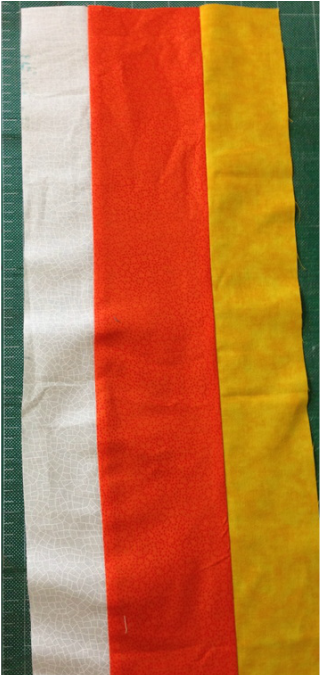
I used a 60 degree ruler and it was a great time to revisit the use of this wonderful ruler which is really very versatile! What you will need:
Want to get the ruler? You can get it by clicking on the link below:
How to make it:
Step 1
2. Cut 3 with the narrowest point white (this is what candy corn looks like). You can cut alternate triangles and use them on another project with narrowest tip yellow (to save on fabric). Scroll down to see what I did with alternate triangles
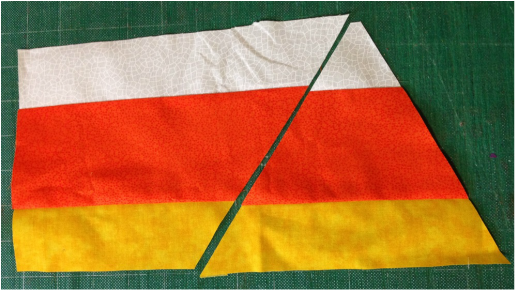
Step 2- Cut 3
3. Mark and cut the corners of each candy corn to round them.
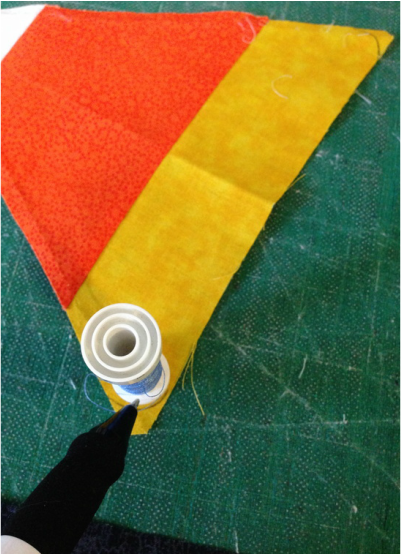
Step 3
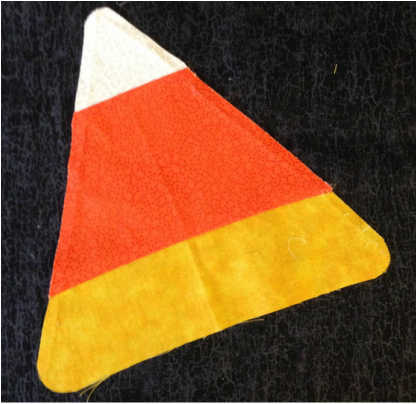
All 3 candy corn should look like this once trimmed in the corners:
4. Using fusible web or fabric glue, adhere your candy corn to the black backing fabric. Use a small zig zag and invisible thread to sew the edges down and appliqué the candy corns to your background. Tip: use a stabilizer adhered to the wrong side of the background to avoid puckers when using the zig zag stitch
5. Lay your batting down on a hard surface and then your backing right side facing you placed on top of the batting. Place your table runner top, right side down onto the right side of the backing fabric (you have your quilt sandwich now). Pin through all layers on the edge and sew 1/4" from the edge all around the table runner. *Leave a 3" gap for turning*
6. Clip all 4 corners and turn your project to the right side. Press to turn your gap edges in evenly and hand sew your gap closed.
7. Quilt 1/4-1/2" from the edge all the way around on the top and free motion quilt around the candy corn and fairly densely in the background so that your table runner lays flat.
Your project is complete! Enjoy!!
An alternate project is below (think about this in different colours too!)
Do I have you thinking? I sure hope so!
I hope you have a Happy Halloween! 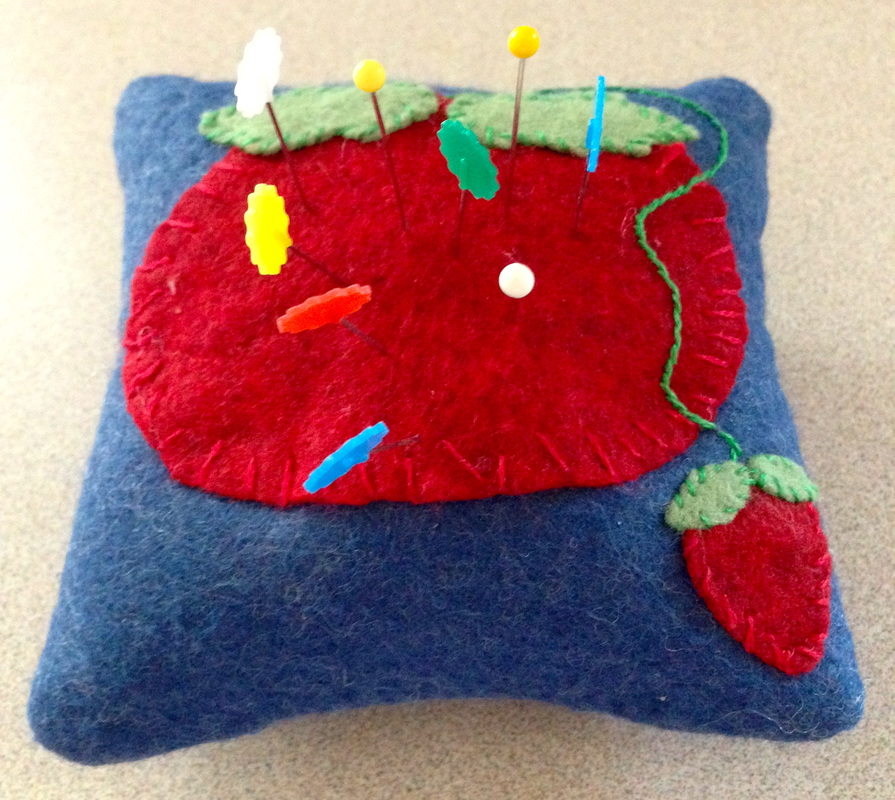 There is a FREE PDF download of this pattern in the SHOP section of this website to get this free download please click here Basically you cut out scraps of red and green felt, blanket stitch appliqué the tomato, strawberry and leaf designs to the top of a 5.5 x 5.5 square of felt, add a vine, sew the front to the back right sides together, stuff and stitch closed. So easy, cute, whimsical and useful. 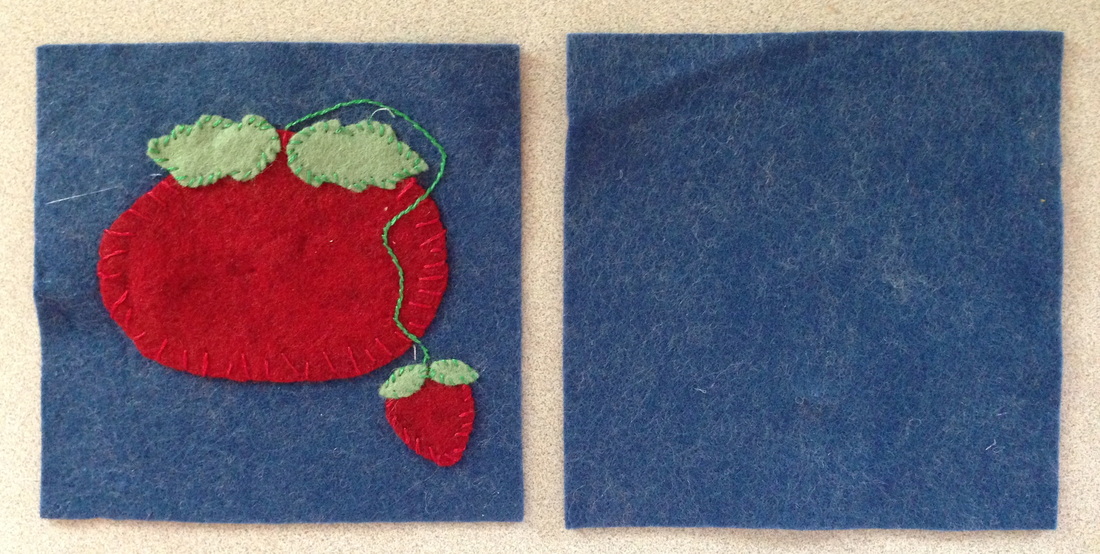 #1 Download the free design, cut out of felt and appliqué the design to the front piece of felt 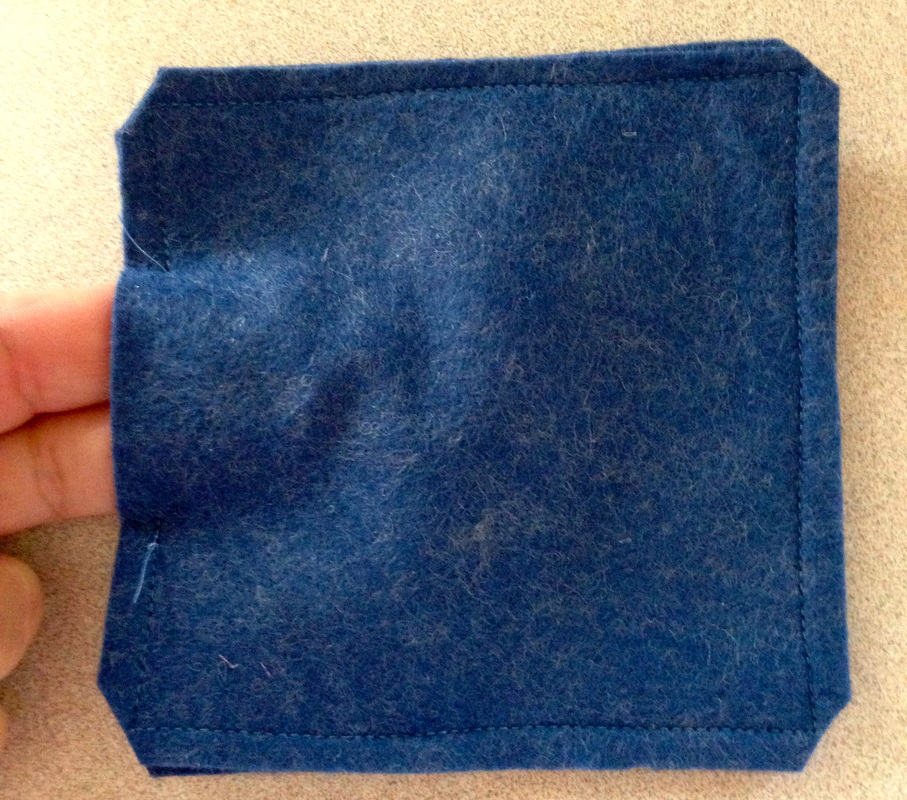 #2 Sew with right sides together and leave a 2" gap for stuffing 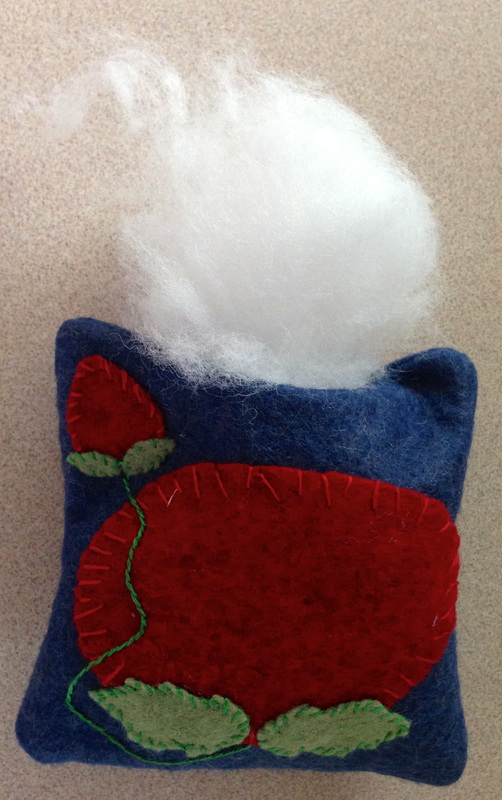 #3 Stuff with fiberfill or walnut shells 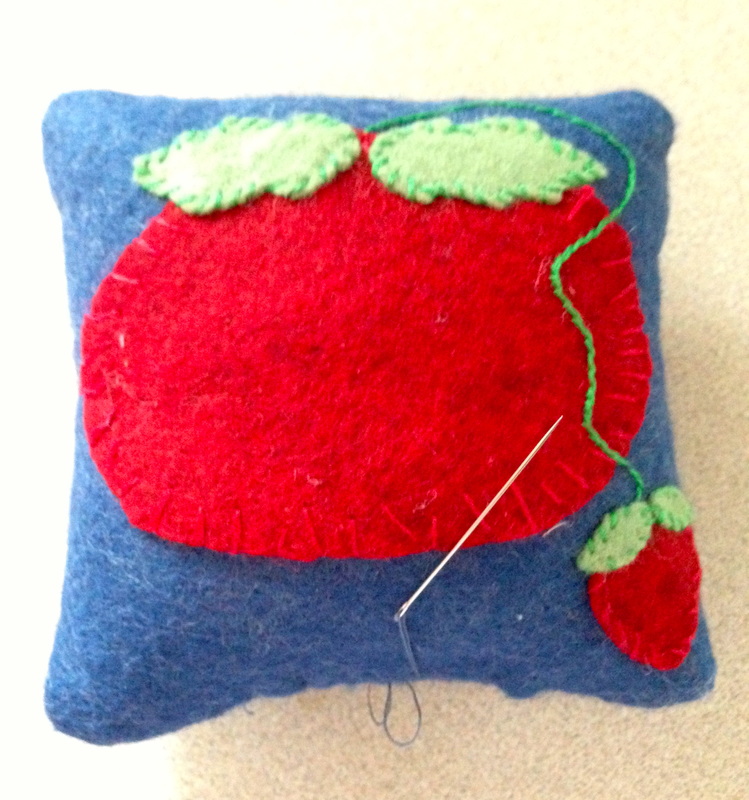 #4 Slip stitch your opening closed 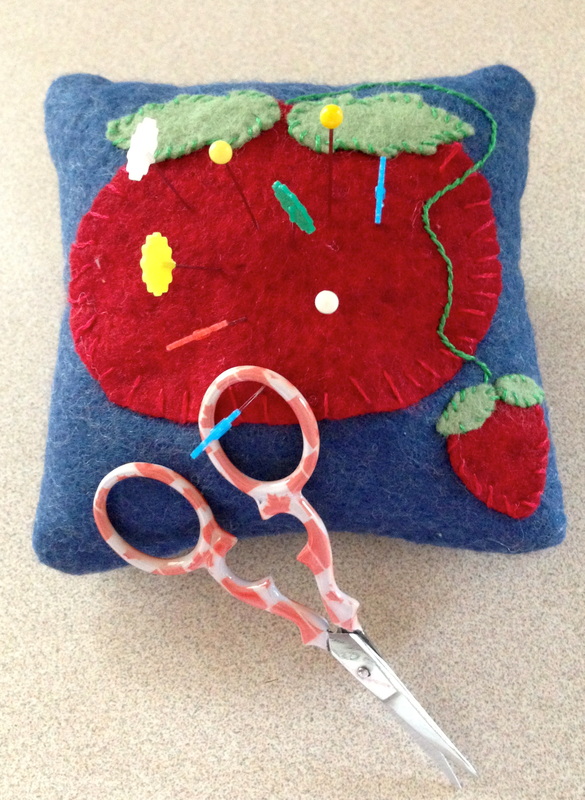 #5 done and ready to use I hope you are able to try this easy tutorial, you can download it for FREE here
Enjoy this one hour project! Happy Tuesday! |
Follow Me:
Welcome!Hi I'm Robin and I am a professional long arm quilter, pattern designer and teacher. I am passionate about all things quilty!  
  Categories
All

Sponsors
This blog contains affiliate links. This means that we endorse products.
We do receive rewards for these endorsements and this helps to keep this site alive and well. We support products which we believe are the best quality and to inspire your creativity! |


 RSS Feed