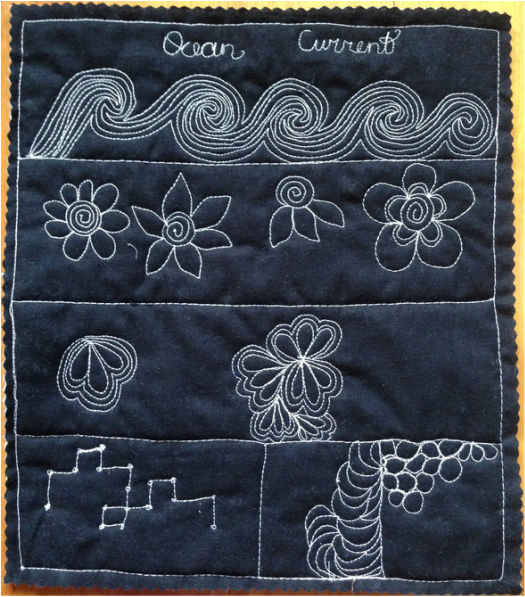
 One of the 11 demos/lessons for my free motion class Hi everyone, in case you wondered what happened to me last week, I was busy teaching a private beginner quilting lesson, designing and working on two new quilt patterns, helping my daughter on reading week with her thread painting project and teaching a free motion quilting class in Barrie, Ontario! Below is a pic of just about how I felt yesterday!!!  I wanted to talk today about free motion quilting and to encourage those that have never tried it to take a class. My class Saturday at Hummingbird Sewing in Barrie was wonderful and the ladies indicated to me that they were thankful and that they learned a lot. Most indicated at the beginning of the class that they had never tried free motion quilting! The reason that free motion quilting is an important skill set to have in quilting is as follows:
I realize because I hear that some people are intimidated by free motion quilting, but believe me to get proficient at it all you need are 2 things:
Even if you are not creative this can happen. You will get smoother with your stitching, stitch length and control of your work with instruction and practise. I am available at your venue if your group or guild believe they need some help in this direction at very reasonable rates, have a look at my teaching page here Scroll down to #6 on my teaching page (teaching is in the above menue) and you will see some of the samples of my free motion class and the class description. Please feel free to use my contact page for scheduling. I guarantee, that you will feel less intimidated about free motion quilting and more confident to use this valuable skill after taking my class. Happy Monday everyone, My wish for all... a wonderful week, some sun and milder temps before we head into a deep freeze again!
0 Comments
 Block # 7 "Maureen" We are well into winter and at block 7 of our quilt along, almost enough to make a table runner! But hang in there - only 45 left to go to freedom! Seriously, they only take an evening or less to complete while watching TV. It is nice to re-visit your scraps while making the blocks. This quilt along is from the book below and if you click on the book it will take you to Connecting Threads where you can purchase it if you like and challenge yourself to complete all 52 blocks this year!  52 blocks to paper piece and projects to complete with the blocks Click here to see all of the other blocks to date! It is getting difficult to capture them in one photo so, I will post all at the end of each month.
Interested in seeing where we started with this? Click here to look at our first blog post and instructions for the quilt along. Have a great Wednesday everyone!👍 You are half way through the week, Yeah! 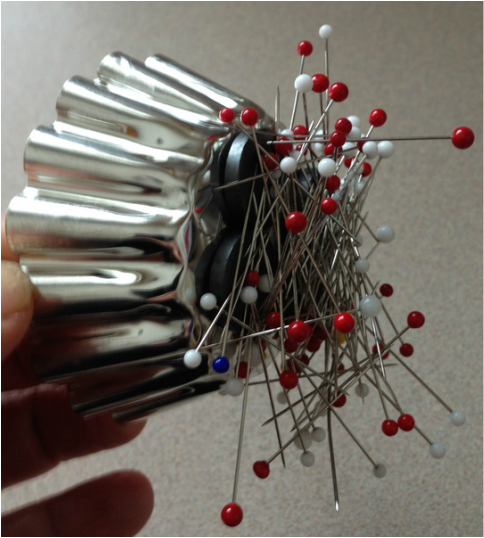
Cost to make one- only .50 cents
It's a pin holder and catcher
Hi everyone, I lost track of where my magnetic "pin holder" was and stumbled upon a really neat and affordable way of replacing it.
I was actually looking at magnets at the $ store and found a package of magnets- see picture below: 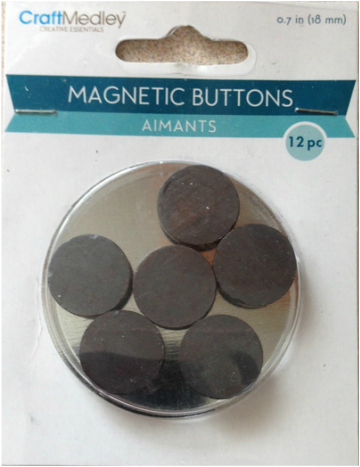
12 magnets for a $ at the local $ store
... and I thought how could I attach these to a bowl or container of some type to make a pin holder?
Then I saw these: 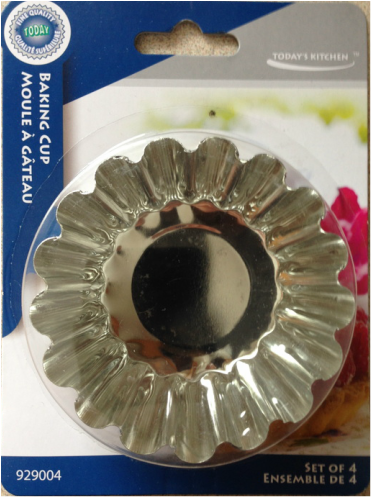
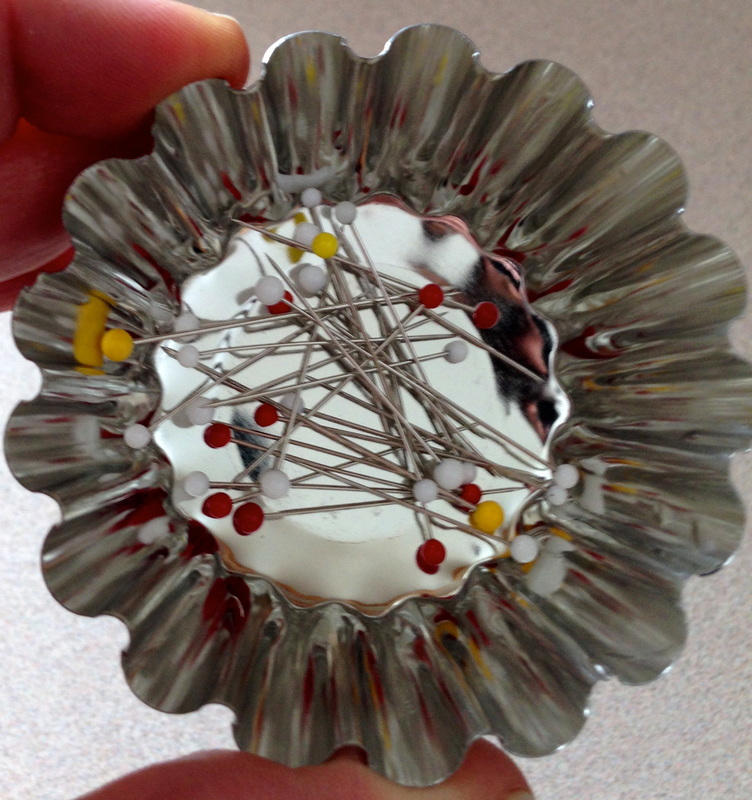
Simple little metal baking cups- 4 in a pack for $1.00
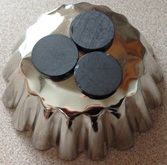
All you do is... place (no gluing necessary) 3 of the magnets to the bottom of the pretty little cupcake dish and you have a very affordable pin keeper. If you hold the bottom where the magnets are to the pins you leave lying about, the magnets will scoop up your mess.
This is also tiny so if you have only a small surface area to sew on, then this little magnetic pin cup would work for you! One package of magnets and one of baking cups = 4 pin holders . Sew... give one to a sewing friend! There are some other alternative solutions/purchase options if you want a pretty coloured pin holder and if you are not a "DIY'er". Some of the below come with additional features as well and they are:

The Pin Caddy from Connecting Threads- a bigger surface for more pins - $13.00 at 20% off sale
Happy Tuesday everyone! ✂︎
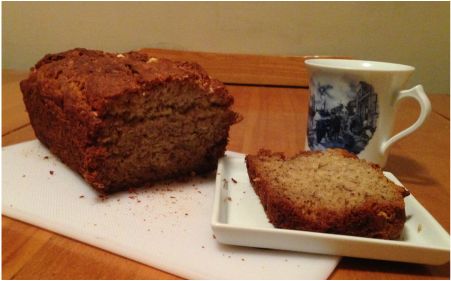 I just finished baking a lovely loaf of Gluten Free/ Dairy Free banana bread. It is a recipe I found with dairy ingredients, I just used non-dairy substitutions. So you could make it with dairy if you wanted to! I show the substitutions in the recipe below.
The smell alone tonight as it was baking made it irresistable! As you can see from the picture above, we have already sliced it and started to enjoy it. It has great texture, it's very moist and the perfect banana flavoured sweetness. It is wonderful served warm, just like the way we ate it because we could not wait! Ingredients:
How to make it:
.... So if you need to bring a gluten free, dairy free treat to a family or friend event, this banana loaf is perfect. Simple ingredients, very tasty and easy to make. Enjoy! Happy Sunday and Happy Valentines Day 💋❤️  Craftsy has a whole page dedicated to ideas for valentines days including classes for candy making, cooking, baking , cake making and yes GLUTEN FREE as well! In addition, they have FREE valentines day related patterns, check out some of these free patterns and ideas ideas below: Craftsy.com also shares a supportive community of crafters who share your passion, post their work with great photo inspiration!
As a Craftsy community member, I can attest to the value of this resource for quilters, artists, cooks and crafters of all persuasion. So if you are searching for Valentines ideas check out this Valentines Day page here. It's Fantastic! Thank Goodness it's Friday.. You Made It. Have a love---ly weekend and a Happy Valentines Day!  To celebrate their 1,000th online class, Craftsy is giving you the chance to get 50% off the most commonly 'wishlisted' classes!
That class you have had your eye on for a while might just be on sale. Why not see for yourself and browse these deals before they're gone? Hurry, the offer ends TODAY! Click here to see all the classes on sale. 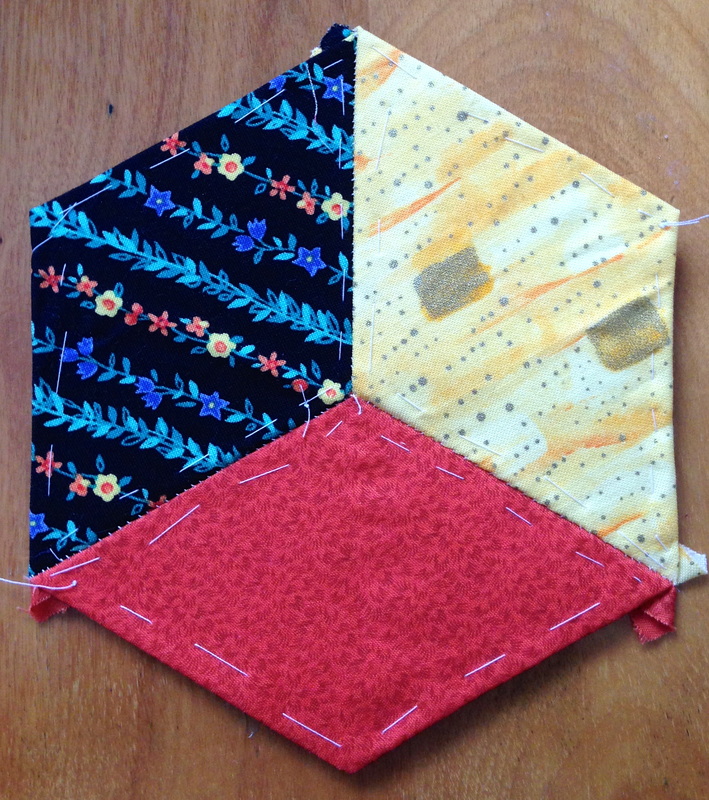 Block # 6 "Delores" - she was easy to complete If you are new to this blog the original information about this quilt along is here Please show us what you are doing along the way by sending us pictures and I will share them on this blog. I cannot wait to see them all!! If any other people want to also follow along, you are more than welcome but please purchase the book here. Unfortunately, you will not be eligible for a prize because we are now past the Jan 31 deadline, but you will gain from sharing your work with others and hopefully be inspired.  We now have 6 complete! All are shown below: 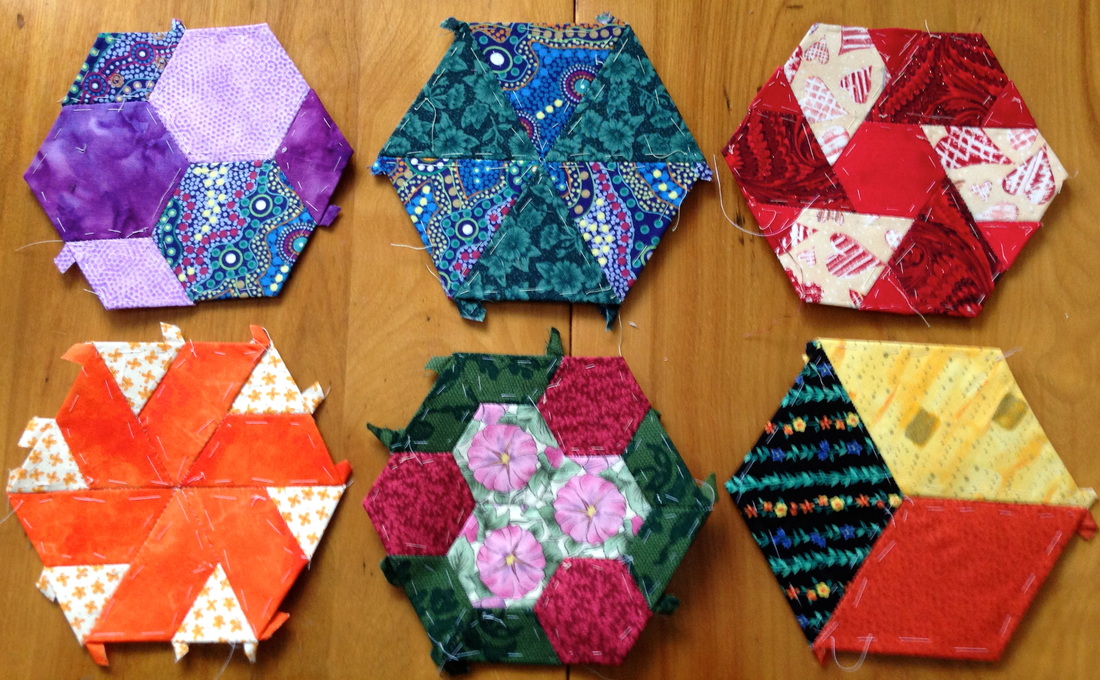 4 for January and 2 for February! They kind of remind me of Christmas Ribbon Candy!
Happy Wednesday Everyone!🍬  Practice your decorative stitches and make these adorable, affordable and easy felt coasters for valentines day. Yes I am still stuck on the love theme this month! Felt is very absorbent and makes great coasters. They are perfect for gift giving! .... Or you just may want to keep them for yourself You will need: Red Felt (2 layers for each coaster needed) A Frixion Pen A rotary cutter with a pinking or wavy blade A sewing machine with decorative stitches Threads in Pink, White Lavender and Peach, I used Connecting Threads, Essential Threads, "Salt Water Taffy"  How to make them: 1) Using a heart shape, trace it onto 2 layers of red felt. (You can download for free my shape template from my shop in the free patterns here) Trace using a Frixion pen, so that when you iron the coaster, the marks go away, it's a wonderful pen! 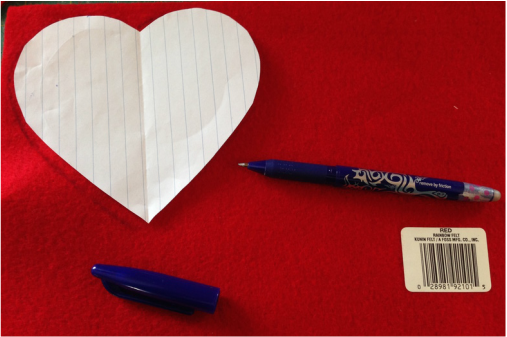 2) With both layers together, stitch around the perimeter of the heart a generous 1/4". 3) Trim with a wavy rotary cutter blade, close to the edge 4) Choose your threads, I used Connecting Threads -Essential Threads in pinks, lavender, white and a peach pink 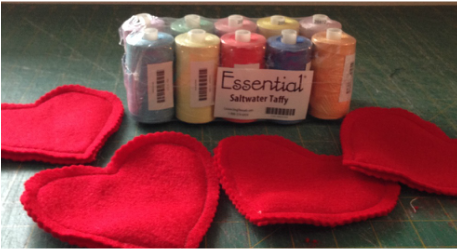 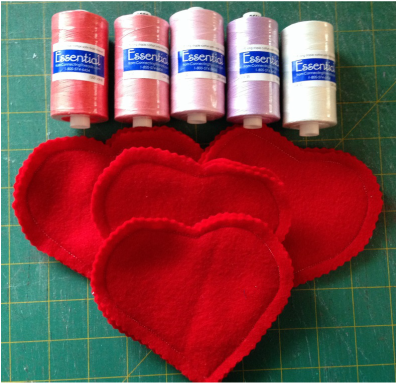 5) Choose your stitches and stitch! It is fun to "audition" these stitches on a small project, that way you know what they look like on something bigger. 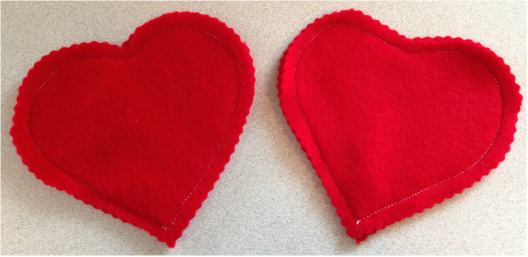 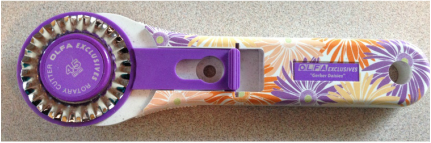 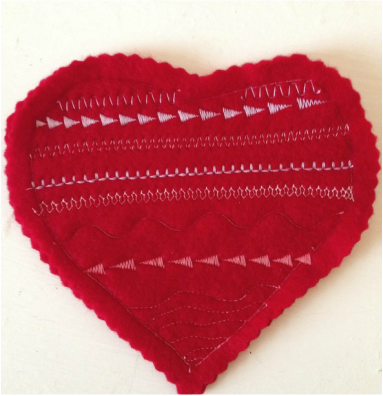 Some great gift ideas with this project:  Add a pretty mug and some hot chocolate packs, don't forget the marshmallows!  Attach them to a nice bottle of wine and give it to a friend  Happy Tuesday everyone!
I hope you enjoy this quick and easy little project! 💋❤️💋❤️💋 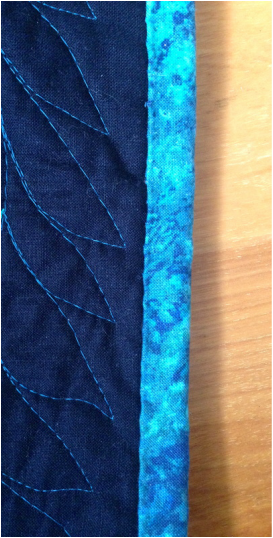 A tutorial for class binding! Yesterday I was teaching my "Simply Colours" workshop in Barrie, Ontario and I had some students in the class who have never done quilt binding before and so I promised to send them a tutorial. I am sharing it below to my blog followers and you can also download it here or go to the "Shop" at the top menue and "free PDF Patterns". Binding Tutorial from www.quiltingintheloft.com When you have finished quilting your project, use a ruler, cutting mat and rotary cutter to trim your edges as square as possible on all sides to it’s finished size. I prefer to use a double folded 2 ½” wide strip of fabric to bind my quilts. Measure your quilt perimeter (add all lengths and widths) and add 8” (for joining slack) to figure out the number of the binding strips needed using an approximate 45” width of fabric. Divide 45 into the perimeter number you have come up with this will give you the number of strips you need. Cut the strips 2 ½” x WOF (Width of fabric) To join your strips:
 2. Trim the seam allowance to ¼”. Press the seam allowances open. Add the remaining strips in the same way to make one long strip. 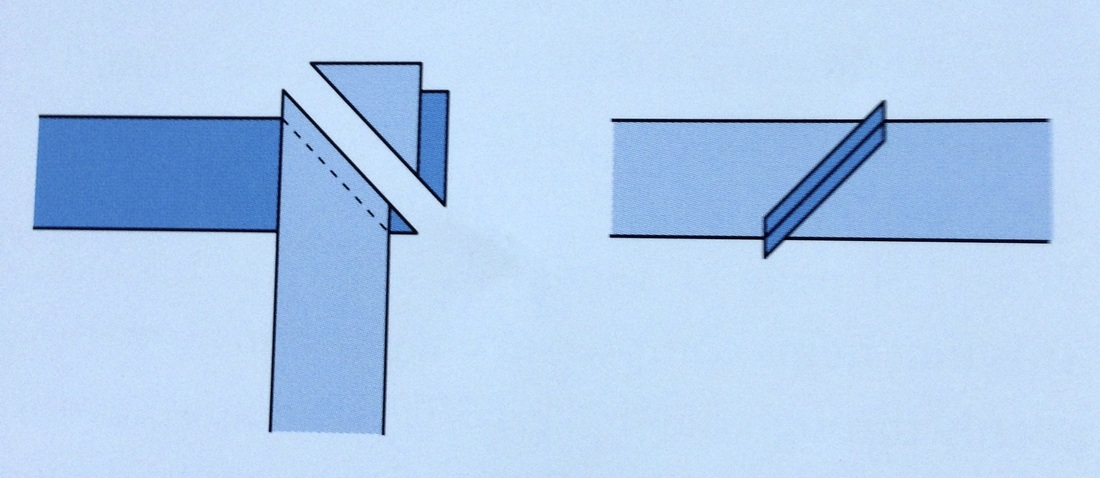 3. Once all of the strips have been joined, cut one end at a 45-degree angle. This will be the beginning of the strip. Fold the 45 degree angle edge under ¼” towards the wrong side. Press the strip in half lengthwise, wrong sides together. 4. Beginning at the 45-degree angle end, place the binding strip along one edge of the front of the quilt top. Start away from a corner; sew 8 “ away from the angled edge, ¼” from the raw edge of the quilt top and binding. When you get near the corner, stop ¼” from the corner and sew off the corner on a 45 degree angle or backstitch up to the ¼” spot. 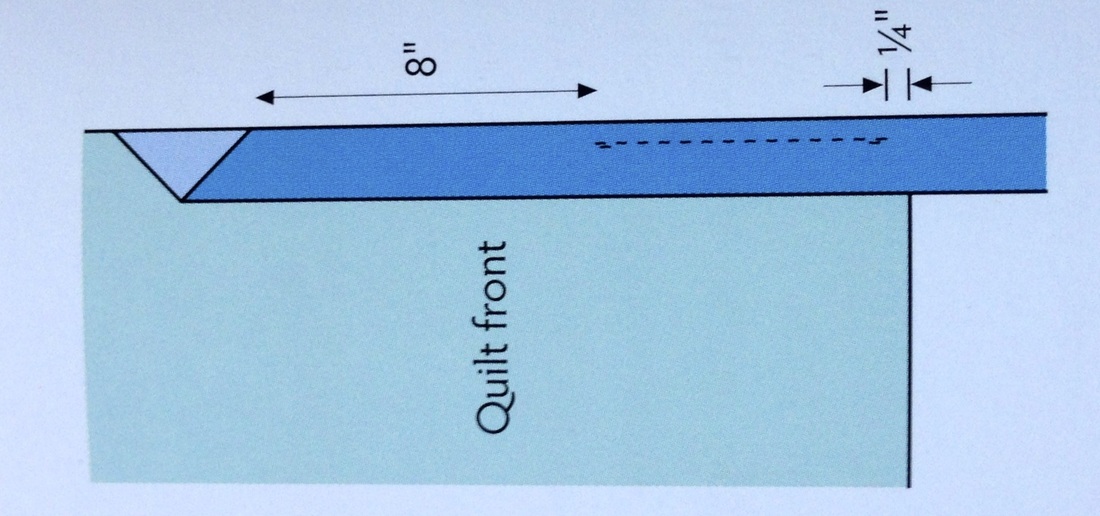 5. Remove the quilt from the sewing machine and trim threads. Turn the quilt so you are ready to sew the binding to the next side. Fold the binding straight up, away from the quilt, to create a 45-degree angle fold. Fold the binding back down onto itself, even with the edge of the quilt top, to create an angled pleat in the corner. Beginning at the edge, stitch the binding to the quilt stopping ¼” from the next corner. Repeat the process on the remaining corners of the quilt. 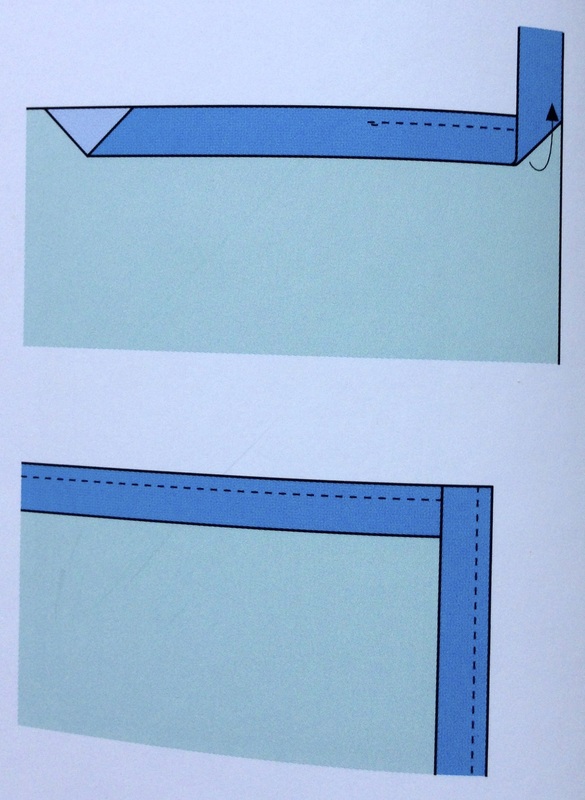 6. Tuck approximately 1-2” of the end of the binding into the folded, 45- degree angle edge so that the binding remains flat (you will need to cut any excess binding). Pinning will be required. Finish stitching the binding to the quilt top. 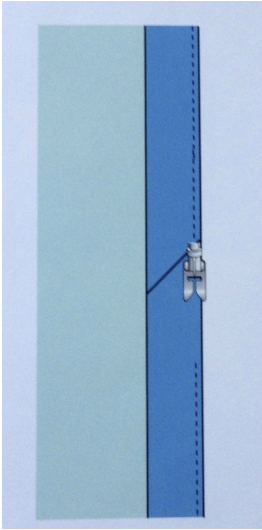 7. Fold the binding to the back of the quilt. Using matching thread and making sure the machine stitching line is covered, hand stitch the folded edge to the backing. Use a backstitch or invisible applique stitch. Fold the binding to form a miter at the corner.  I hope you can understand and use of this tutorial, we are always striving to make quilting easier for our followers!
Happy Monday, Have a Great Week and Stay Warm! 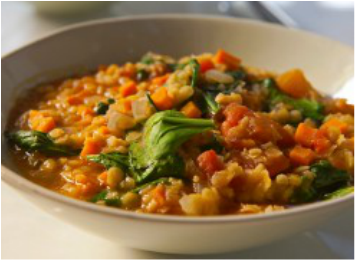 I spent the last couple of days at my sisters and teaching my "Simply Colours" class at a business near her and she made this wonderful soup for me! It was delicious.
If you are interested in learning tips on proper methods of canning and preserving as well as money saving advice and ideas check out her website at www.preserveforlife.com On to the recipe! You will need: 5-6 cups of chicken stock ( Vegan =vegetable stock) or more as needed- see #4 below 1 1/4 cup red lentils 1 large garlic clove 1/2 large onion, minced 1 tsp salt 1 tsp pepper 1 large bell pepper diced 2 large carrots, peeled and diced 2 ribs of celery diced 1 cup of chopped tomatoes 4 oz of mushrooms, chopped 1 cup of chopped green beans 1/2 bunch fresh spinach 1 Tbsp dried parsley 1 Tbsp tomato paste 1 Tbsp dried oregano 1 Tbsp dried basil 2 cups of rice (cooked) 1/4 cup of cilantro (optional) How to make it: 1. Combine stock, lentils, garlic, onion, salt and pepper in a large pot and bring to a boil. 2. Chop your vegetables and add to pot as they are ready along with tomato paste and seasonings 3. Once to a boil, reduce to a simmer and stir every 10-20 minutes until lentils have broken down(at about 60-90 minutes). 4. This is a thick soup , but 1/2" of liquid should cover the vegetables at all times, so add additional stock if needed. When lentils are soft it is ready to eat. 5. Garnish with a scoop of rice and sprinkle with fresh cilantro 6. It's even better the next day!! This was so savoury and warming on a cold winter day!❄️⛄️ Recipe courtesy of www.preserveforlife.com Happy Sunday!! |
Follow Me:
Welcome!Hi I'm Robin and I am a professional long arm quilter, pattern designer and teacher. I am passionate about all things quilty!  
  Categories
All

Sponsors
This blog contains affiliate links. This means that we endorse products.
We do receive rewards for these endorsements and this helps to keep this site alive and well. We support products which we believe are the best quality and to inspire your creativity! |


 RSS Feed